Wondering how to track the performance of your Meta (Facebook) ads in Google Analytics?
With Google Analytics, you can capture the data of your Meta ad campaigns and quickly and easily analyze their performance.
Once you know which ads are working to drive conversions and which ones aren’t, you can stop spending money on the ones that aren’t working as well.
In this article, let’s take a look at how to track Meta (Facebook) ads in Google Analytics.
Meta Ads Tracking Video Tutorial
Why Track Facebook Ads in Google Analytics?
Tracking Meta ads in Google Analytics will give you a lot more information about what those users who clicked your ads are doing on your website.
Are they visiting other pages besides the ad landing page? How long are they spending on your site? Are they contributing to your revenue?
Also, while Meta Ads Manager gives you detailed insights into the performance of your ads, you’ll sometimes find a discrepancy between the data you gather on Ads Manager and Google Analytics.
This discrepancy makes it hard for you to understand whether Meta advertising is a cost-effective marketing channel.
The easiest solution to avoid the discrepancy and get accurate Facebook analytics is to correctly set up Meta Ad conversion tracking, and create URL parameters for your ads.
When you install your Meta pixel and set up conversion tracking correctly using Meta’s Conversions API, you can be sure that your ads tracking data is accurate. The easiest way to do this (for WordPress users) is with the MonsterInsights PPC Ads Tracking addon.
Plus, by creating URL parameters, you ensure accurate data in Google Analytics and easily analyze the performance of different ad campaigns to make more money and grow your business.
We’ll show you how to install your pixel and set up ad conversion tracking, and how to create URL parameters using MonsterInsights for more accurate Meta ads tracking in Google Analytics.
Install Your Meta Pixel for Conversion Tracking
The easiest way to install your Meta pixel (for WordPress users) is with the MonsterInsights PPC Ads Tracking addon.
MonsterInsights is the best Google Analytics plugin for WordPress. It allows you to easily connect your WordPress site with Google Analytics so you can view all the data that matters most right in your WordPress dashboard.
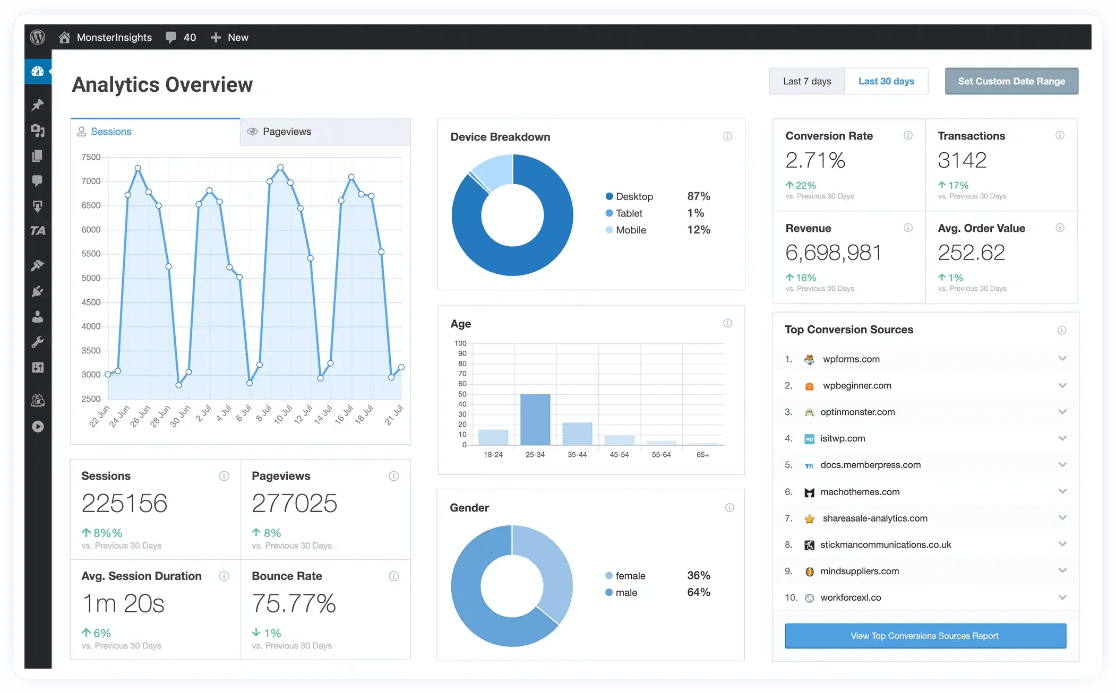
Plus, with the click of a button, you can set up sophisticated tracking features such as event tracking, PPC ad tracking, eCommerce tracking, form tracking, custom dimension tracking, outbound link tracking, and much more.
To use the PPC Ads Tracking addon, get started with MonsterInsights at the Pro level and follow these setup instructions: How to Add Google Analytics to WordPress the Right Way (2023).
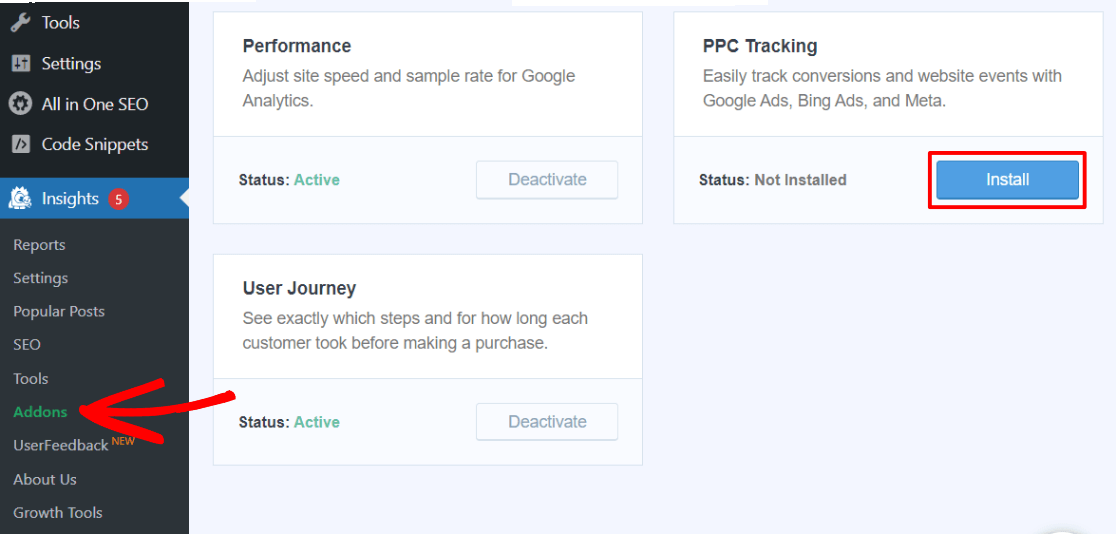
Then, you’ll need to head to Insights » Addons to install the PPC Ads Tracking addon:
Finally, enable Meta Ads tracking and copy and paste your pixel ID into Insights » Settings » Conversions:

Create UTM Parameters for Your Meta Ads
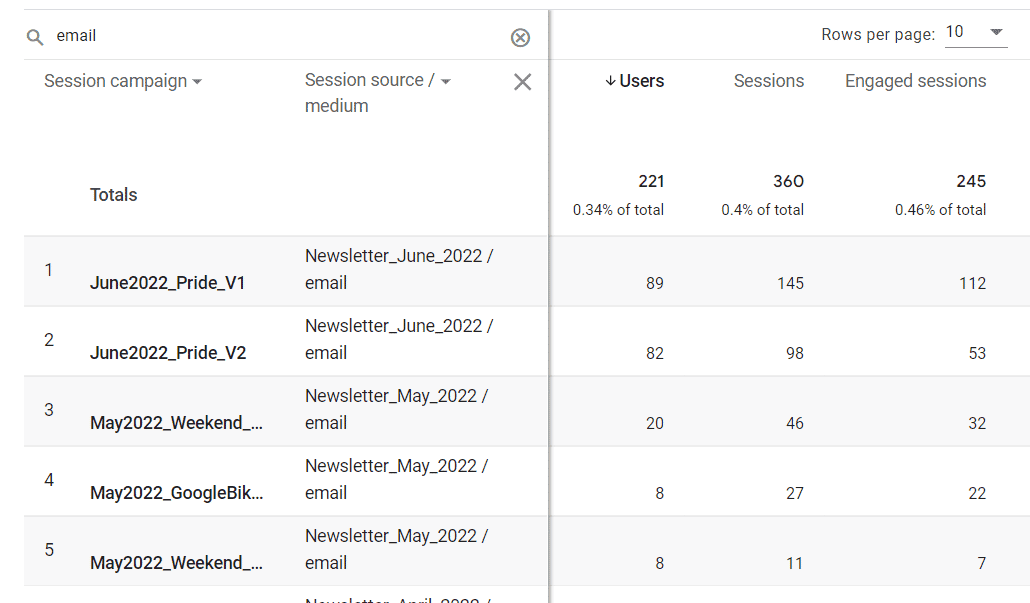
Creating UTM parameters is a really awesome way to keep track of extra data about your Meta ads. If you don’t use URL parameters on the links you share, traffic from your ads will be lumped together in a Paid Social channel.
When you use parameters, though, you’ll be able to organize your ads into groups to easily see what’s working and what isn’t:
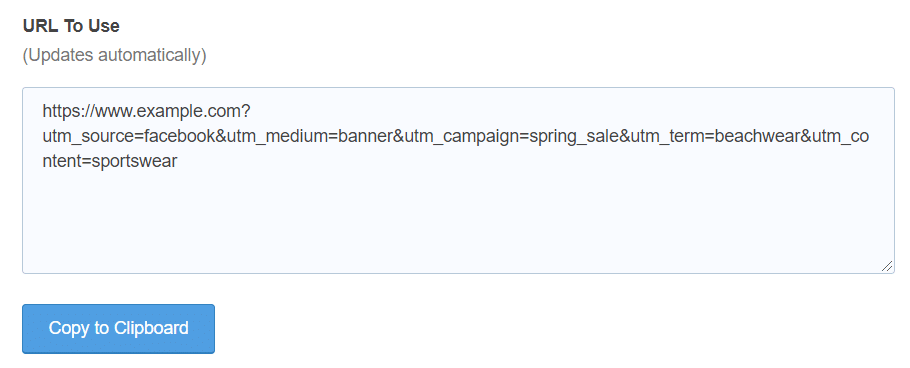
To help you create UTM parameters (also called campaign URLs), MonsterInsights has a URL builder tool. Find it by navigating to Insights » Tools, and click on the URL Builder tab on the top:
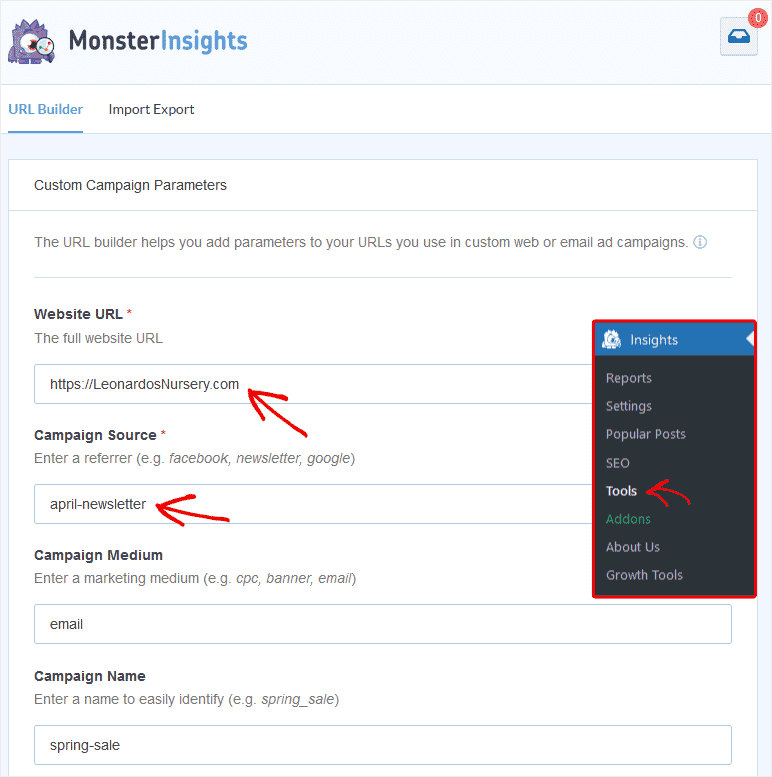
This tool makes it easy to build your URLs with all the relevant information. You just need to enter the URL you want to track, along with its parameters.
For Google Analytics 4, you’ll only need to fill out the Website URL. However, you can also use Source, Medium, and Name to add extra information.
The parameters you can add to a link are:
- Campaign Source (utm_source): It is used to describe the traffic source in which the link will be placed. In our case, it is Facebook.
- Campaign Medium (utm_medium): It helps you discern your Facebook ads traffic from your regular Facebook traffic. For example, you can specify cpc as your utm_medium.
- Campaign Name (utm_campgain): You can add your Facebook ad’s campaign name here. It helps you track the performance of all your Facebook ad campaigns.
After specifying the required details, you can copy the URL and insert it into the Destination URL field in your Facebook Ads Manager.
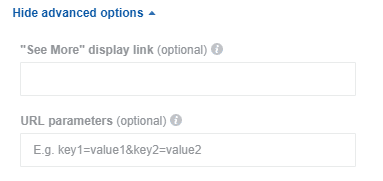
Note: Facebook also offers you parameter tracking within Ads Manager where you can manually add parameters to track campaigns. Since we’re using the URL builder, you can leave the URL parameters field blank.
View Your Meta Ads Report in MonsterInsights
After configuring your custom URL for Meta ads tracking, it’s important to evaluate the performance of your Facebook ads once they are active.
With MonsterInsights, tracking the effectiveness of your campaigns is straightforward from your WordPress dashboard.
Navigate to Insights » Reports » Traffic in your dashboard and click on the Campaigns tab:
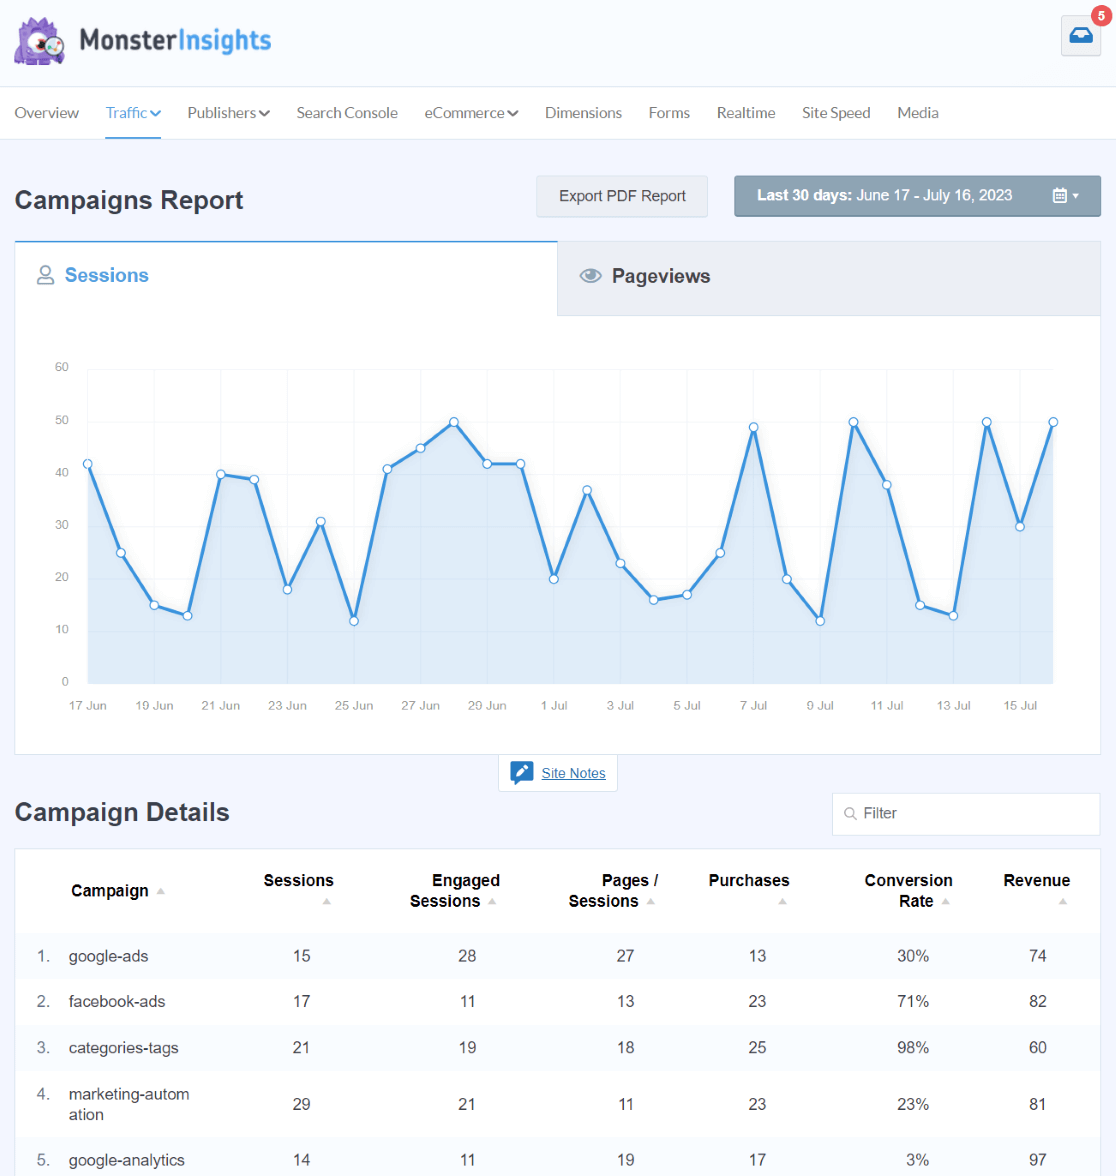
Here, you’ll see the number of visitors each of your Meta ads has directed to your site (look for your utm_campaign tags in the Campaign column), along with key performance metrics like the revenue generated by each campaign.
Additionally, MonsterInsights users with a Plus license or higher can benefit from the dedicated Social Media report.
To view this, navigate to Insights » Reports » Traffic » Social Media within your WordPress dashboard:
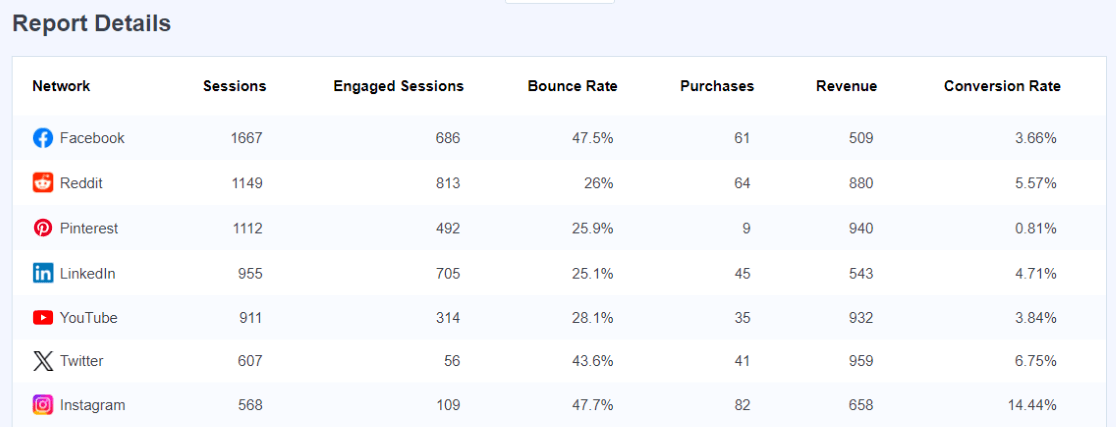
Here, the report provides detailed statistics such as sessions, engaged sessions, bounce rate, purchases, revenue, and conversion rates from various social media channels, giving you a comprehensive view of your social media performance.
Finding Your Meta Ads Report in Google Analytics
People who don’t have a WordPress website must view their Meta Ads report in Google Analytics.
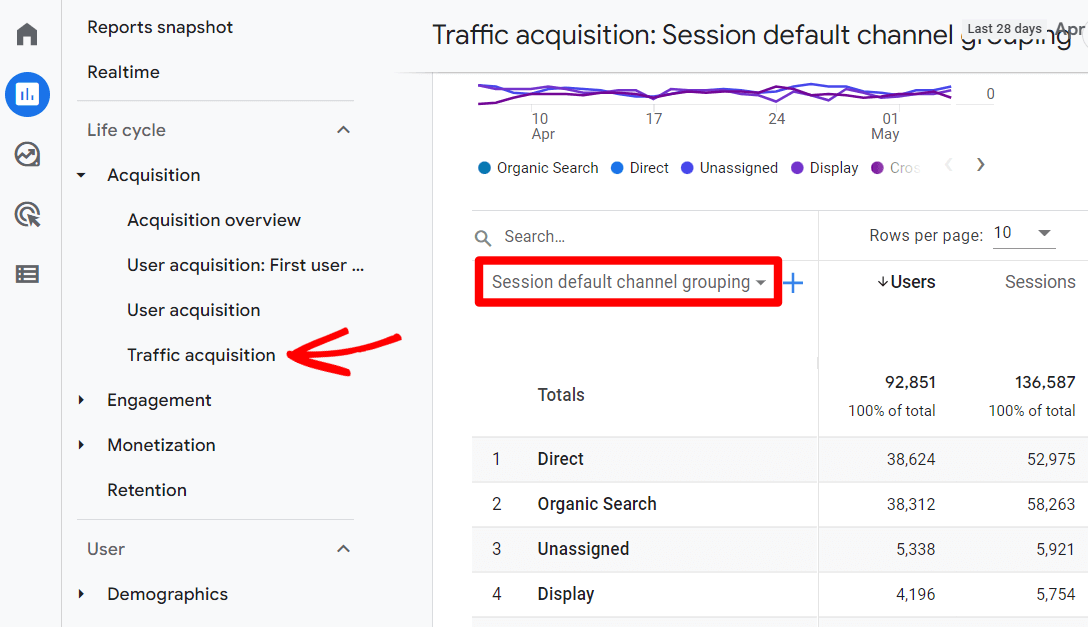
In your Google Analytics account, you’ll see your data in the Traffic acquisition report as a Paid Social channel, or if you used campaign URLs, in your Campaigns report.
To find your Campaigns report, go to Acquisition » Traffic acquisition. Scroll down to the table and click the Session default channel group dropdown:
From the dropdown, select Session campaign:
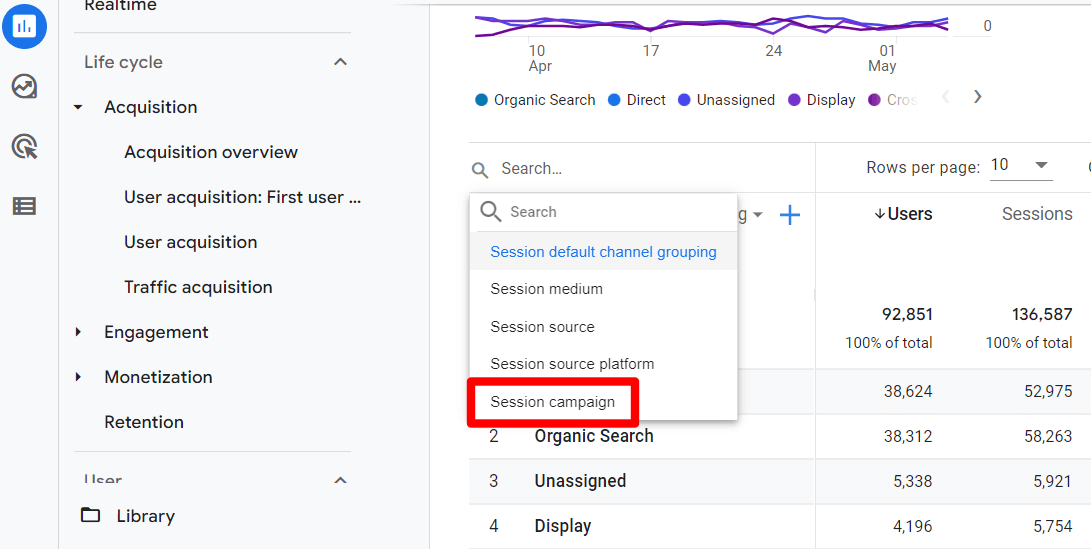
You’ll now see traffic from your different campaigns, including Facebook ads if you used campaign URLs.
That’s it!
We hope this article helped you learn about tracking Facebook ads in Google Analytics. You might also want to check out How to Set up Google Analytics Social Media Tracking.
Not using MonsterInsights yet? What are you waiting for?
Finally, don’t forget to follow us on YouTube for more helpful Google Analytics tips and tutorials.

Thanks for letting us know a great way to explain it.