Are you wondering if there’s an easy way to track your Elementor forms in Google Analytics?
To set up any type of form tracking in Google Analytics, most tutorials will walk you through setting up Google Tag Manager and going through the complicated setup of tags and triggers to track each form’s submissions. Or, you’re being told to use GA4’s built-in “enhanced measurement” tracking. However, that doesn’t work correctly on every website.
If you’re using WordPress, there’s a much easier way to track your forms.
In this article, I’ll show you how to set up Elementor form conversion tracking easily, without using Google Tag Manager.
Why Form Tracking is Essential
With Elementor form conversion tracking set up in Google Analytics, you’ll be able to gain insight into which of your forms are working and which are getting too few submissions. Then, you can use that data to scale your marketing efforts.
With form tracking, you can:
- Track form views to see which forms are getting seen the most
- Find out which forms get the most submissions
- Check form conversion rates and work on making tweaks to the ones that don’t perform as well
- See how the people who completed your forms found your site
- See which pages people were on when they submitted your forms
- And more
Ready to set up Elementor form tracking? Let’s get to it.
How to Track Elementor Forms in Analytics
Form submissions are often the crucial moment in your customer journey when a visitor becomes a lead or customer. I’ve found that tracking these conversions carefully is one of the best ways to understand what’s working on your site, and what isn’t. By analyzing your form conversion data, you can identify patterns in successful conversions and optimize your forms, landing pages, and overall strategy to get even better results.
The easiest way to track your forms is with MonsterInsights.
MonsterInsights is the best Google Analytics plugin for WordPress. It allows you to easily connect your WordPress site with Google Analytics so you can view all the data that matters most right in your WordPress dashboard.
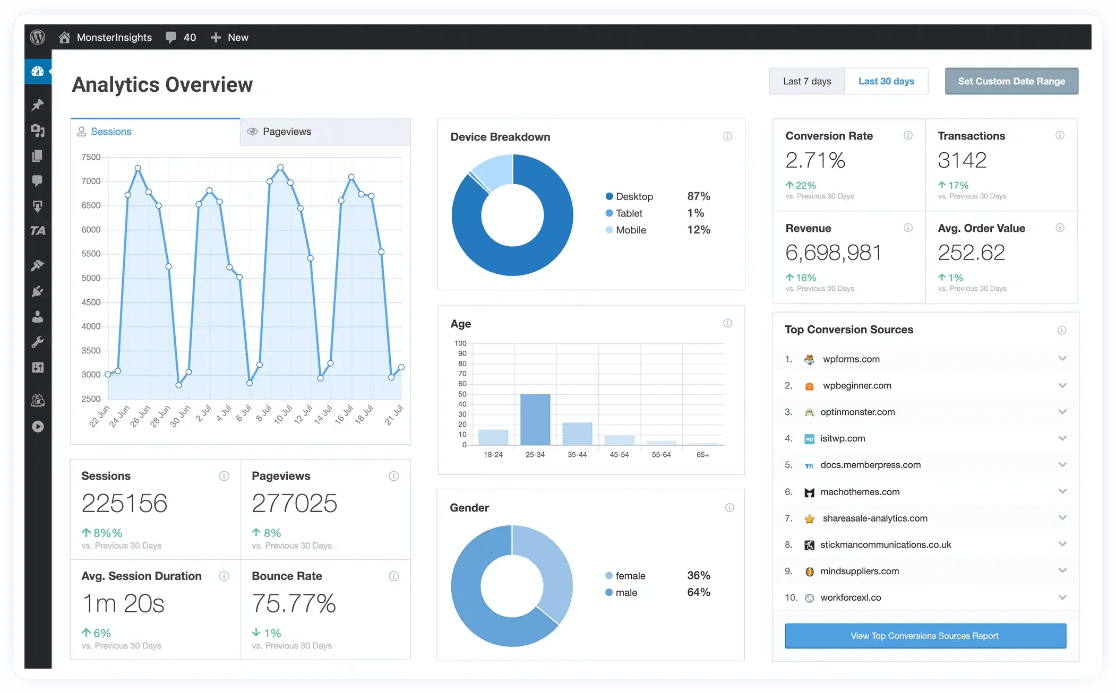
Plus, with the click of a button, you can set up sophisticated tracking features such as event tracking, eCommerce tracking, form tracking, custom dimension tracking, outbound link tracking, and more.
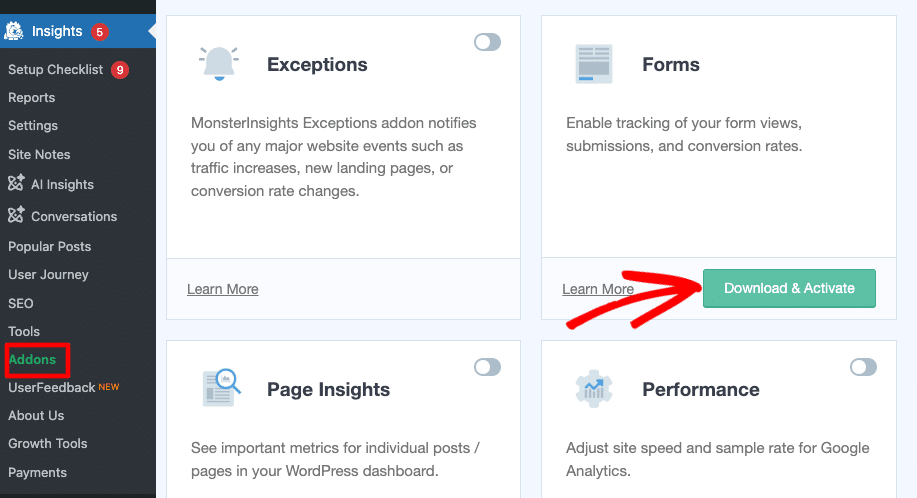
With MonsterInsights, you don’t have to worry about setting up anything complicated or time-consuming in Google Tag Manager to track your forms. Simply click to install our Forms Addon, and that’s it!
A few benefits of using the MonsterInsights Forms addon to track Elementor form submissions are:
- No thank you page or event setup required: You don’t have to set up a thank you page or a custom GA4 event to track your submissions.
- Track all your forms out of the box: Just activate the addon once, and all the forms you create on your site will be automatically tracked in your Google Analytics account without any further steps.
- Supports your favorite contact form plugins: It works seamlessly with any WordPress forms plugin, including WPForms, Formidable Forms, Ninja Forms, and more.
- In-depth insights: Determine how your forms perform by analyzing form impressions and conversions.
- Event tracking: You can mark the form submission event in Google Analytics 4 as a ‘key event’ (GA4’s name for a conversion) to get more data on your conversions.
Form Tracking Setup: Step-by-Step Tutorial
The first thing you’ll need to do is to install the MonsterInsights plugin and connect it with Google Analytics.
Head to the Pricing page and grab a MonsterInsights Pro license to get our Forms Addon and a whole lot more.
Then, install MonsterInsights on your site and connect it with Google Analytics. For the full instructions on getting everything set up, check out How to Add Google Analytics to WordPress the Right Way.
Then, go to Insights » Addons and click Install under the MonsterInsights Forms addon.
Congrats!
You’ve successfully installed the Forms addon. No further configuration is required. It’ll take some time to gather data, but your Elementor form submissions will now be tracked in Google Analytics.
Once data is recorded, you’ll see it right in your WordPress dashboard. Navigate to Insights » Reports and click on the Forms tab to see the reports.
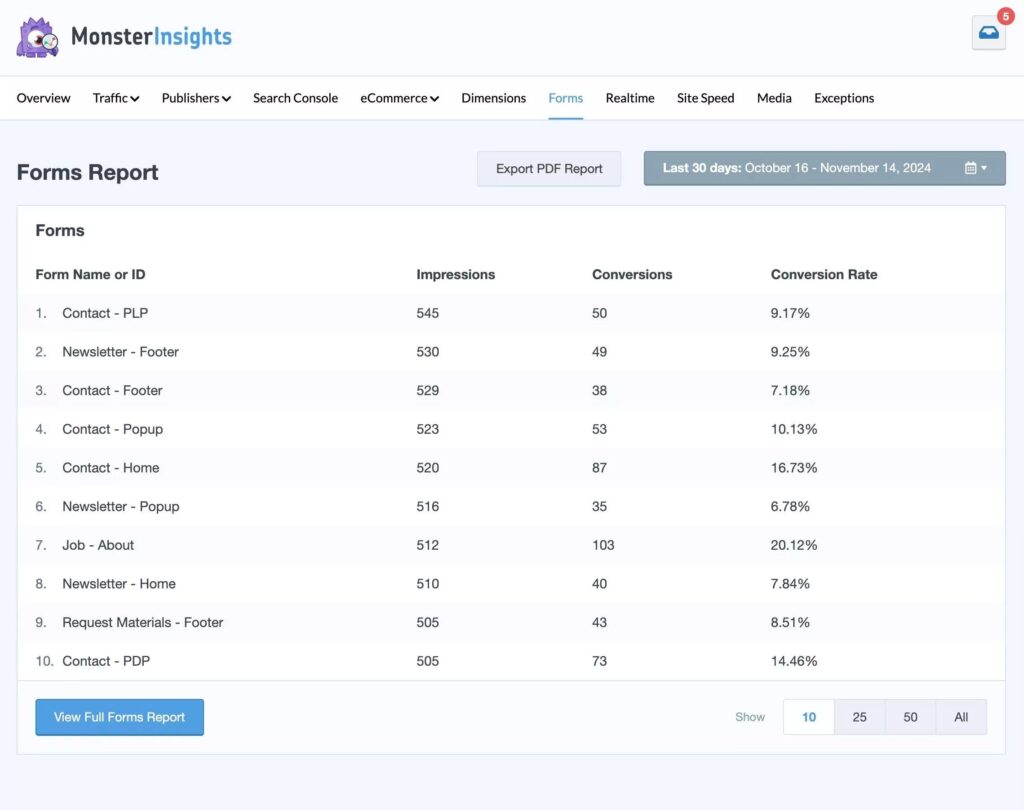
In the MonsterInsights forms report, you’ll see the total number of impressions and conversions, plus the conversion rate for each of your WordPress forms.
Now, although the Forms report inside the MonsterInsights dashboard gives you great insights, I want to also show you how to dive into the data that MonsterInsights sets up for you in Google Analytics. Let’s take a look.
How to View Form Submissions Google Analytics 4
Have you created a custom report in Google Analytics 4 before? If not, check out this guide on creating custom reports in GA4.
When you connect MonsterInsights with your website and install the Forms addon, the plugin sets up certain custom tracking in Google Analytics that you need to see your form submissions. So, you can use that data to see more information about who submitted your forms, which pages they were submitted on, and more.
Note that conversions in Google Analytics are called “key events”.
We’ll follow these steps to create a custom form conversion report:
Step 1: Create a Blank Custom Explore Report
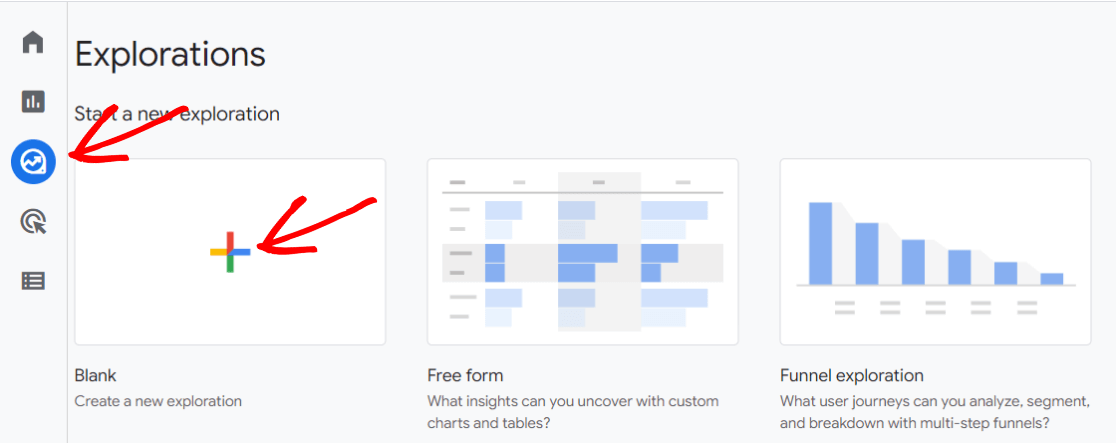
To start, open Google Analytics and head to the Explore tab. From there, click on the Blank report option.
Step 2: Import Dimensions
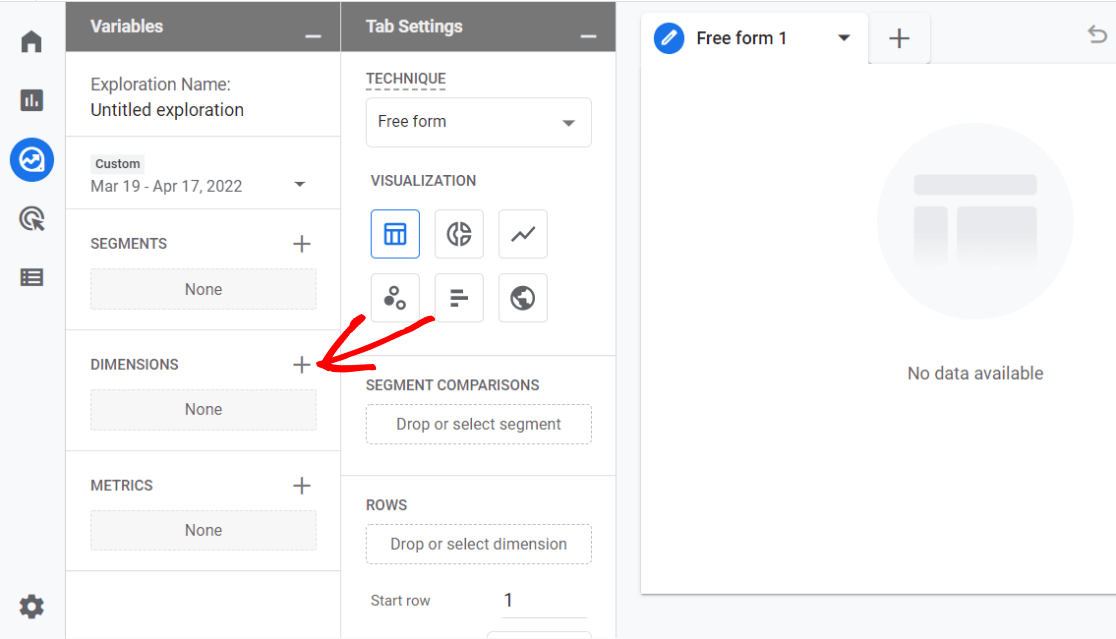
Now you need to add dimensions to your report. To do that, click the plus sign next to Dimensions to open the long list of possible dimensions:
Add the following Dimensions by using the Search bar and checking each one:
- Event name
- Form ID
- Session source/medium
- Page page + query string
- New/established
Once you have them all checked, click the blue Import button in the upper right:

You can also give your report a name in this step – name it something like “Form Conversions.”
Step 3: Import Metrics
For this report, the only metric we really need is Event count. So, click the plus sign in the Metrics box, check Event count, and hit Import.

Step 4: Build the Report
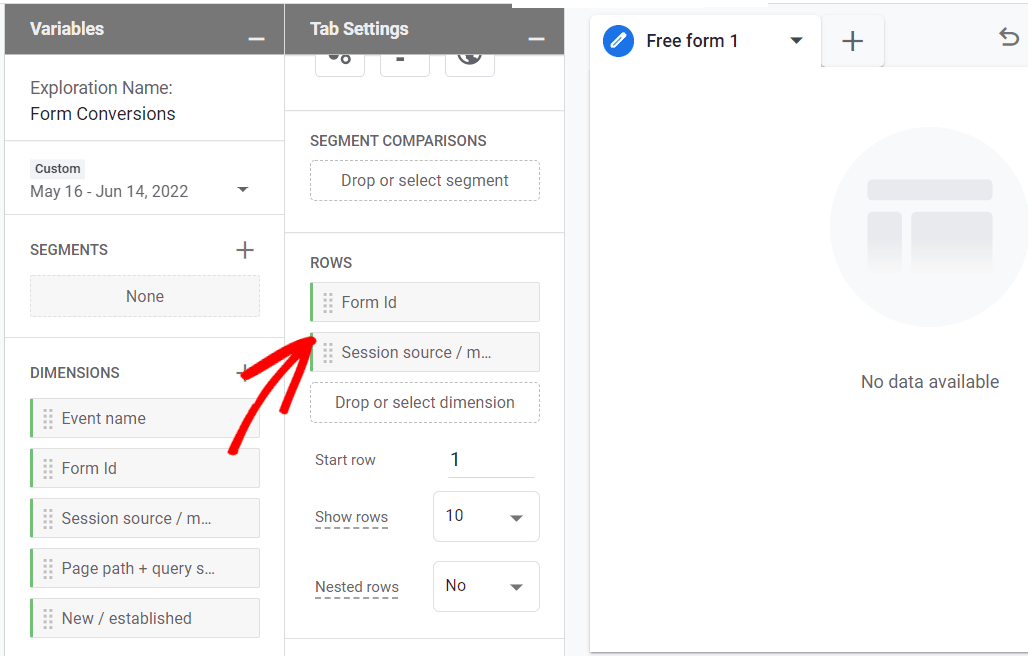
Now that you have all the dimensions and metrics you’ll need, you can build your report. To do that, click and drag Form Id and Session source/medium from your Dimensions box over into the Rows box:
Then, click and drag your Event count metric into the Values box:
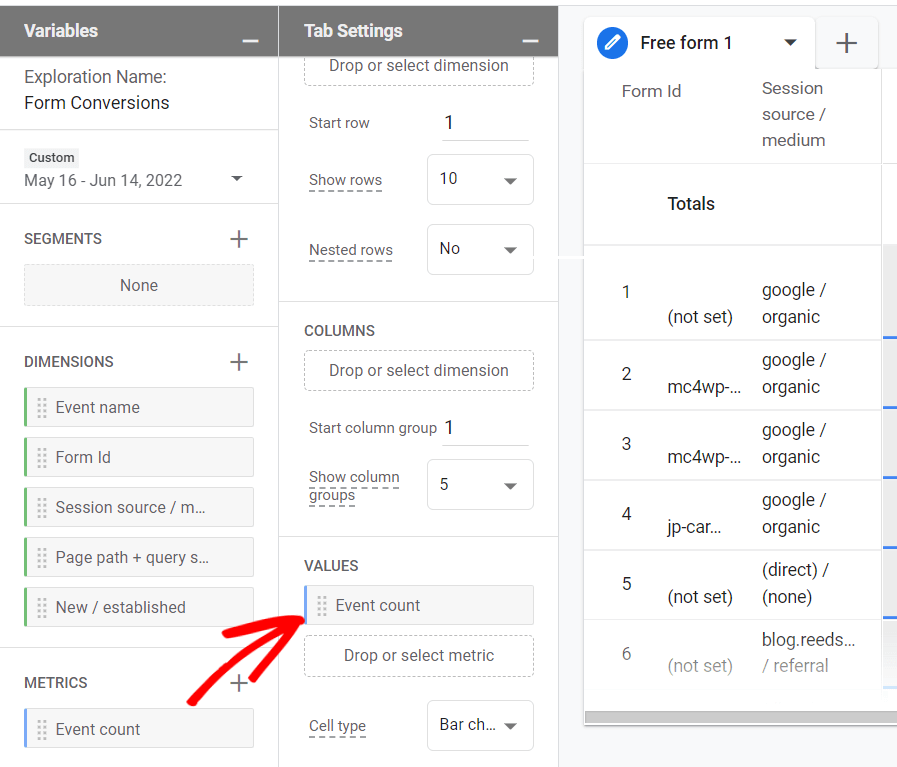
You should now have some data appearing in your report, but you have one more step to take to make it correct.
Step 5: Add a Filter
Now, you need to tell the report that you only want to see form submission events. So, click and drag Event name dimension down into the Filters box:
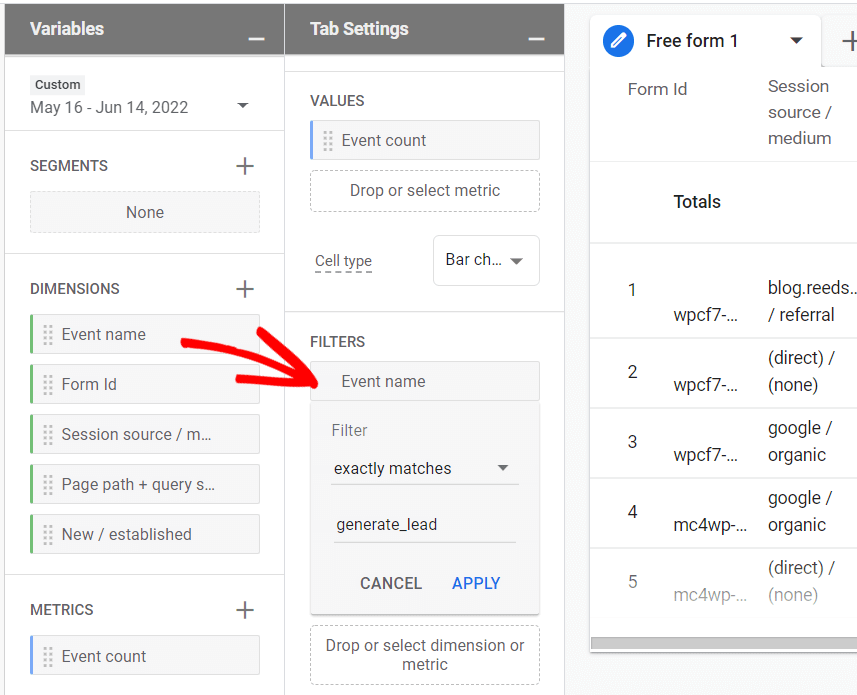
Then, choose exactly matches from the dropdown and start typing/select generate_lead in the bottom field. Then click Apply.
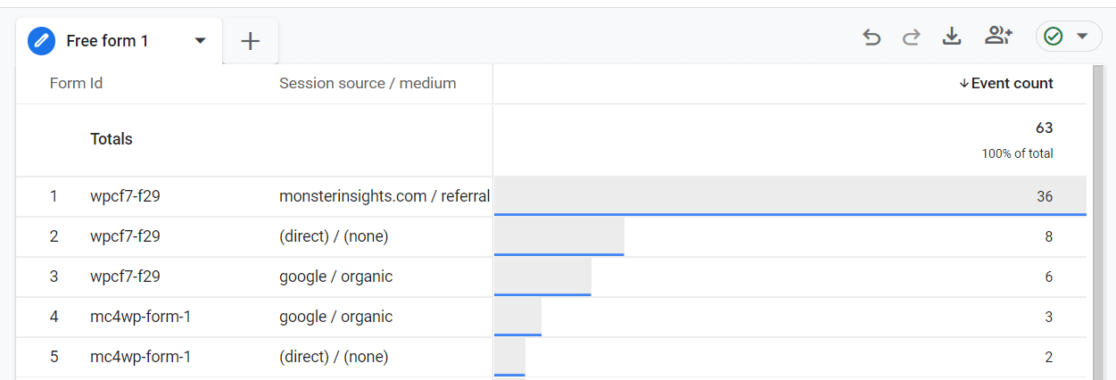
You now have a report that shows which forms were submitted and where your users came from (source/medium) when they came to your site and filled out the form:
Variations
There are a few other fun things you can do with the report you just built to see some more data.
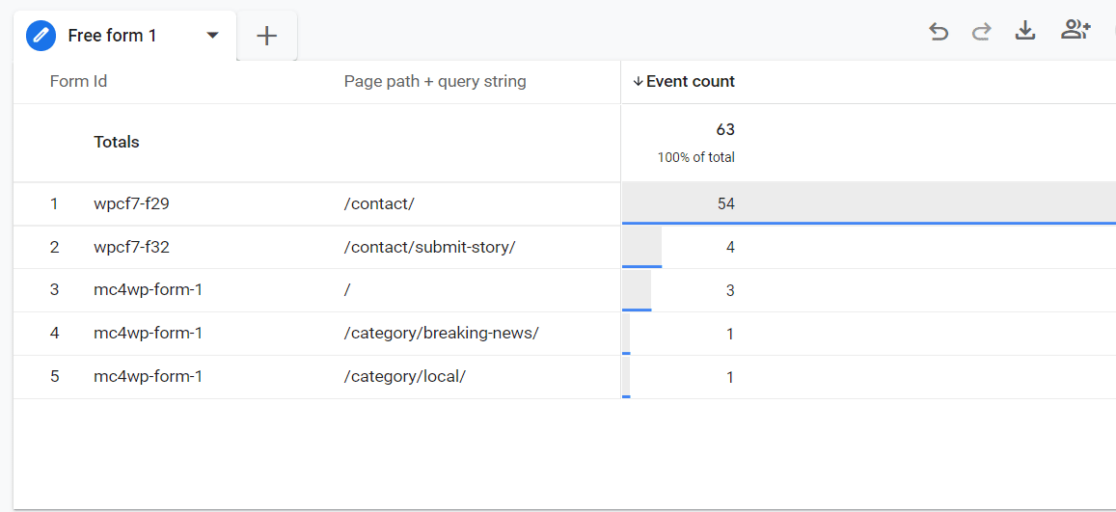
Variation #1: Remove Session source/medium from your Dimensions and drag Page path + query string there instead. This will give you a report of form submissions by page. This is especially useful if you have a form that’s on multiple pages, like in the example below.
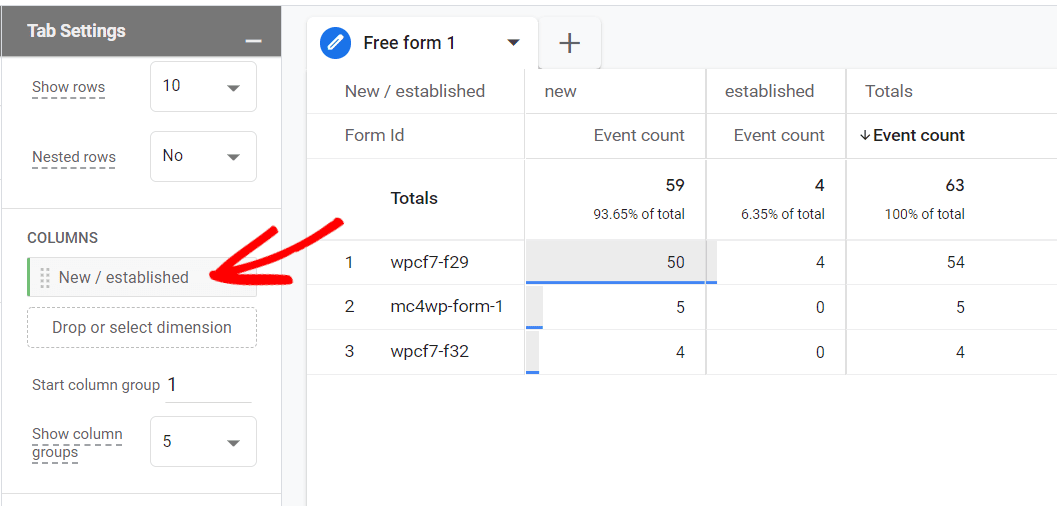
Variation #2: To see if new users or returning users are filling out your forms, leave just Form Id in the Rows box and drag New/established from Dimensions into the Columns box. So in the report below, 50 of the submissions for the first form were by new users and 4 were from established/returning users.
You can see more data in this report. Play around with it and see what else you can do.
How to Mark Form Submissions as Key Events Google Analytics 4
If you want form submissions to count as conversions in Google Analytics 4, marking them that way is pretty simple when you have MonsterInsights creating the event for you!
Just log into Google Analytics and go Configure » Events, then flip the switch next to generate_lead:
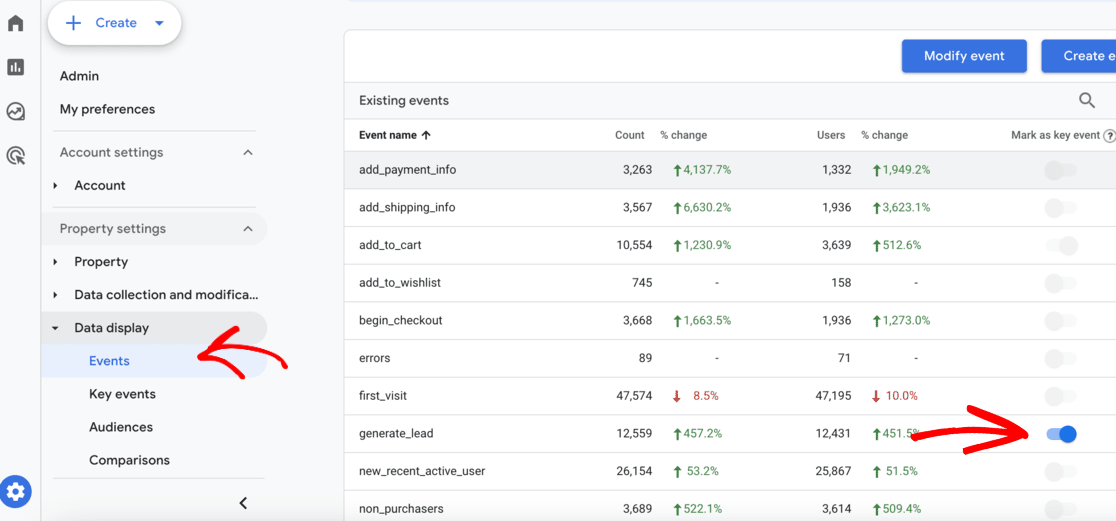
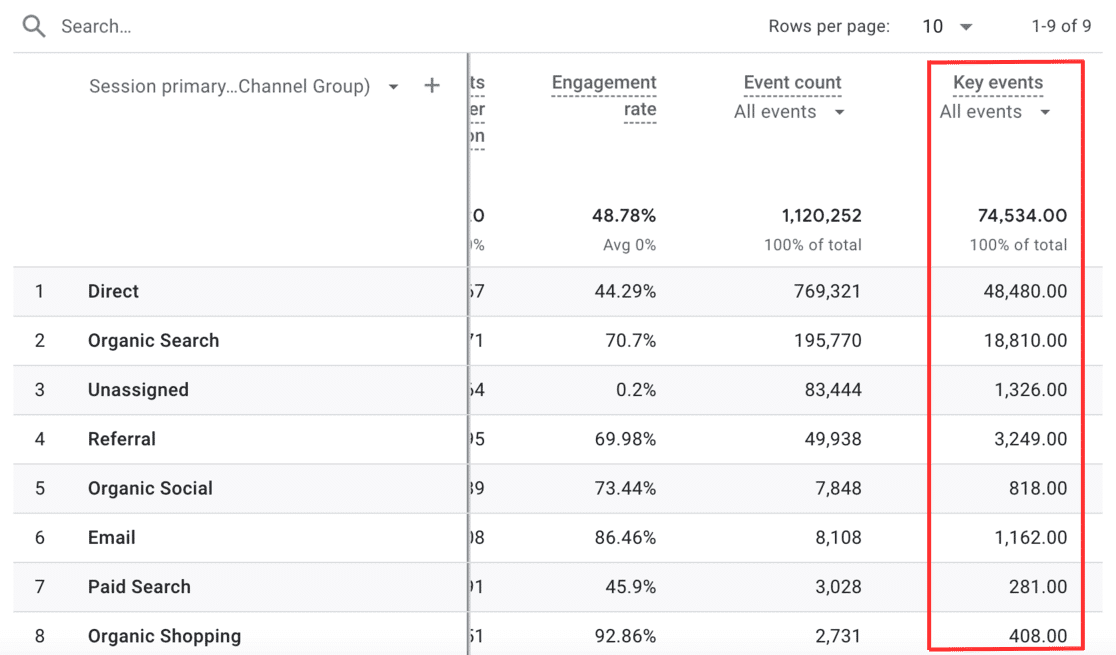
That’s it! Your Analytics report will now count form submissions as conversions, like in this traffic acquisition report:
That’s it! Now you know how to track your WordPress form conversions in Google Analytics and your WordPress dashboard.
If you liked this article, you might also want to check out:
A Complete Guide to GA4 Conversion Tracking for WordPress
How to Create a Data-Driven Marketing Strategy
8 Best Ways to Use ChatGPT with Google Analytics [GA4]
Not using MonsterInsights yet? Get started today!
Finally, stay connected with us on YouTube for the latest Google Analytics and WordPress tips and tutorials.
