Are you having trouble setting up MemberPress Google Analytics tracking for your site? As powerful as Analytics is, it can be tricky to get the hang of it right away.
Plus, manually tracking the performance of your membership website in Google Analytics requires you to know how to add tracking code to your WordPress site, which isn’t the easiest thing for beginners and non-developers.
This is where plugins come in handy. MonsterInsights makes the setup process incredibly simple. With only a few clicks, you can start tracking your MemberPress site and get important data about your business.
In this article, we’ll show you how to set up Google Analytics for a MemberPress site easily. We’ll also explain the different Google Analytics metrics you should be tracking for your membership website.
How to Set Up Google Analytics for MemberPress
- Step 1: Install MonsterInsights
- Step 2: Activate the eCommerce Addon
- What Metrics to Track for a Membership Site
Step 1: Install MonsterInsights

MonsterInsights is the best WordPress plugin for Google Analytics. You can set up Google Analytics on your WordPress website without editing a single line of code or having to hire a professional.
Its setup wizard will guide you every step of the way. You’ll be tracking your visitor’s behavior and getting the insights that matter, right inside your WordPress dashboard, in no time at all.
Plus, with the MonsterInsights eCommerce addon, you can set up advanced tracking for your MemberPress site easily. Start tracking conversions, file downloads, top conversion sources, the steps in your customer journey, and more.
You’ll also get access to tons of other awesome Google Analytics features like:
- One-click Google Ads, Microsoft (Bing) Ads, and Facebook Ads conversion tracking
- Custom dimensions and custom event tracking
- Social media tracking
- Advanced form tracking and integration with popular form builders like WPForms, GravityForms, Ninja Forms, Formidable Forms, and more.
- Advanced content and author tracking
- Outbound and affiliate link tracking
- EU Compliance
- Video play tracking
- And more…
To get started, head to the MonsterInsights pricing page and grab the Pro license or higher. (You need Pro or above to access eCommerce tracking).
Once you’ve purchased MonsterInsights, you need to install and activate the plugin on your WordPress MemberPress site.
Step 2: Activate the eCommerce Addon
If you need help installing MonsterInsights and connecting it to Google Analytics with the setup wizard, you can check out our tutorial with detailed instructions.
When you’re ready to set up Google Analytics eCommerce tracking for MemberPress, head to Insights » Addons. Find the one that says eCommerce and click Install.
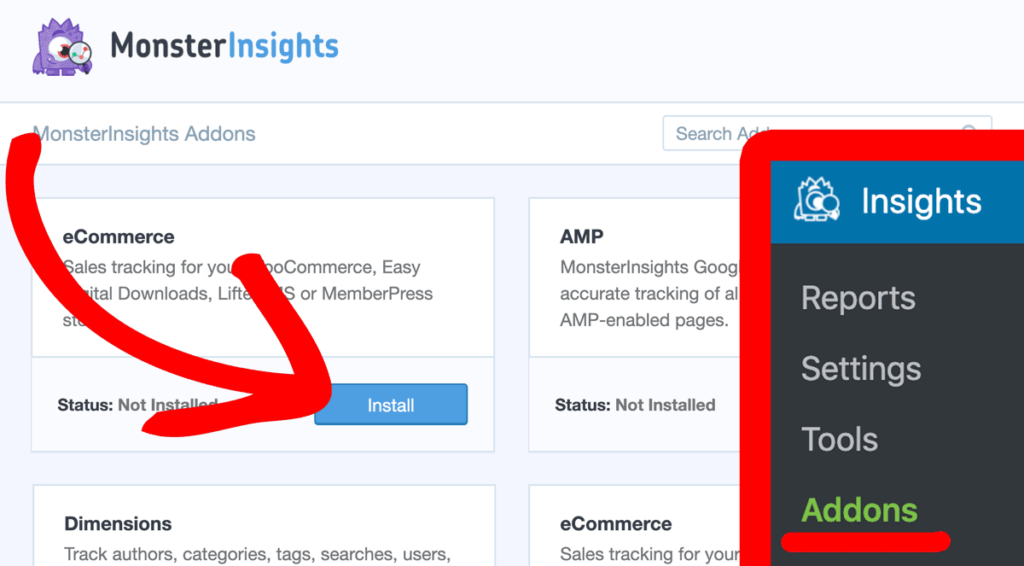
The addon will then automatically install and activate on your website. You can see the addon status shift from Inactive to Active.
That’s it! If you have MemberPress installed on your WordPress website, MonsterInsights will automatically detect it and start tracking its performance. Now, let’s see where you can find your MemberPress Google Analytics reports.
Bonus Tip: If you want to be able to track your buying journey, see what each visitor clicked on and for how long before they made a purchase, and optimize your conversion funnel, you can also install the User Journey addon.
Congratulations!
You have successfully set up Google Analytics for a MemberPress website. Now, are you ready to learn which metrics you should be tracking and where to find them?
What Metrics to Track for a Membership Site
After you’re done setting up MemberPress tracking in Google Analytics, you’ll want to keep an eye on some important metrics that can help you scale your business.
With MonsterInsights, you can view these stats in your WordPress dashboard without having to worry about navigating through Google Analytics.
1. Conversion Rate
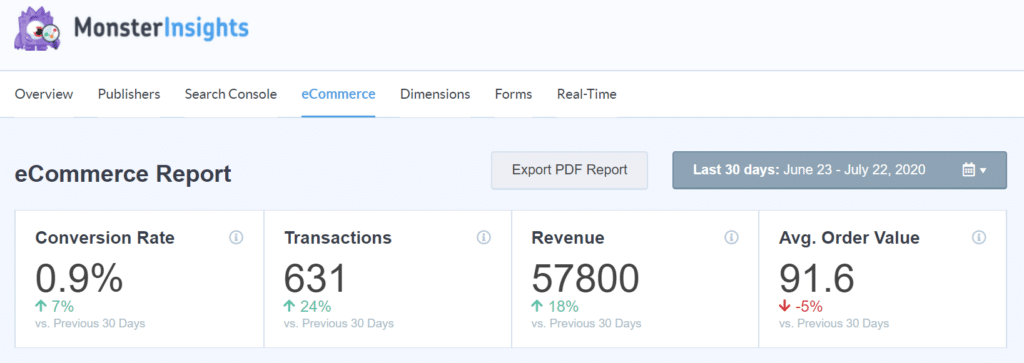
The conversion rate tells you the number of visitors that result in a transaction on your website. You’d want more people to convert into paying members on your MemberPress site, so the higher the number, the better.
To find your eCommerce report, go to Insights » Reports and click the tab at the top for eCommerce. You can view the conversion rate for the selected date range, the number of transactions, revenue, and average order value.
Use these 24 eCommerce hacks to double your conversions.
2. Top Conversion Sources
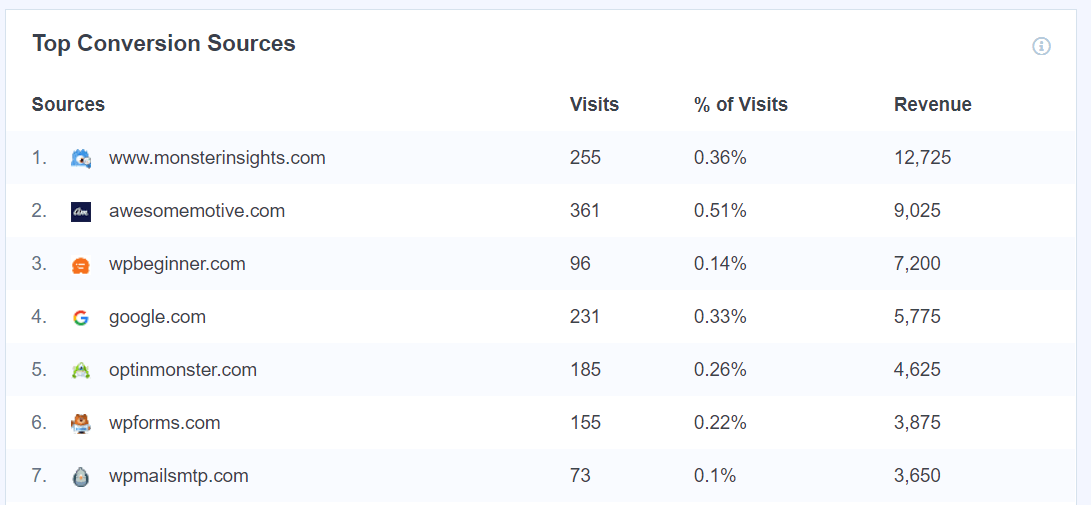
Wondering which metric reports on how often a channel contributes to conversions in your MemberPress site and what your top channels are? In your eCommerce report, scroll down to where it says Top Conversion Sources.
Here, you can see the sources of your referral traffic and your top conversion sources. This shows you where your visitors that convert into members are coming from. You can keep tabs on your social media traffic, see if your email marketing is paying off, partner with sites that are sending lots of converting traffic your way, and more.
3. Top Download Links
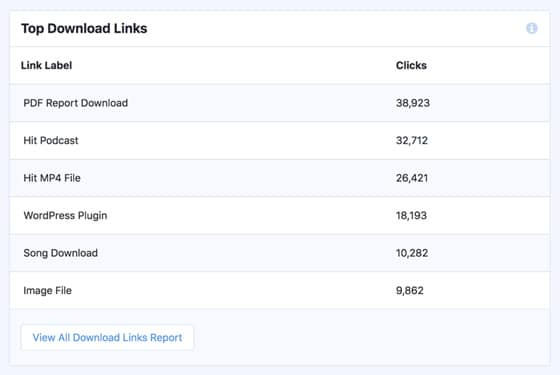
Since different members have access to downloadable content on your MemberPress website, it’s important to track which files get the most downloads.
Now, Google Analytics doesn’t track file downloads by default. But with MonsterInsights, you can track them right out of the box. No additional set up required.
To view your most popular downloads, go to Insights » Reports » Publisher and then scroll down to the Top Download Links report.
4. Average Engagement Time
Tracking how long, on average, users are spending on your site tells you how engaged users are with your site’s content. And, high engagement means that visitors are interacting with your site, reading content, signing up for your newsletter, and hopefully subscribing to your membership plan.
To see your average session duration, head to your Overview report in MonsterInsights. Below your traffic graph, you can see your Avg. Session Duration in the third column. You’ll also be able to see the number of sessions, pageviews, and total users.

Check out the Top 5 User Engagement Metrics for Your Website Explained.
While these are a few important metrics to track, you can use MonsterInsights’ other reports and features to get more key insights about your visitors and use that information to optimize your MemberPress site and skyrocket your conversions.
Well, that’s it for this article. We hope you liked learning how to set up Google Analytics for a MemberPress site.
You can also take a look at our ultimate guide to MonsterInsights dashboard reports and the best membership plugins for WordPress.
Not using MonsterInsights yet? What are you waiting for?
Don’t forget to follow us on Twitter, Facebook, and Youtube for the best WordPress tutorials and Google Analytics updates.

Hi, how i can use Ecommerce tracking in Google Analytics 4?
Hi Alessandro! It’s the same as you see in this article, just with Google Analytics 4 connected to your site instead. Here’s a tutorial on how to do that: How to Add Google Analytics 4 to WordPress (Best Way)
Is there any way to only have ecommerce tracking on *some* MemberPress items?
For example, I’ve got a site with three membership levels, but two of them are free. I’d like only the paid membership to be reported as a transaction.
Hey Joshua! Unfortunately there isn’t a way to switch off tracking on just those products. However, there are a few different ways you can see your data without those transactions included. You can create custom reports without those transactions for $0 included, or you could even make a segment that you can apply that removes those transactions from all reports when it’s applied.
Hi,
Does the MemberPress tracking track just the first purchase? Or does it track all transactions including subsequent membershp transactions?
Hi Samar – By default, MonsterInsights doesn’t track renewals. There’s a simple filter you can use, though, if you’d like renewals to be tracked. Please reach out to our support team here if you have more questions on this.