Want to know how to sell digital downloads in WordPress?
Choosing the perfect eCommerce platform is half the battle, and you’ve already won that! With WordPress, you can easily set up a full eCommerce store for selling digital products, without having to touch any code.
If you have no idea how to get started, don’t worry. In this article, we’ll guide you through the entire process of creating an eCommerce store for selling digital downloads in WordPress, step by step.
Best Digital Downloads WordPress eCommerce Plugin
Before we begin our tutorial, let’s get you set up with the eCommerce plugin you should use for selling digital downloads. In WordPress, WooCommerce is the most popular eCommerce plugin used for creating online stores; however, it’s not be the best choice if you’re selling digital products exclusively.
With WooCommerce, you can sell both physical and digital products. It includes a lot of additional features that you won’t need, though, if you’re selling only digital files. For example, there’s no need for shipping options for a store selling only digital products.
It can get both confusing and time-consuming to navigate through all of WooCommerce’s options just to find the ones you actually need.
Instead, use the best, most powerful WordPress plugin for selling digital downloads specifically: Easy Digital Downloads.
Easy Digital Downloads is the most popular WordPress eCommerce plugin for selling digital products. It specializes in selling just digital downloads, so it’s not bloated with extra features that you don’t need. It allows you to create an online store for selling digital products in WordPress really quickly and easily.
With Easy Digital Downloads, you can sell all types of digital files, including:
- Software (Such as WordPress plugins)
- eBooks
- PDF files
- Documents
- Videos
- Audio and music files
- Photography
- Graphics and digital art
- Any other type of media file
Tutorial: Selling Digital Downloads on WordPress
Now, let’s go over how to start up a WordPress eCommerce site for selling digital files using Easy Digital Downloads.
Note: If your site is already set up, skip to Step 2.
Step 1: Set Up Domain and Hosting for Your Store
To start an eCommerce store in WordPress, you’ll need 2 things up front: a domain name and a web hosting account.
A domain name is your WordPress digital download site’s name that people type into their browser to visit your store. It’s your site’s address on the internet. For example, monsterinsights.com is the domain name of this website.
Web hosting is your site’s storage space on the internet where your website’s content and files are stored. If you think of your domain name (URL) as your website’s street address, web hosting would be your website’s house.
Normally, a domain name costs $ 14 per year and a hosting plan costs around $7.99 per month and up. The combined cost of a domain and hosting can be quite costly, especially when you’re just starting out.
Thankfully, Bluehost has agreed to offer our users a free domain name and over a 60% discount on web hosting.
Now, you can get web hosting for just $2.75 per month. Plus, the hosting plan includes a free domain name and a free SSL certificate (to accept payments securely). So, you can start your eCommerce site for just $2.75 per month.
Now, let’s go ahead and purchase your domain and hosting.
Open the Bluehost website in a new tab and click the Get Started Now button.
Then, you’ll see the pricing section. You can review the available plans and select a plan you like. If you’re just starting out, starting with the Basic plan is just fine. You can always upgrade when needed!
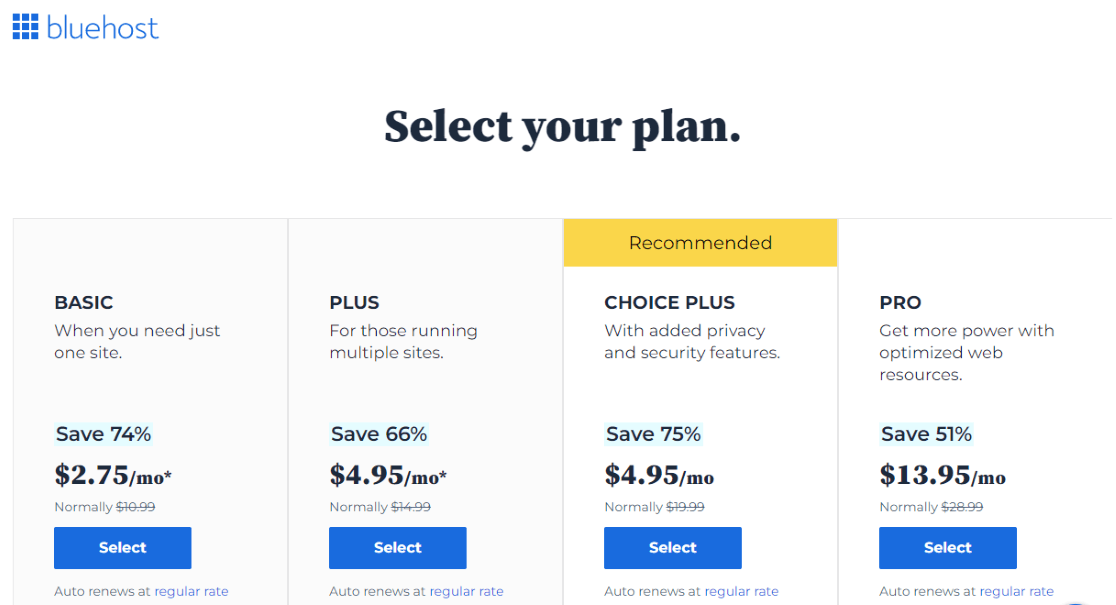
Click the Select button to proceed.
On the next screen, you’ll need to enter your new domain name.
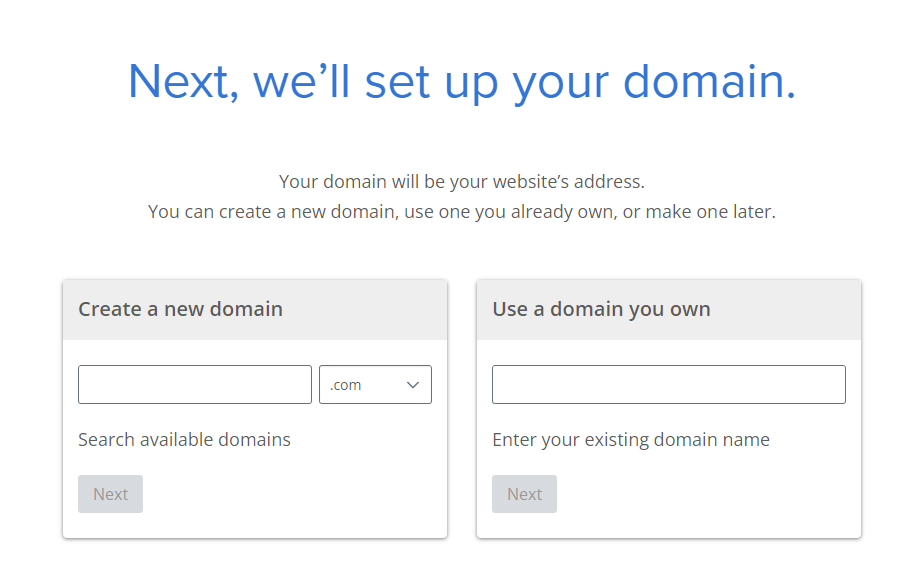
In the Create a new domain box, you can enter the domain name you want and click next. If you already have a domain name, you can enter your existing domain name in the Use a domain you own box.
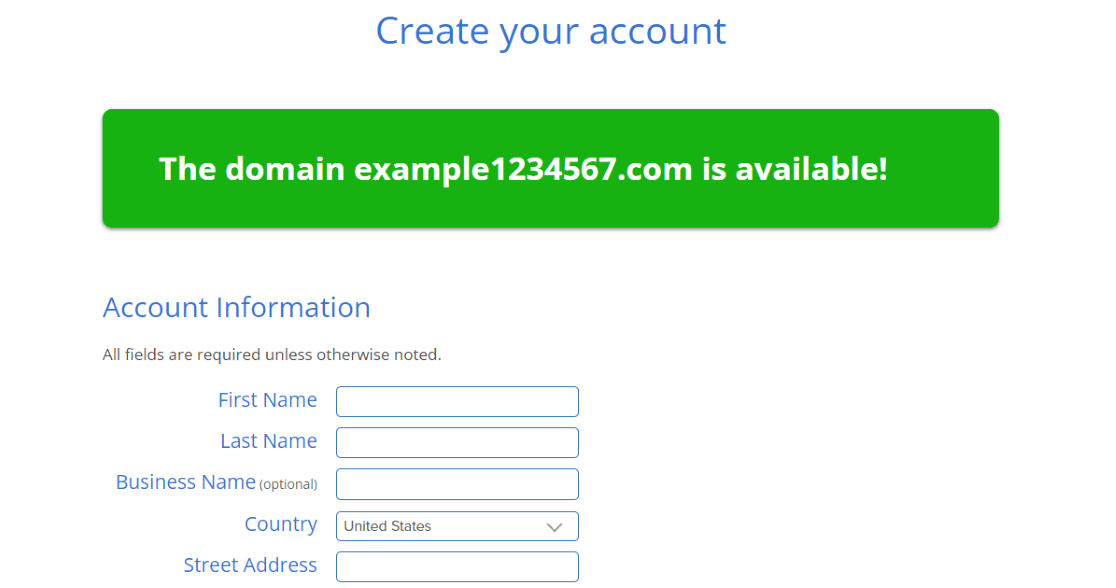
Next, you’ll see the create your account page. If you chose to create a new domain, you’ll see a message if it’s available.
To set up your account, first you’ll need to enter your account information.
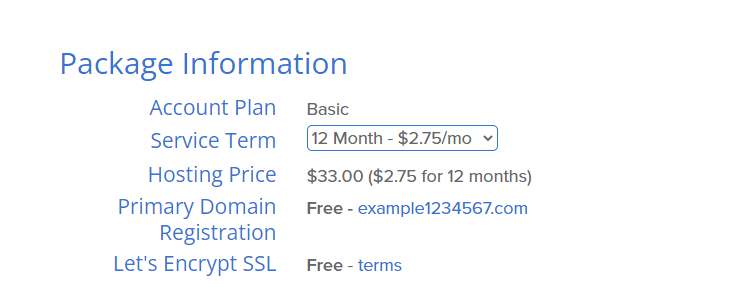
As you scroll down the page, you’ll see the package information box.
Then, you’ll see the package extras box where extra services like domain privacy protection, site security, and backups are selected by default. You can choose here which ones you’d like to keep or pass on for now.
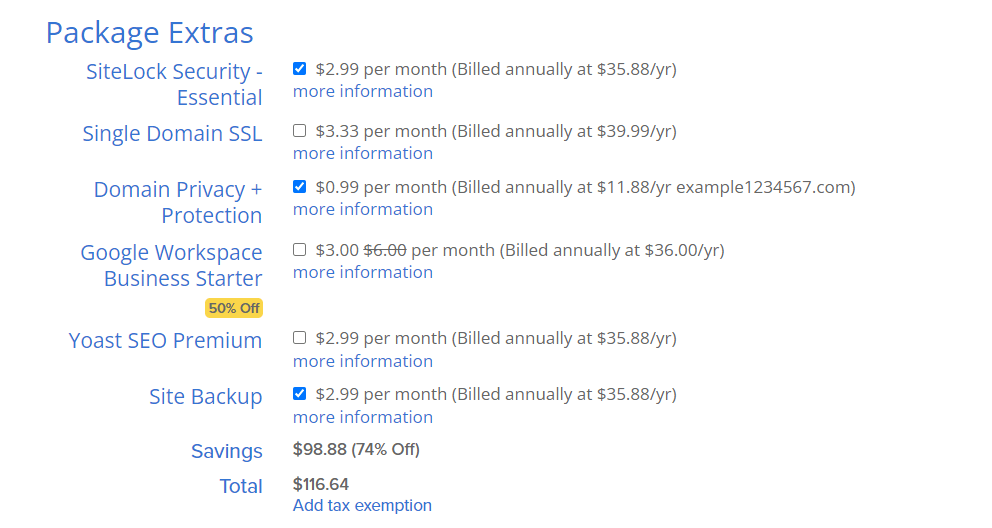
Finally, there’s a payment information section at the end.
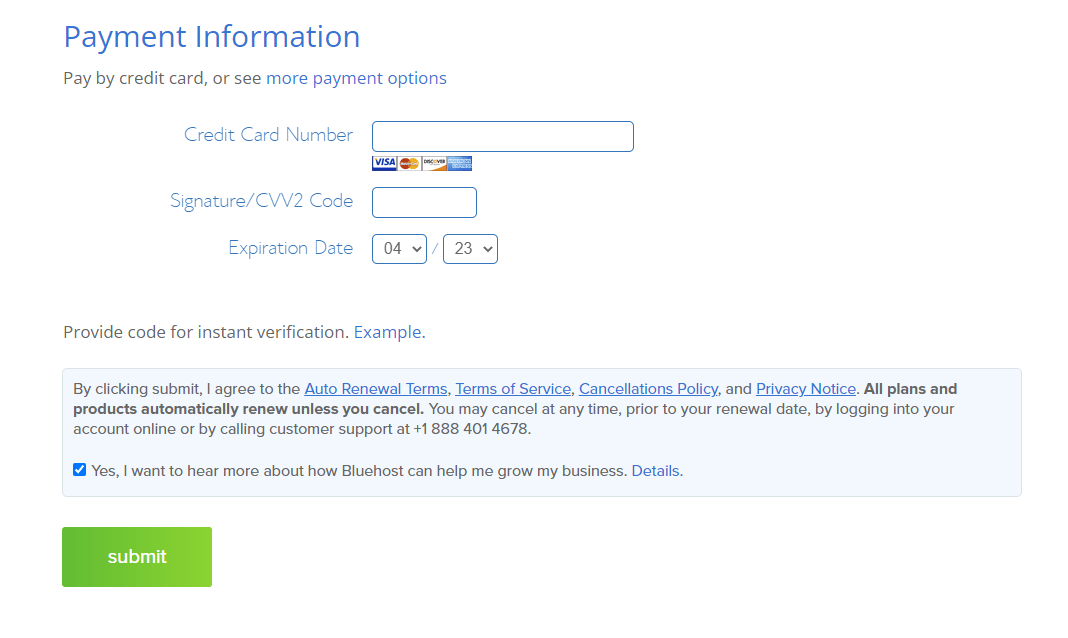
Enter your credit card details, and then choose if you want to get emails from Bluehost. Click the Submit button.
Soon after completing that, you’ll receive an email with login details for your web hosting control panel (cPanel). Your cPanel is where you can manage your website files, support, emails, etc.
Once you’re logged in to Bluehost, you’ll be able to click the My Sites link. Then, click the Add site button to start creating your new WordPress site.
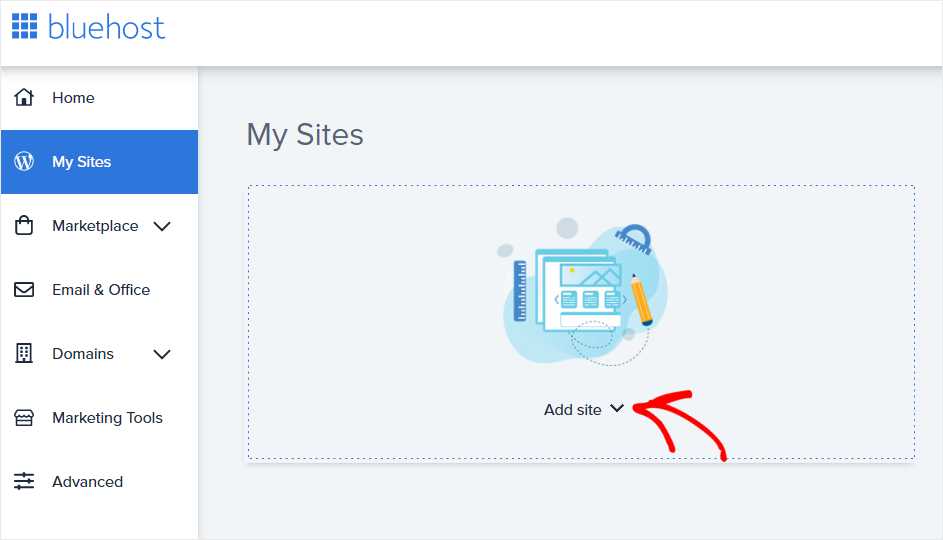
After that, you’ll need to choose the name and tagline for your website.
After adding the required details, click the Next button. Bluehost will now install WordPress for you and, once done, you’ll see the screen like the one below:
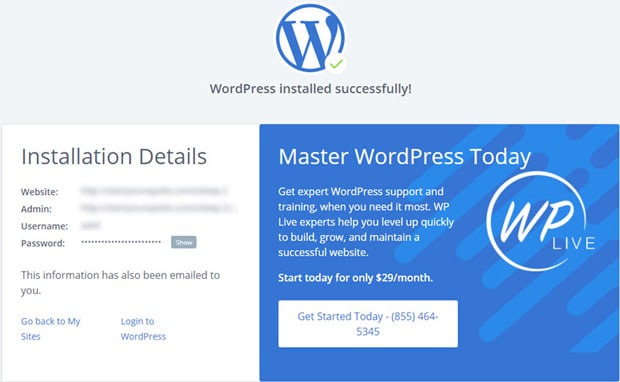
Now, you can log in to your site by adding wp-admin to your site URL. For example:
https://example.com/wp-admin
Log into your WordPress website with the credentials sent to your email address.
In the next step, we’ll show you how to install and configure Easy Digital Downloads on your site.
Step 2: Install Easy Digital Downloads and Configure the Settings
After you log into your WordPress dashboard, you can first change your theme. We recommend you choose a theme that has Easy Digital Downloads support and a design that looks great for selling digital downloads.
Next, you’ll need to install the Easy Digital Downloads plugin.
To install the plugin, navigate to Plugins » Add New from your dashboard. Then, search for easy digital downloads in the plugin search bar.
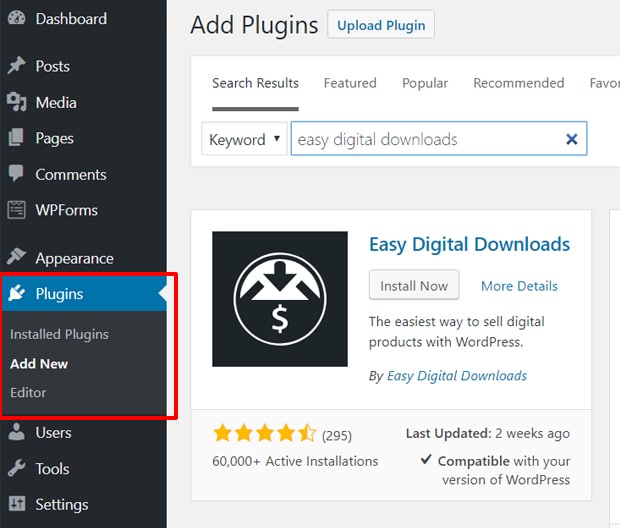
Once it appears in the results, click the Install Now button. Then, click Activate.
Next, you’ll see a new Downloads menu added to your WordPress dashboard menu.
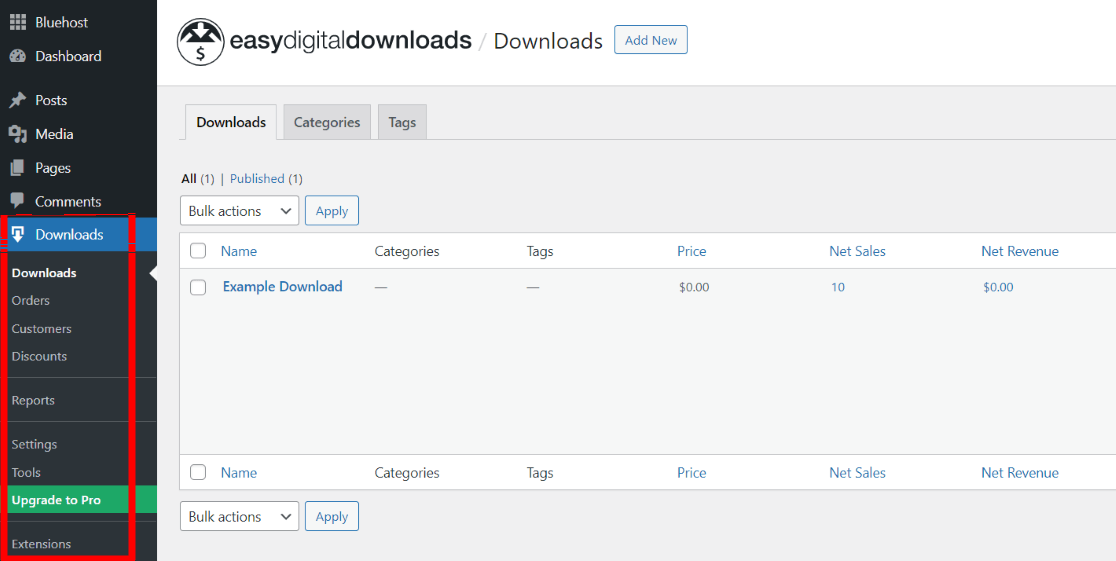
First you’ll need to configure plugin’s settings to get started. So, navigate to Downloads » Settings. Then, you’ll see a General tab.
By default, Easy Digital Downloads has created and set up pages for your eCommerce store. The primary checkout page, success page, failed transaction page, and purchase history page are pre-defined. You can stick with the default options here or go to the Pages settings (within the General tab) to change them.
As you scroll down, you’ll see options to specify your store location.
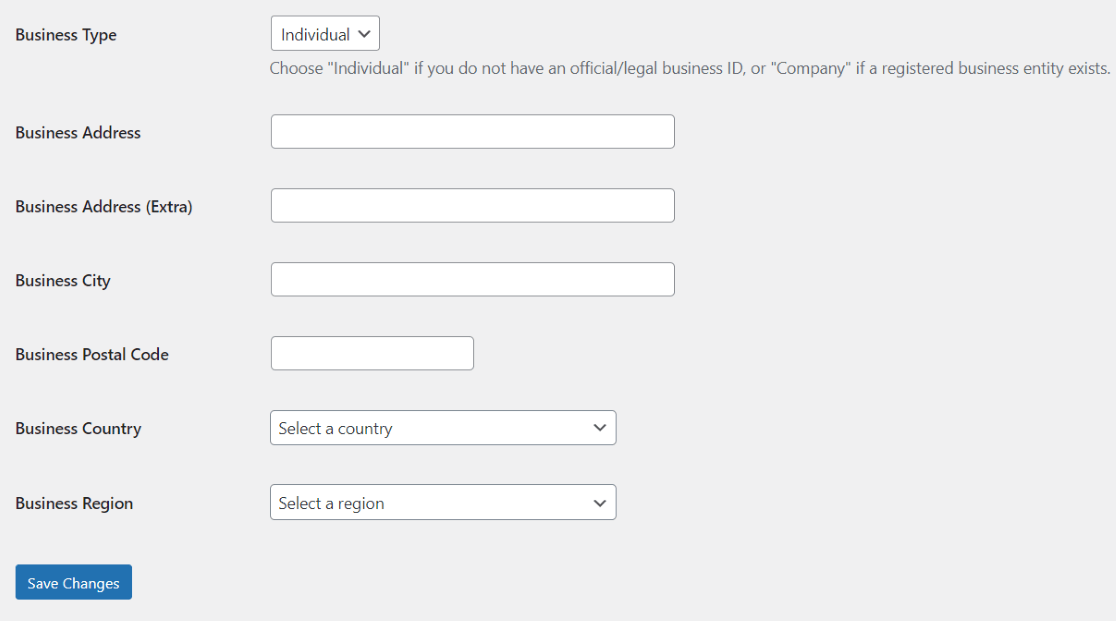
By adding your store location, you can allow the plugin to pre-calculate any taxes defined in the location. Once you’re done, click Save Changes.
Next, click Currency option next to Store.
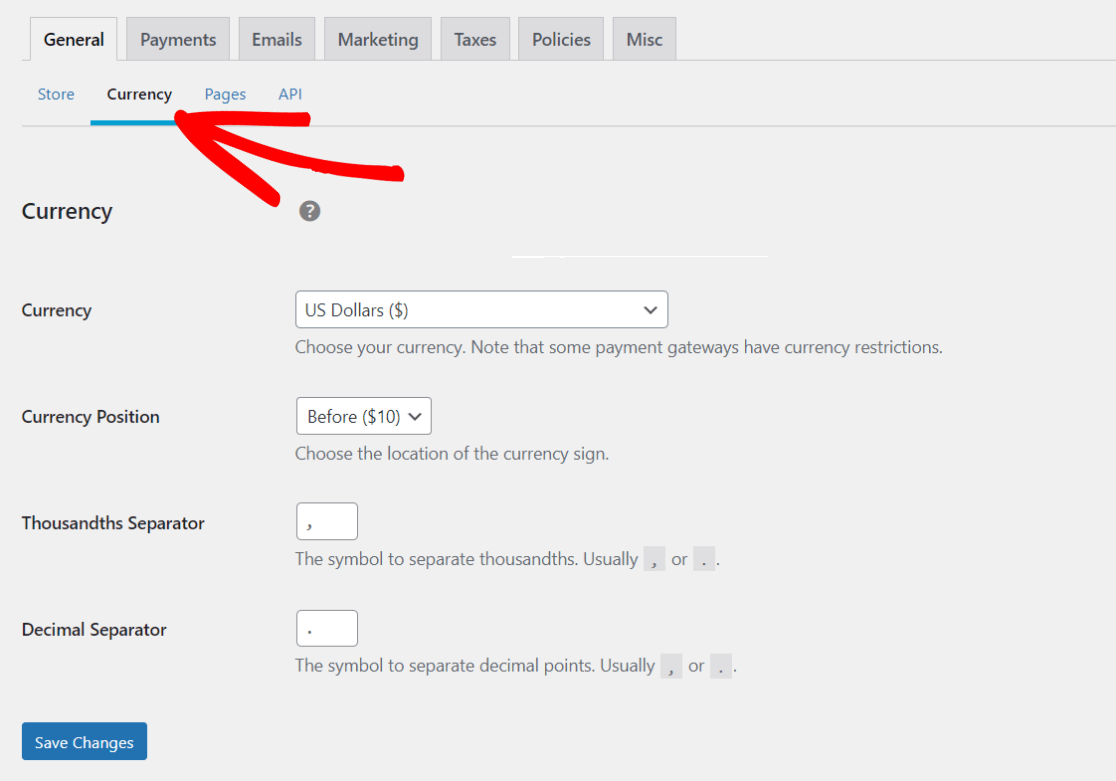
You can choose your currency, currency sign location, thousands separator, and decimal separator. Then, click the Save Changes button.
After the General settings, you can configure payment settings by clicking Payments tab.
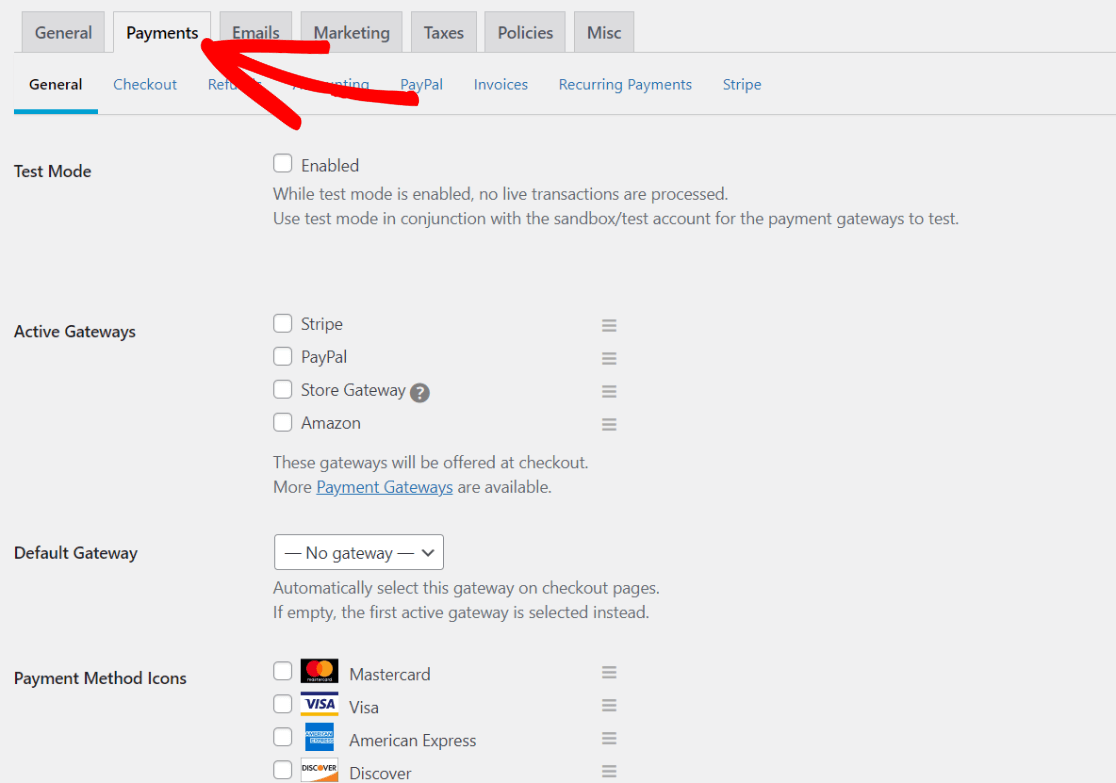
Here, you can choose payment gateways. Choose the ones you want to have available for payment on your site, select your default gateway, choose accepted payment method icons, and click the Save Changes button.
Next, you’ll need to configure your selected payment gateway settings. For instance, click the PayPal option to configure the settings.
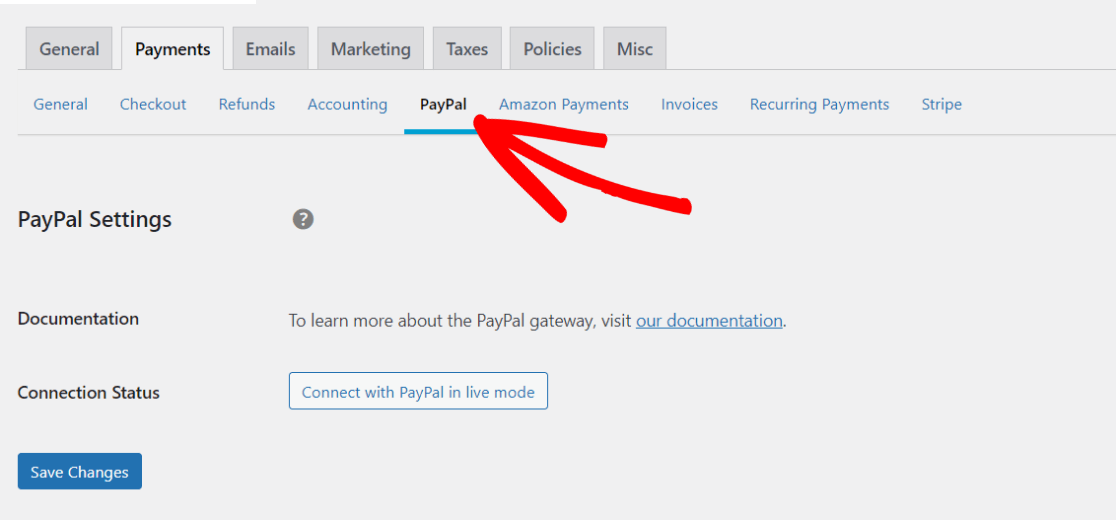
Review all the options, connect with PayPal, and click Save Changes. Visit each payment gateway tab you’ve activated and repeat.
Next, you’ll need to configure your email settings. Click the Emails tab to do that.
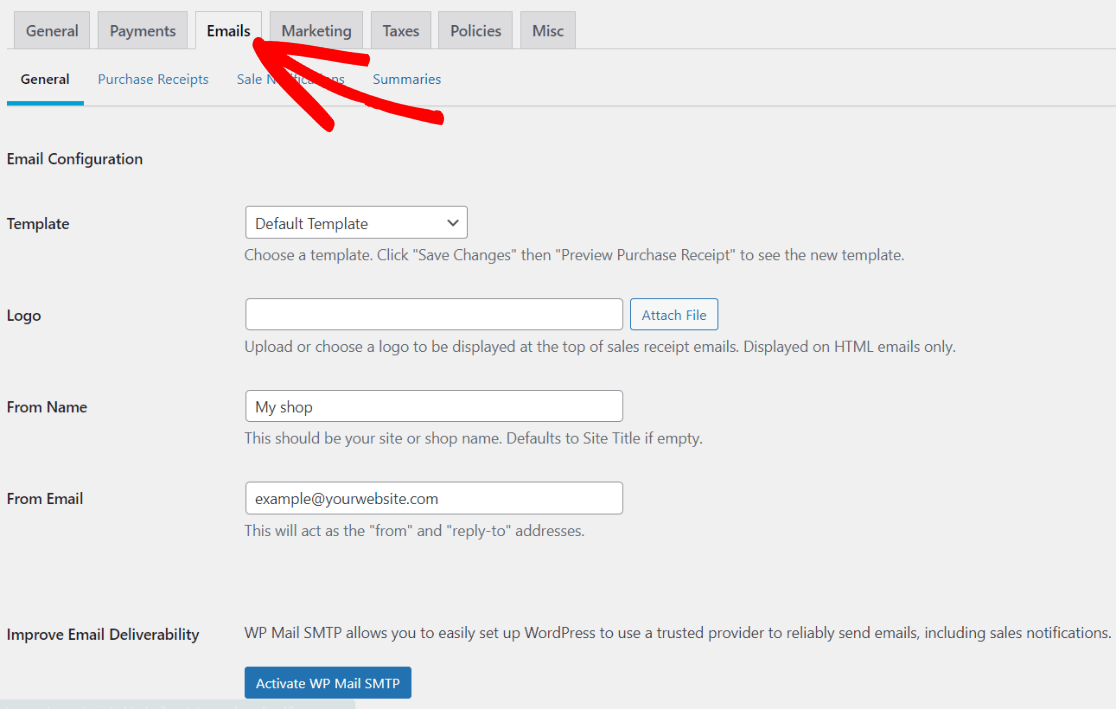
Choose your email template, upload your logo, and enter a name and email address from whom emails will be sent. After that, set up emails for purchase receipts and new sale notifications.
Next, you can review other options by clicking through each one of the tabs. Once you review all the settings, you’re ready to add your first digital product into your store. In the next step, we’ll show you how to do that.
Step 3: Add Your Digital Products to Your Store
Now that you’ve configured all the necessary settings, you’re ready to add your digital products to your eCommerce store. Go to Downloads » Add New.
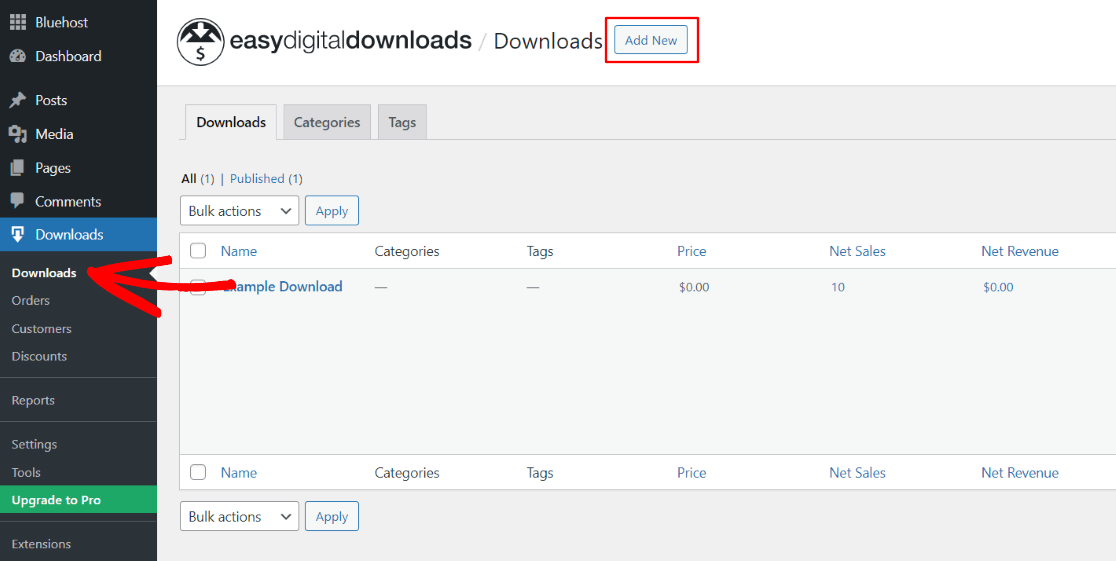
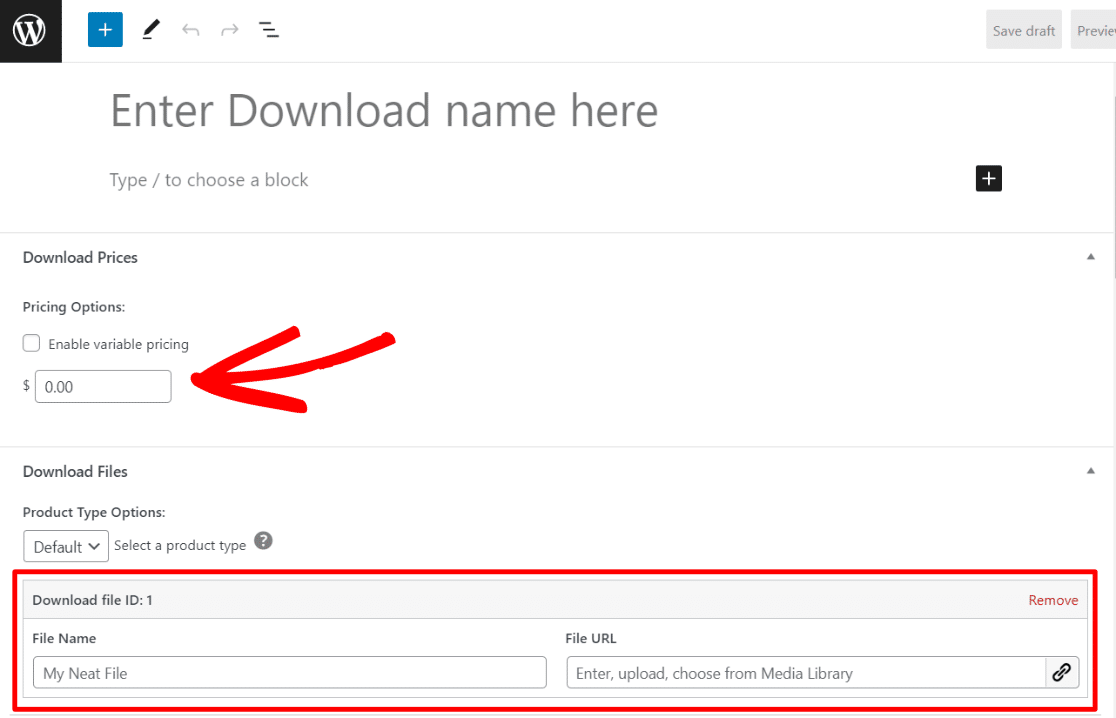
Enter your digital file title and description first. Then, scroll down to the Pricing Options section to set price for your product. Enter a price for your product. Then, go down to the Download Files section and upload the digital file you want to sell.
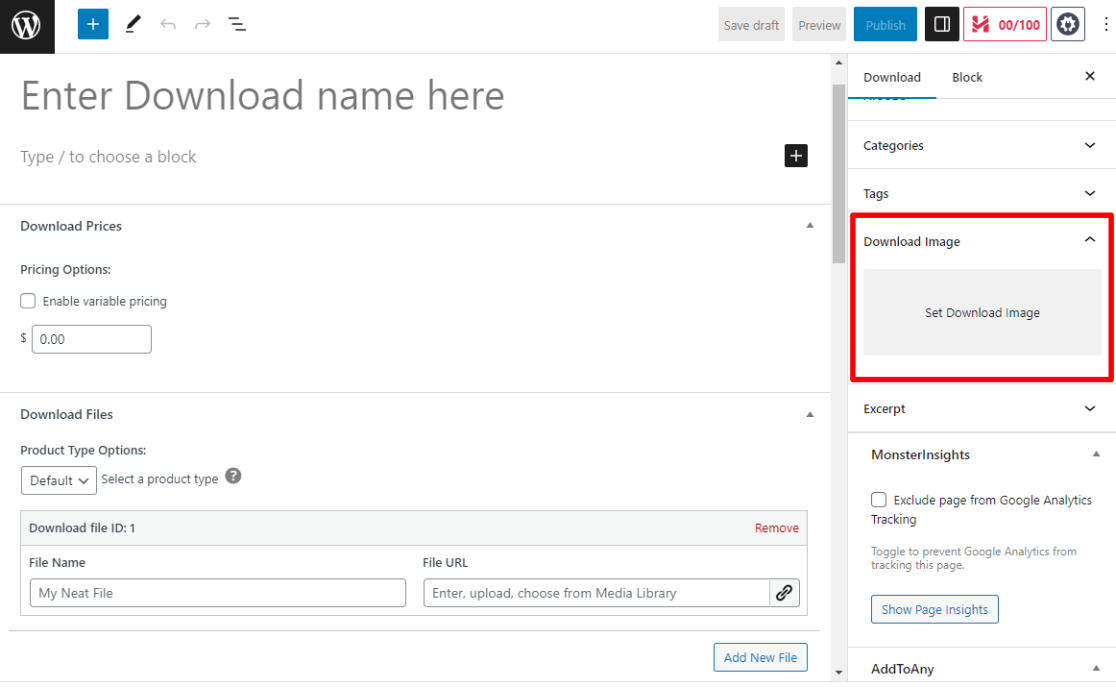
After adding both your pricing and download file, navigate to the right side panel. You’ll see an option to add your download image. You can create a featured image that reflects your digital product and add it there.
Then, find the Download Settings sidebar box and review the options.
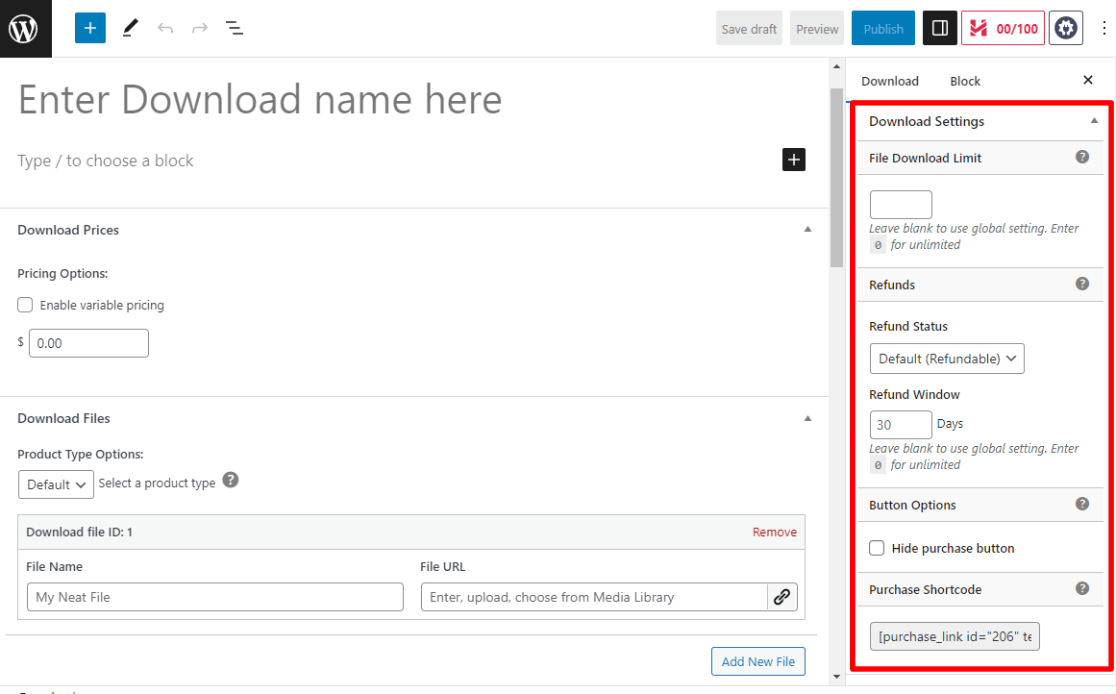
You can set up a file download limit and configure button options from there. You’ll also find your product’s shortcode, which you can use on any page or location to display this product.
You can also choose categories and tags for your product in the sidebar.
When your settings are all set to your liking, go ahead and hit the blue Publish button at the top.
That’s it! You’ve published your first product. If you have more digital products, you can add them to your store by repeating the same steps above. It’s easy and quick!
If you have questions about any of the steps we went over (or anything we didn’t go over), you can find your answer in the Easy Digital Downloads docs.
Step 4: Track Your Digital Downloads Properly
Once you’ve set up your eCommerce site for selling digital downloads in WordPress started selling, you’ll want to know how your online store is actually performing. You’ll definitely want to find out your most popular products, conversion rates, total sales, total revenue, and more metrics to understand how your store is doing and make improvements to grow it.
If you have these reports, you can understand your customers and their shopping behaviors better. Using this data, you can make informed business decisions and build highly effective marketing campaigns.
So, do you want to know how to track your digital download sales? Look no further than MonsterInsights because it’s the perfect solution for tracking your Easy Digital Downloads store’s performance.
MonsterInsights is the best Google Analytics plugin for WordPress. It has easy-to-use options to set up advanced tracking for eCommerce, downloads, forms, ads, videos, and much more.
To get started, grab MonsterInsights at the Pro level. That’ll give you access to the easiest 1-click eCommerce tracking!
Then, install the plugin and connect your online store with your Google Analytics account. For full setup instructions, check out How to Add Google Analytics to WordPress the Right Way (2023).
Then, navigate to Insights » Settings » Addons and find the eCommerce addon.
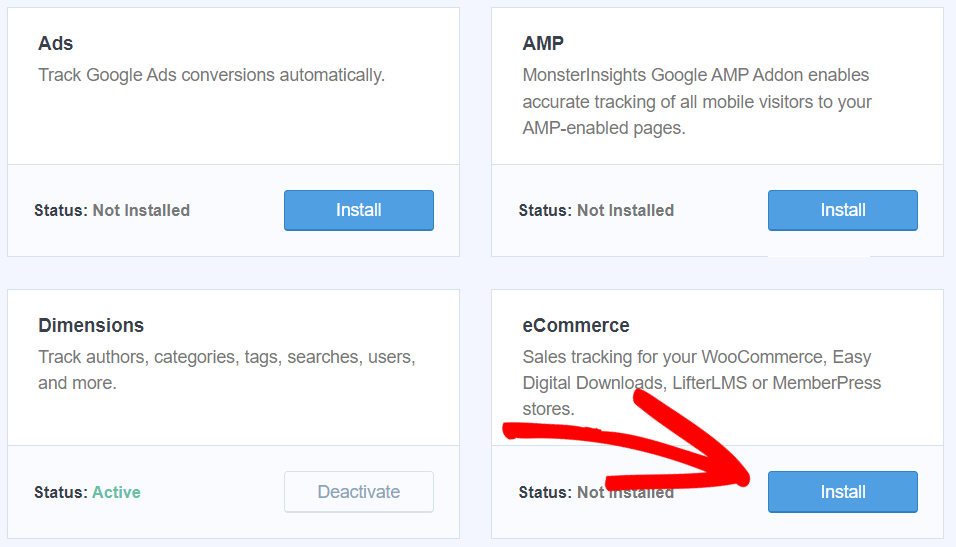
Click Install. The addon will automatically activate itself after download.
That’s it!
After data is collected, you can view your eCommerce reports in your MonsterInsights dashboard reports. Just navigate to Insights » Reports » eCommerce from your WordPress dashboard.
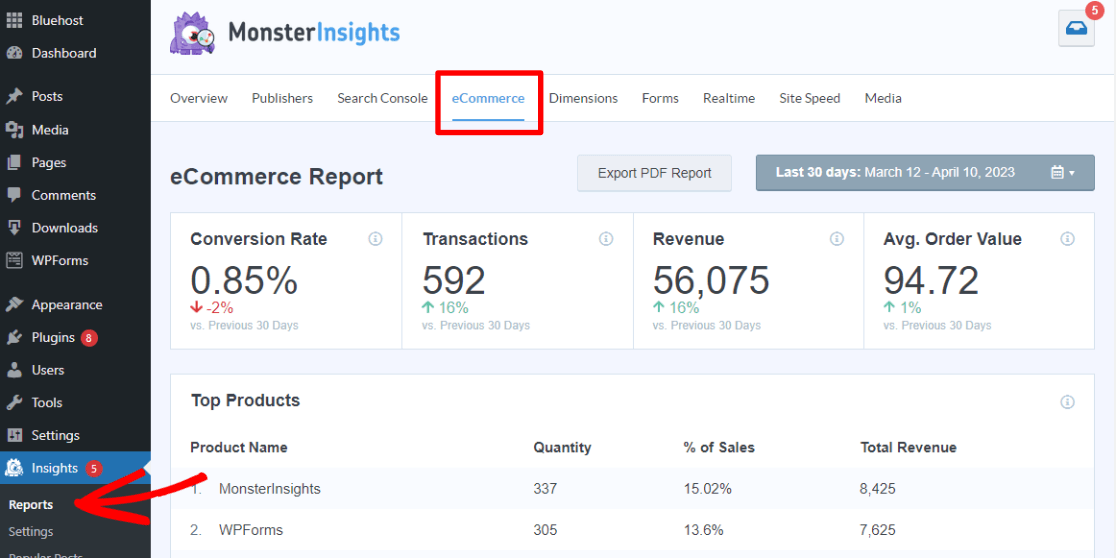
Now you can view detailed reports on your customers and their interactions with your digital downloads store. Use this data to create strategies that’ll build and grow your business!
For full instructions on setting up Google Analytics eCommerce tracking, check out How to Set Up Google Analytics eCommerce Tracking on WordPress.
We hope this article helped you learn how to sell digital downloads in WordPress. You may also want to learn about the 9 Top eCommerce Metrics & KPIs to Track in Google Analytics 4.
Not using MonsterInsights yet? What are you waiting for?
And don’t forget to follow us on Twitter, Facebook and YouTube for more helpful reviews, tutorials, and Google Analytics tips.




Very helpful, thanks a lot! I didn’t know I can sell items on my WP blog without the WooC. Thanks
Thank you very much. This is comprehensive and detailed. I have always thought about how to start selling digital products on my blog but I always felt like it’ll be too technical. Thanks again.
Hi, What if you want a third-party site or cloud to store your digital download files. which third-party file hosting would you recommend for music digital download WordPress stores? thank you.
Hey David! Thanks for your question. We’d recommend Amazon S3 to store those files.
Do you HAVE to get blue host to sell digital downloads on Wordpress? I already have a Wordpress blog established.
Hey Katie! Thanks for your comment. You do not have to get Bluehost if you’ve already got a blog established. Go ahead and start at step two with the Easy Digital Downloads plugin. Let us know if you have any other questions!
My easy digital download is not working. When I view my digital product and click purchase there are no payment details displayed,only check out message displayed. I think my potential customers could be experiencing this Problem. What is wrong or not write?
Hi James,
That sounds like an issue for the support team over at Easy Digital Downloads: https://easydigitaldownloads.com/support/
Nice post! You could keep in mind WP File Downloads! It gives you the opportunity to serve digital downloads with multiple themes, and also from the cloud so you can connect it to your Google Drive Account.
It has an integration with WooCommerce as well 🙂
Thanks for the tip, Alejandro!
Awesome blog!! As you have mentioned you need to install plugins for enabling more payment options other then Amazon and PayPal So, Can you please suggest a plugin for debit and credit cards payment
Hey Ajay! We recommend the Stripe addon for Easy Digital Downloads.
Thanks for the step-by-step instructions, they are very helpful.
Hi, thanks a lot for the guide.
I was wondering, does it slow down my site or my webhosting server when people download a 30mb pdf file? Would it be diffrent or better if I would link and provide the file on lets say google drive?
All the best to you and thanks a lot
Hi Andy, thanks for your question. Downloading a 30mb pdf file would use bandwidth for sure, but it depends on how often that’s happening. If you have people coming by and downloading all day long, that might use too much of your bandwidth. If it’s every once in a while, it wouldn’t be as much of an issue. If you want, you could use a CDN or a cloud storage service for the file.