Learning how to create an email newsletter is essential if you run or market a business, brand, or organization. Email is one of the most effective marketing and communications platforms you can use today. After all, 88% of email users check their inboxes multiple times per day!
Whether you have a business, brand, or organization, email newsletters help you stay in front of your audience, build relationships, and drive traffic to your website.
That said, many small business owners are either too intimidated by the upkeep of a newsletter or daunted by the technical and financial aspects of running one.
I’m here today to assure you that setting up a newsletter probably takes less time and budget than you think. Many email marketing platforms make it super easy, don’t cost a ton, and provide plenty of support if you get stuck.
In this article, I’m going to walk you step-by-step through how to create an email newsletter on my favorite email marketing platform, Constant Contact. I picked Constant Contact because of just how easy it is for beginners, and because you can get started for free. Give it a try, see how you like it, and pay only if you’re ready to keep it going.
Why Do I Need an Email Newsletter?
Email newsletters are important for businesses, brands, and organizations of all shapes and sizes. Whether you have a blog, eCommerce store, small business, non-profit organization, or educational institution, newsletters help to keep your audience engaged and connected with you.
Here are 5 really big reasons why you need an email newsletter:
- Increase Your Returning Visitor Rate – With all of the things going on in peoples’ lives today, it’s pretty easy for someone to buy once or interact with your website once, then completely forget about you for a long time. An email newsletter is one of the best ways to remind that audience that you’re here and increase the likelihood that they return.
- Make Your Brand Memorable – This goes hand-in-hand with reason #1. Not only do you want your visitors and customers to return, but you also want to make yourself easily memorable. While sending an email newsletter isn’t the only way to make that happen, it can certainly help.
- Boost Your Conversions – So, if more of your customers or visitors are returning and remembering you, odds are, you’ll see your conversions increase. Whether it’s sales, sign-ups, downloads, donations, or any other type of conversion, email newsletters help drive them.
- Generate Traffic – Ranking in Google and driving traffic to your site is hard, and it tends to take more time than you’d like. It can feel like you’re publishing content in a vacuum, where all your well-crafted words get stuck and remain unread. With an email newsletter, you can distribute that content straight to people who are actually interested in reading it. They click, creating traffic for your site.
- Build a Loyal Fanbase – Newsletters help you connect with your readers and build up a relationship. Especially if you add your personality to your emails, your subscribers will start to feel like they know you and really connect with you.
Now that you know the importance of newsletters, let’s look at the tools you can use to create one.
The Best Email Newsletter Platform for Beginners
There are many email marketing platforms and tools designed for creating a newsletter, but finding the right one for your business or brand can be tough.
When you start searching for an email marketing platform, it’s pretty easy to get overwhelmed by the sheer number of choices. Especially if you’re a beginner, you can quickly feel lost!
Case in point: Here’s a Reddit user who feels frustrated that every suggestion for “the best email newsletter platform” has a different answer:
There are way too many newsletter platforms – which one should I start with?
byu/GalacticHedgeFund inEmailmarketing
My answer to his question would be that it depends.
I know that’s a frustrating answer! But it really does depend on your business size, preferences, budget, and goals.
HOWEVER. If I have to pick one platform that’s going to be a fit for most beginners-intermediates with a budget that’s not huge, I’m going with Constant Contact.
Constant Contact
Constant Contact is one of the most user-friendly email marketing services out there. It has the best balance of ease of use vs. features for the price point.
Building emails is easy, but nowadays, you get that with most email builders, to be honest. Most, if not all, are drag-and-drop and fairly straightforward to use.
What makes Constant Contact stand out, though, is the ease of use for everything, not just designing emails.
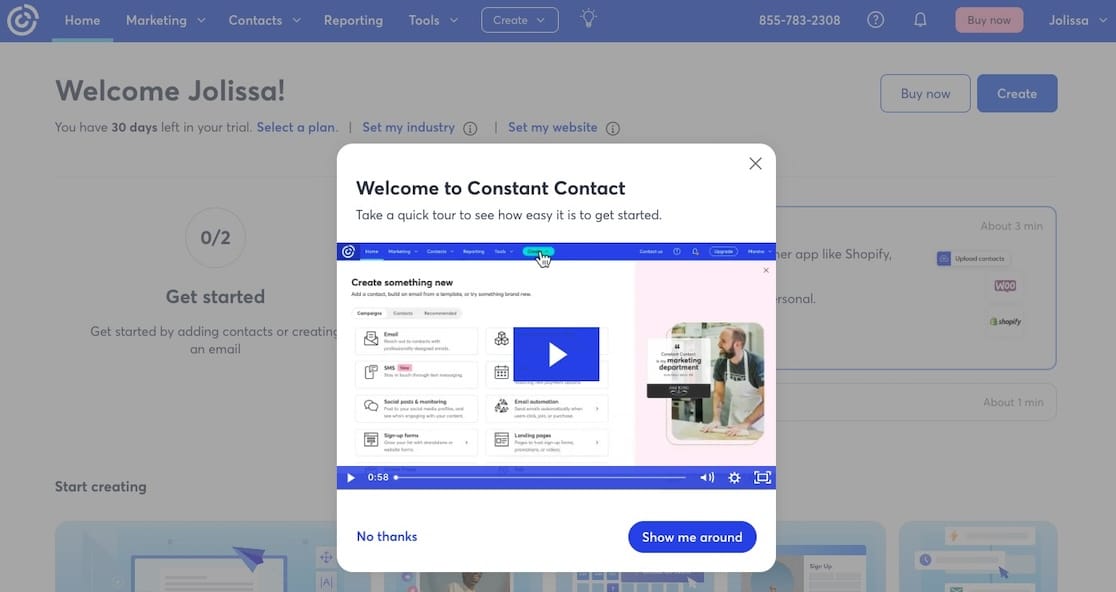
For example, when you create an account and log in for the first time, it’ll offer you a walkthrough video so you can easily learn the dashboard:
Then, you get a short and sweet setup checklist to get things started that walks you through the absolute essentials of setting up an email platform, including creating audience segments.
Segmenting your audience is an incredibly important consideration when uploading contacts, so it’s awesome that it’s one of the first few steps in their walkthrough.
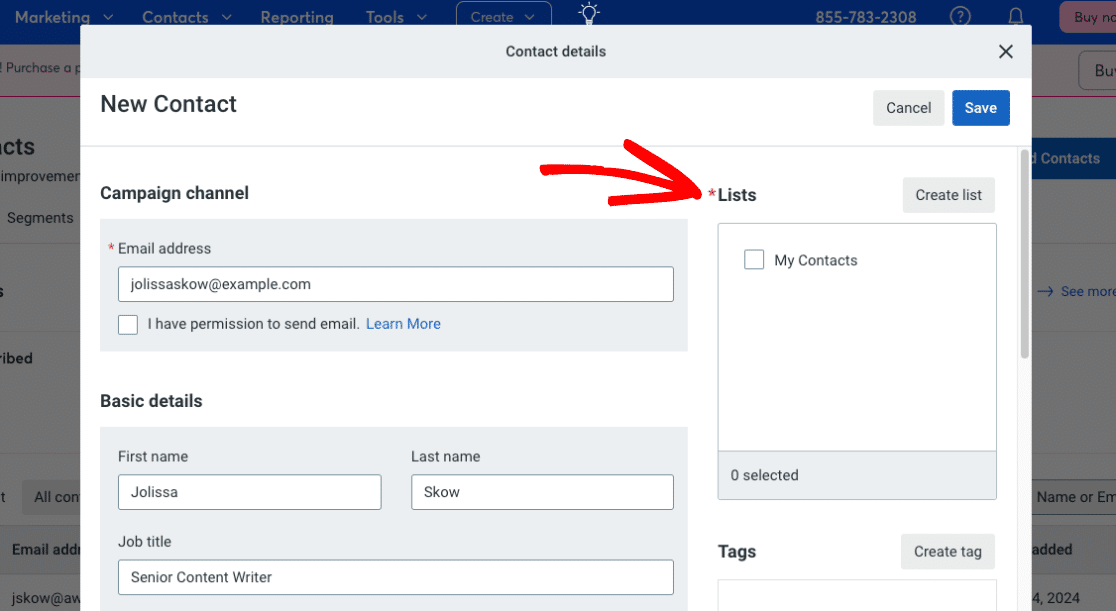
Constant Contact makes sure you’re keeping your contacts organized and segmented by requiring you to add them to lists when they’re uploaded:
Beyond the simple setup, free trial, smashing suggestion to start with segmentation, and ease of use, here are some more features and reasons why I picked Constant Contact:
- Easy segmentation and personalization
- 100s of email templates
- Send automated welcome emails or email workflows
- Create landing pages and signup forms
- Grow your email list and site traffic through Facebook and Instagram Ads
- Set up social media posting and monitoring
- Create polls and surveys
- Integration with other marketing platforms
Of course, there are different levels of access to all of Constant Contact’s features depending on your budget.
Alright, now that you know why I picked Constant Contact, I’ll walk you through each step of setting up your first email newsletter.
How to Create an Email Newsletter
Creating an email newsletter can be simple! Create your Constant Contact account, then follow the steps below to get set up and started.
Step 1: Add Contacts to Your Account
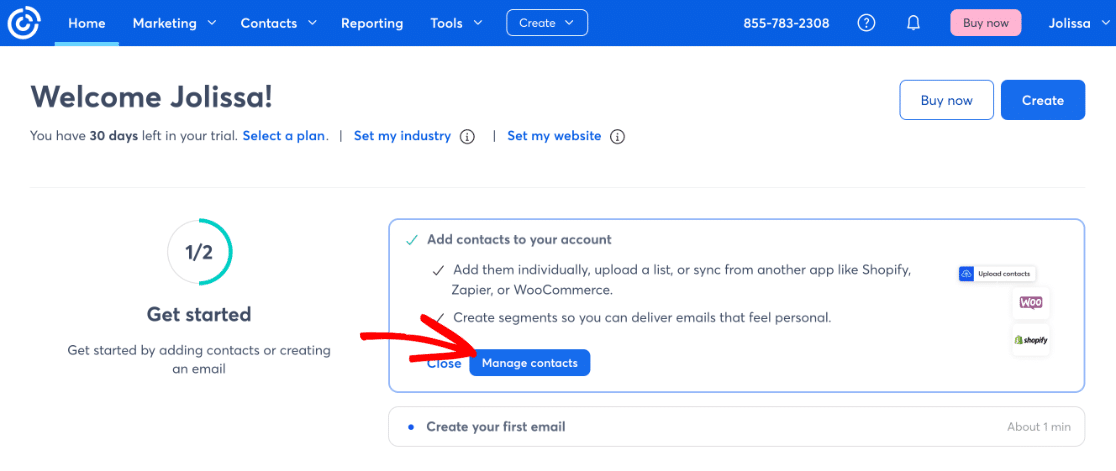
After you’ve signed up for a Constant Contact account, you can begin by adding contacts to your account. Go ahead and click the Manage Contacts button on your dashboard:
Then, export your list (if you have one) from wherever you’re keeping your contacts’ email addresses and either upload or copy-paste them into Constant Contact:
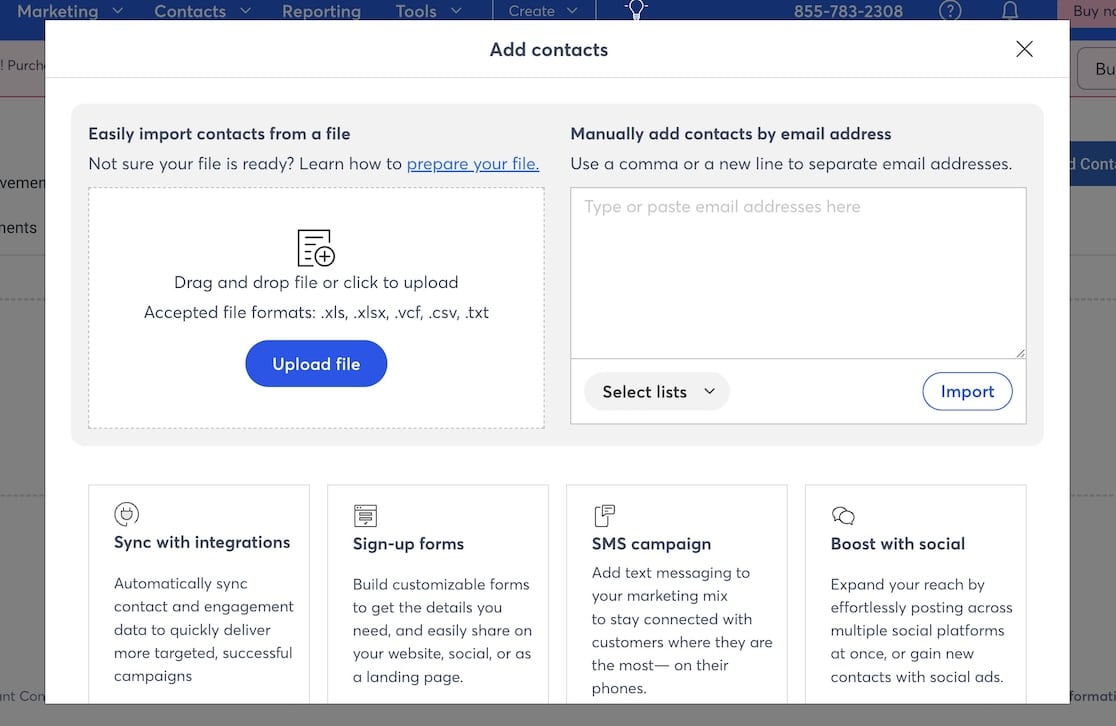
When you add or upload contacts, you’ll have a chance to choose which list(s) they belong to and any tags they should have. Using lists and tags is an important way to segment your contacts, so make sure to add any descriptive lists or tags you can think of that match the contacts you’re uploading!
Don’t have real contacts yet? Add another email you own, a coworker’s email, or a friend’s to try it out.
Step 2: Start Creating Your First Newsletter
Alright, now that you’ve got a few contacts, it’s time to make your first newsletter.
We’ll start by going to Marketing » Email, then click the + Create an email button:
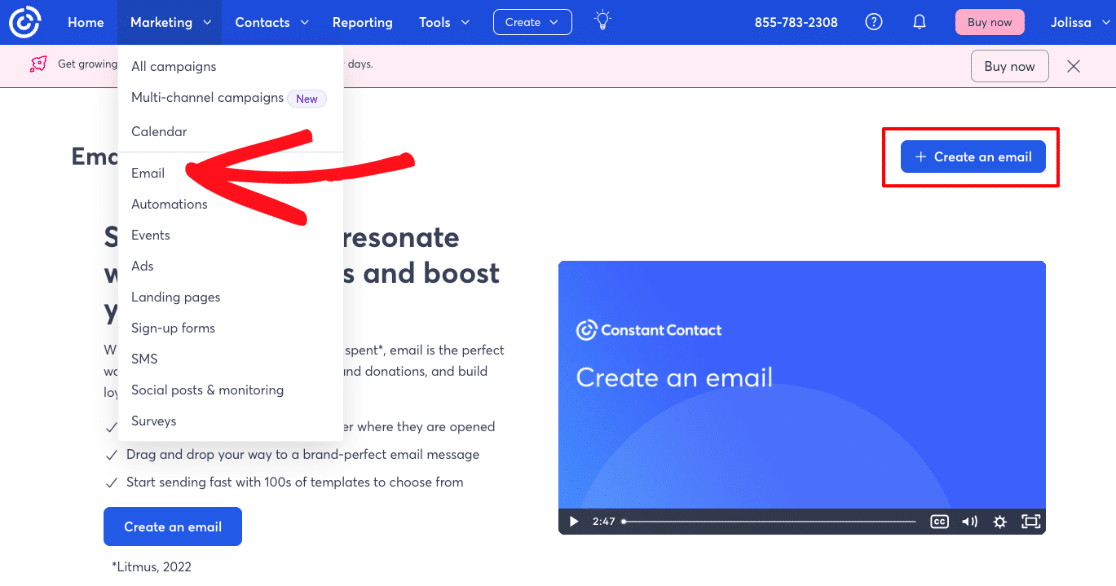
Note the video on the Email page—you can pause to watch it if you’d like! This is a big part of why I picked Constant Contact for email beginners. They’ve got helpful videos and links to help docs everywhere to walk you through every step!
Alright, after you click the Create an email button, you’ll land on a page where you can start setting up your brand, personalizing your templates, or getting started with a pre-made template.
I’ll use a pre-made template for this tutorial, but I want to point out a really cool feature first.
Notice the Scan my website button:
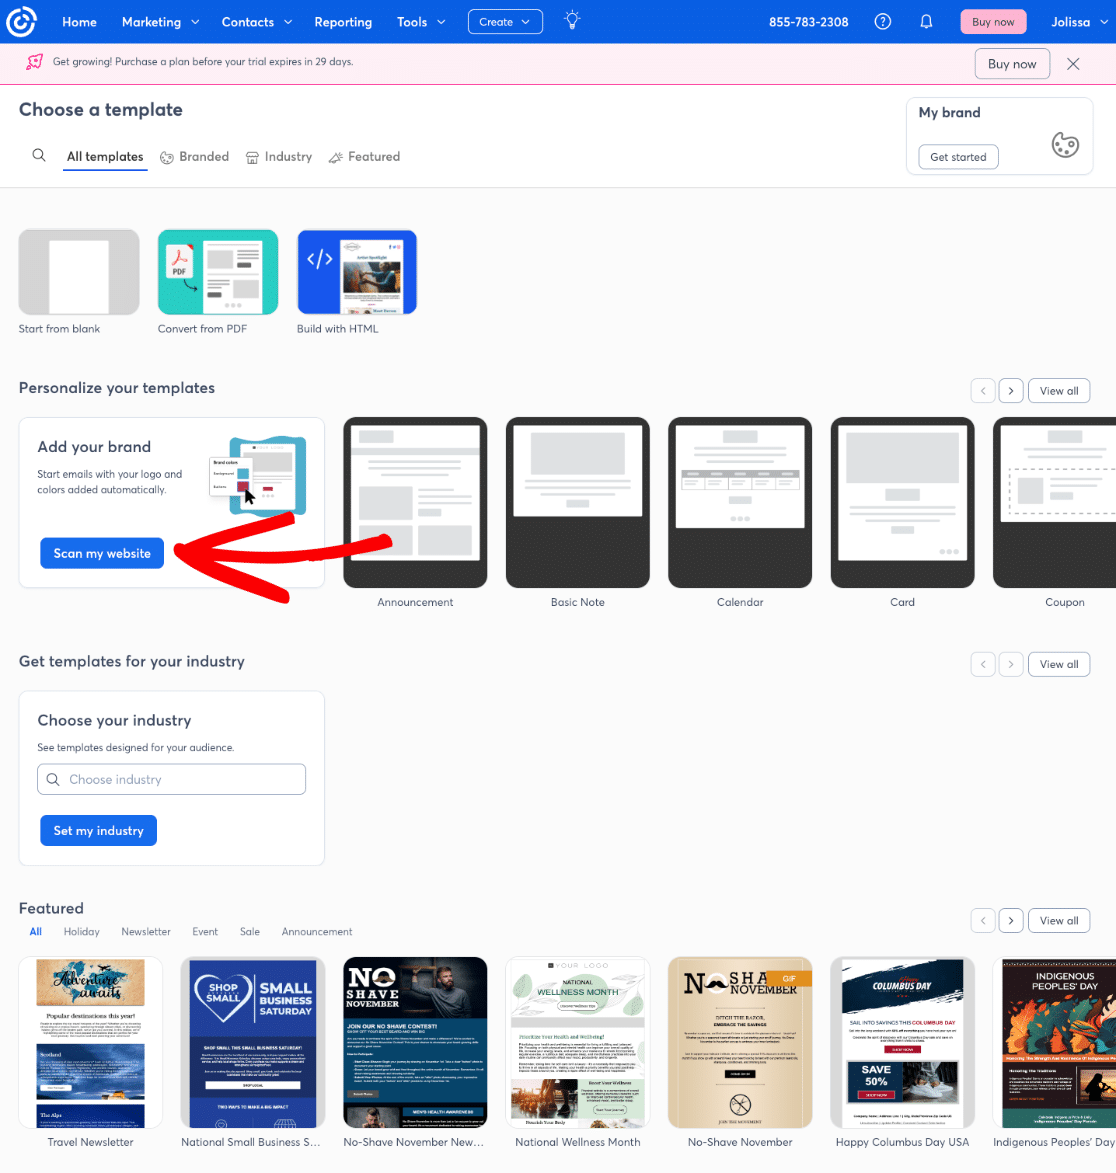
If you click that button and input your URL, the tool will scrape your website to find your logo, colors, and images that matter to your branding. You can then use them to set your brand colors and other elements. You can really save some time by using it!
Step 3: Design and Personalize the Email
This is where you can get creative. How do you want your newsletter to look? What content will it contain?
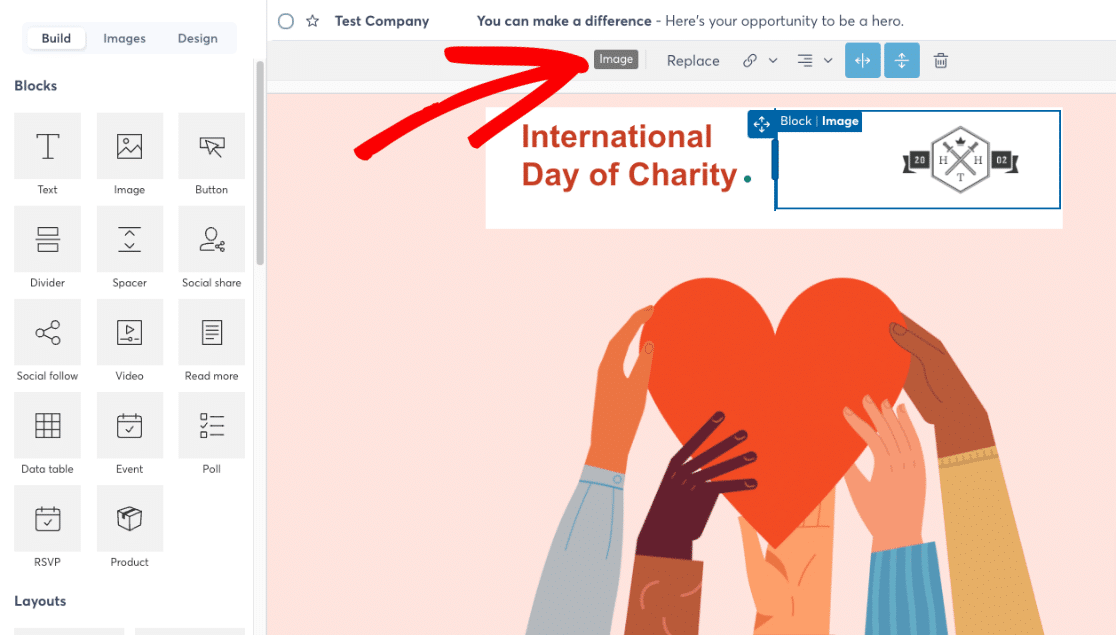
Building an email is easily done with a drag-and-drop editor. I’ve started with a pre-made template, so you can see some of the blocks it includes. To edit any of them, just click. You’ll notice some options appear in the bar at the top of the page, like for an image:
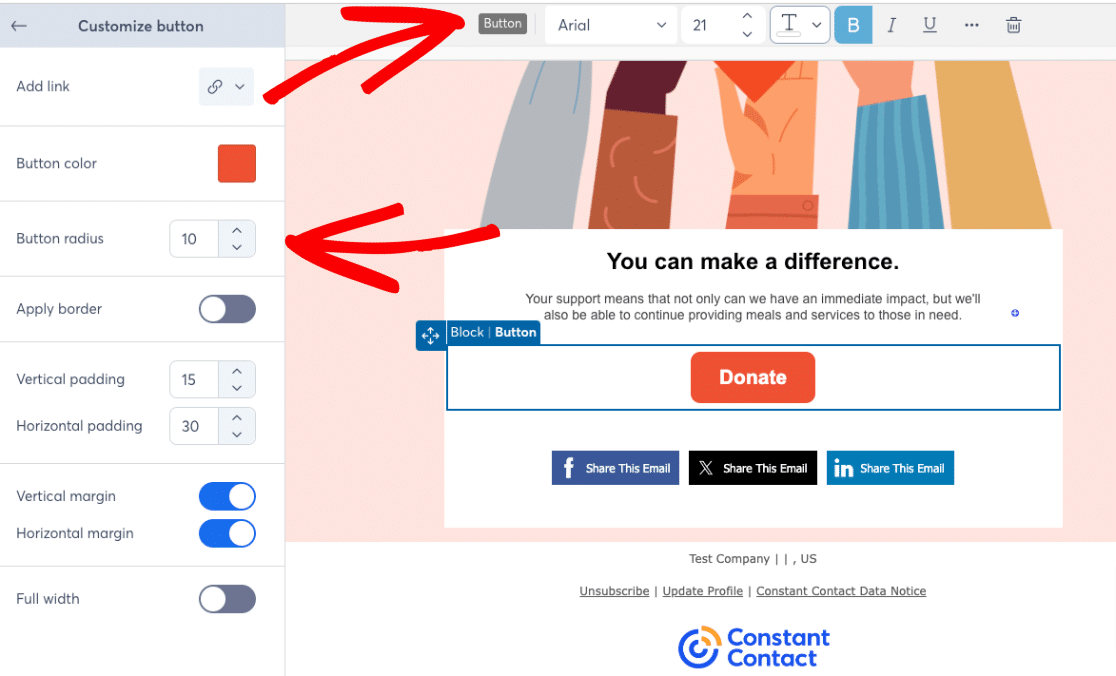
Some blocks might also open some options on the top and on the side, like for a button:
The best way to familiarize yourself with the available blocks and understand how they work is to click on them, drag them over, and try them out. Don’t worry about making mistakes! Just explore.
Content ideas for your newsletters:
- New blog posts
- Tutorials
- Recommendations
- Videos
- Personal messages/letters to your subscribers
- Company news & updates
Important Note:
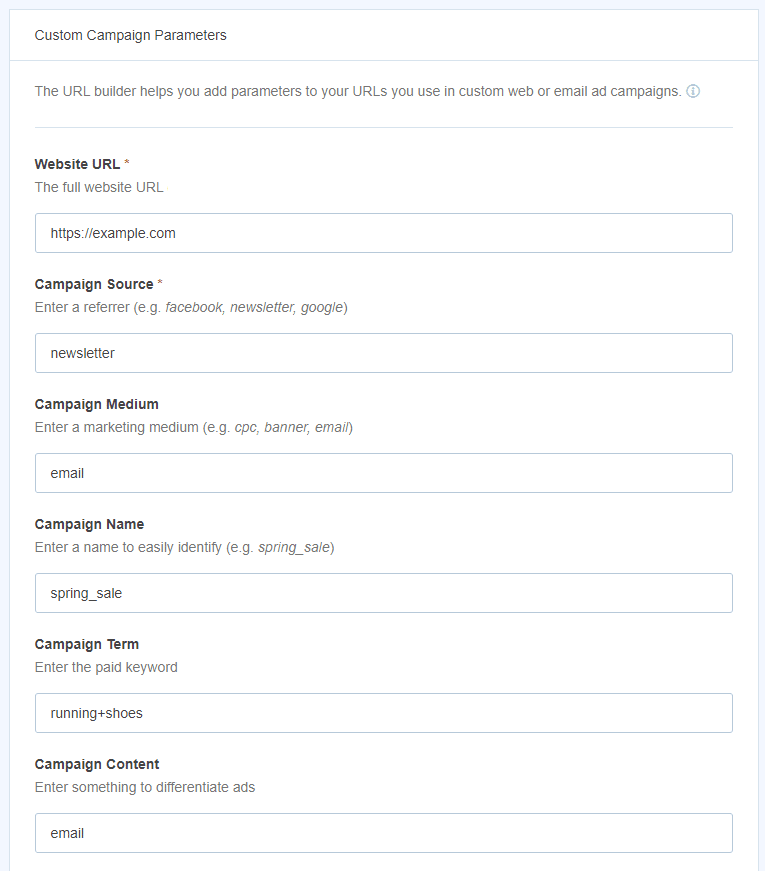
Most likely, you’re adding links to your website from your email. When you add links, it’s really important to use UTM parameters. UTM parameters are words you add to the end of your URL that tell Google Analytics where the clicks are coming from.
Without UTM parameters, traffic from your email to your website might get lumped into the Direct traffic channel in Google Analytics, making it impossible to tell what those visitors did on your website.
For example, let’s go ahead and add a link to a web page on the button:
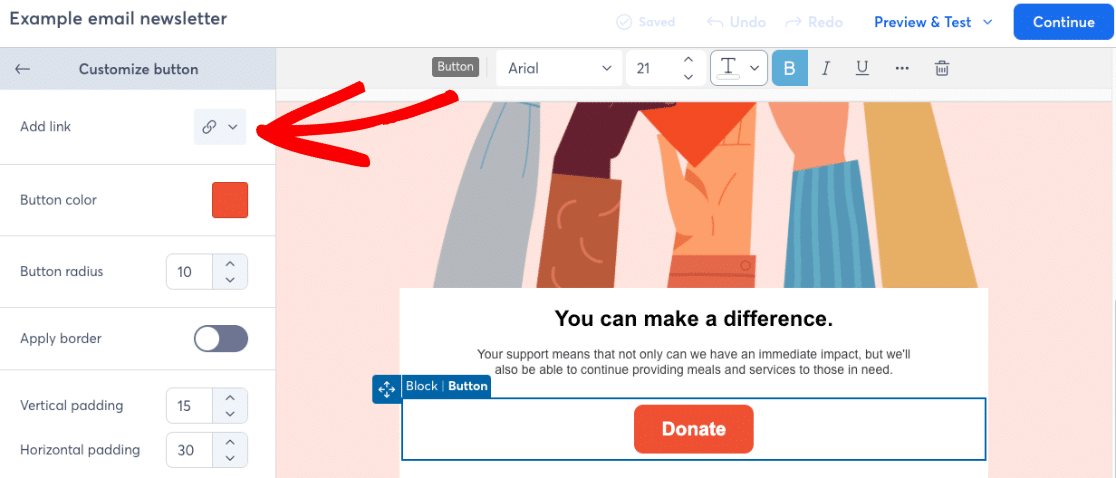
Select the Web Page option for your link, then you’ll see the options screen. The Link URL field is where you’ll add your URL:
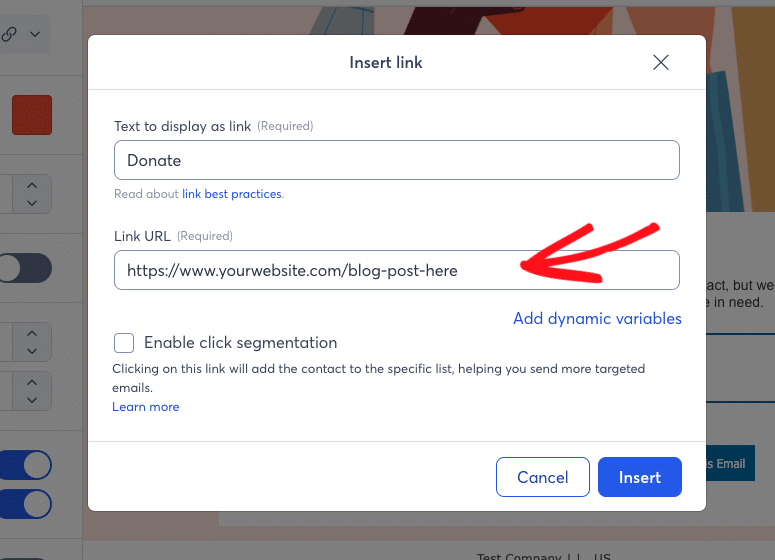
With UTM parameters, your link will look something like this:
https://www.yourwebsite.com/blog-post-here?&utm_source=constant-contact&utm_medium=email&utm_campaign=donate
For a tutorial on using UTM parameters, check out A Beginners Guide to UTM Parameters (And How to Use Them).
Step 4: Edit Email Settings
An important part of setting up your email is changing the settings. To access settings, scroll to the top of the email preview window and click Email Settings:
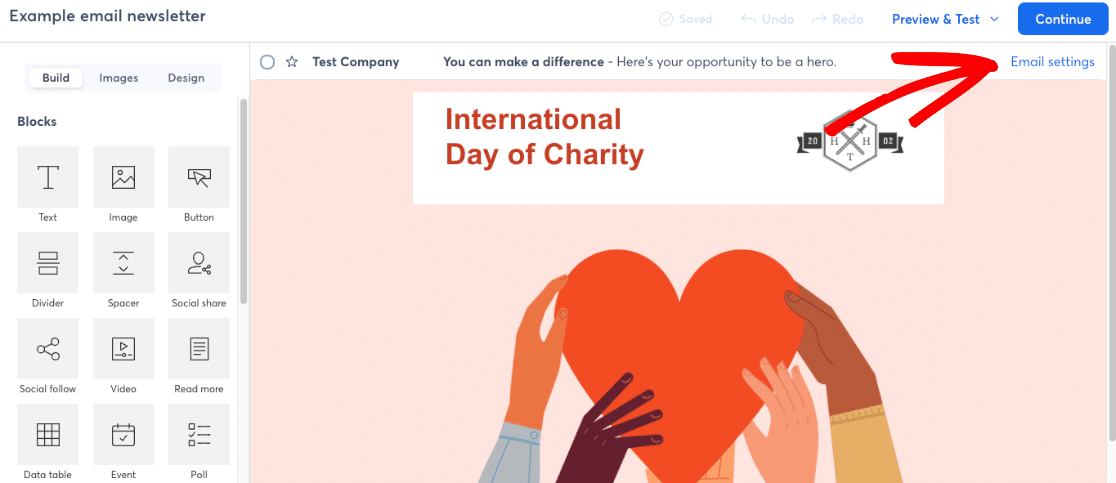
Here’s where you’ll write your subject line, preheader, and from email address. At the top, you’ll be able to see a preview of how your message will appear in inboxes. Keep in mind that less of your subject line and preheader will show on mobile devices, so try to keep it fairly short.
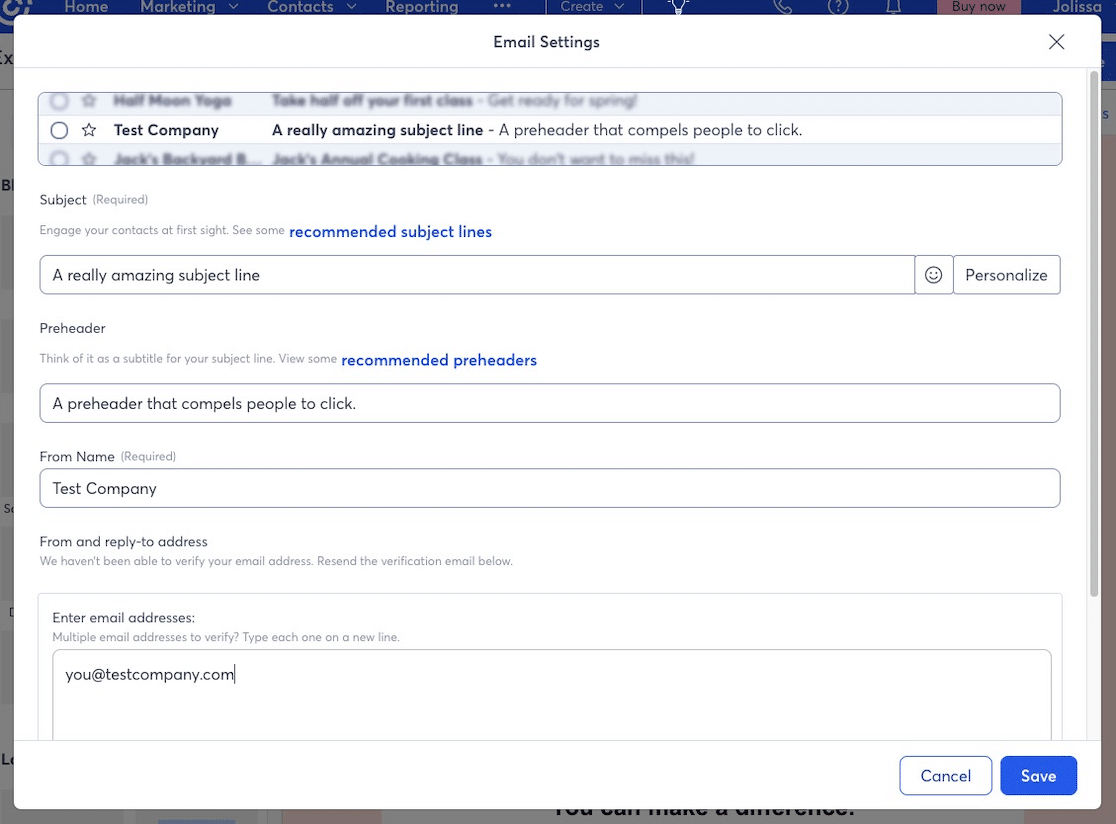
For help with writing email subject lines that compel users to click, check out OptinMonster’s guide: 184 Best Email Subject Lines And Why They Work! (2024).
Step 5: Preview, Test, and Send Your Email Newsletter
When you’ve got an email you’re ready to send (even if it’s just a test email that you’re sending to yourself), go ahead and click on the Preview & Test dropdown. Here’s where you can preview what the email will look like after it’s sent and send a test to yourself to make sure it looks right in your own inbox. I highly recommend doing both of these things before sending an email to your list!
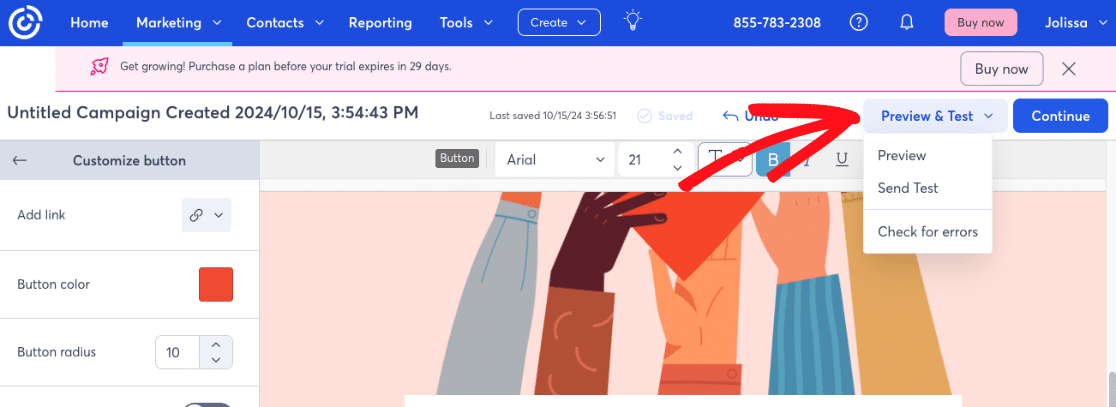
Once you’re satisfied that all the links go to the right places, images scale correctly for mobile phones, and everything looks great, go ahead and click the Continue button.
On the next page, you’ll choose when your email should send, whether that’s now or in the future, and who it should be sent to. If you’re new to Contact Contact, you might also have some setup tasks listed here that you need to complete before you can send your first newsletter:
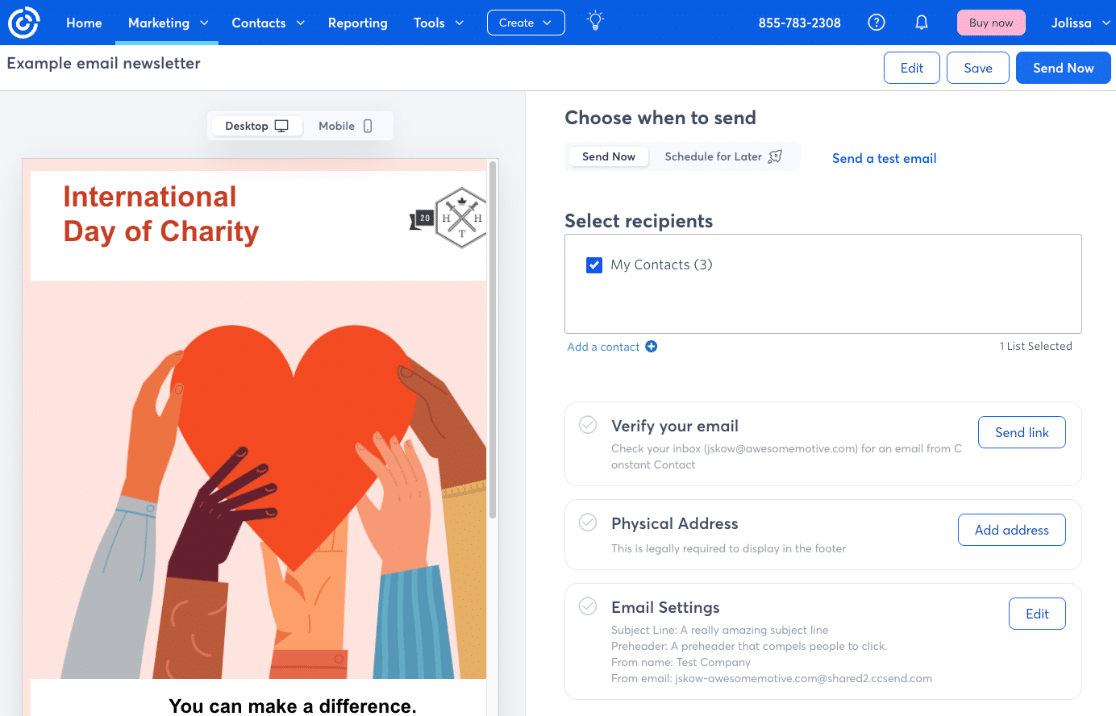
When it’s all ready, go ahead and click the Send Now (or Schedule) button!
Congratulations! You now know how to create an email newsletter.
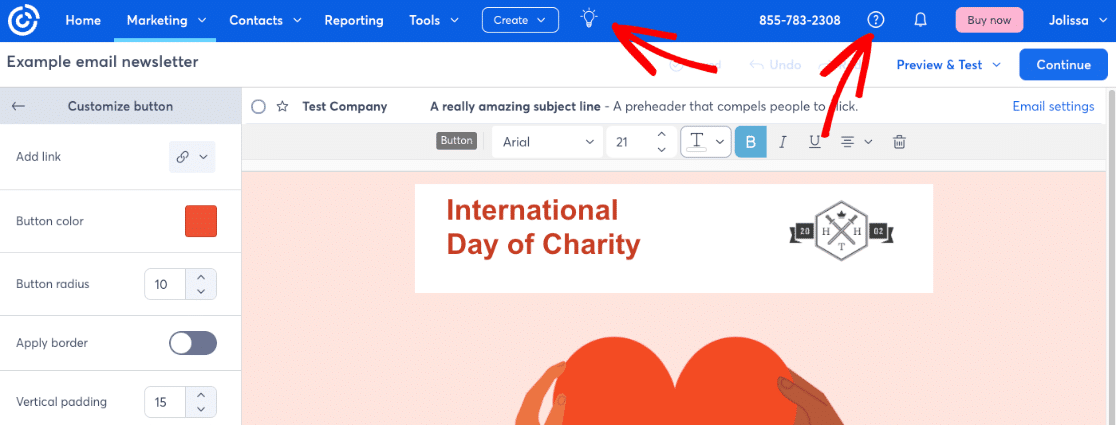
If you should feel stuck at any point, click on the light bulb to find the guided walkthroughs or the question mark for the knowledge base:
Step 6: Measure Your Email’s Success
You’re not done yet! After you’ve sent your email, it’s important to monitor how it does. How many people clicked on it? Which links did they click on the most? Did they complete a conversion (like a purchase or sign-up) while they were on your site?
All of these metrics are important to see so that you can figure out which emails do the best. When you know what works best with your audience, you can build on it to get more visits, more conversions, and more business growth out of each email.
Constant Contact has some built-in analytics that you can use to track the success of your emails. The amount of analytics you have access to changes based on which plan you’re using, but you’ll always be able to see views, clicks, bounces, and unsubscribes.
To really understand whether your emails are driving business growth, you’ll want to use Google Analytics.
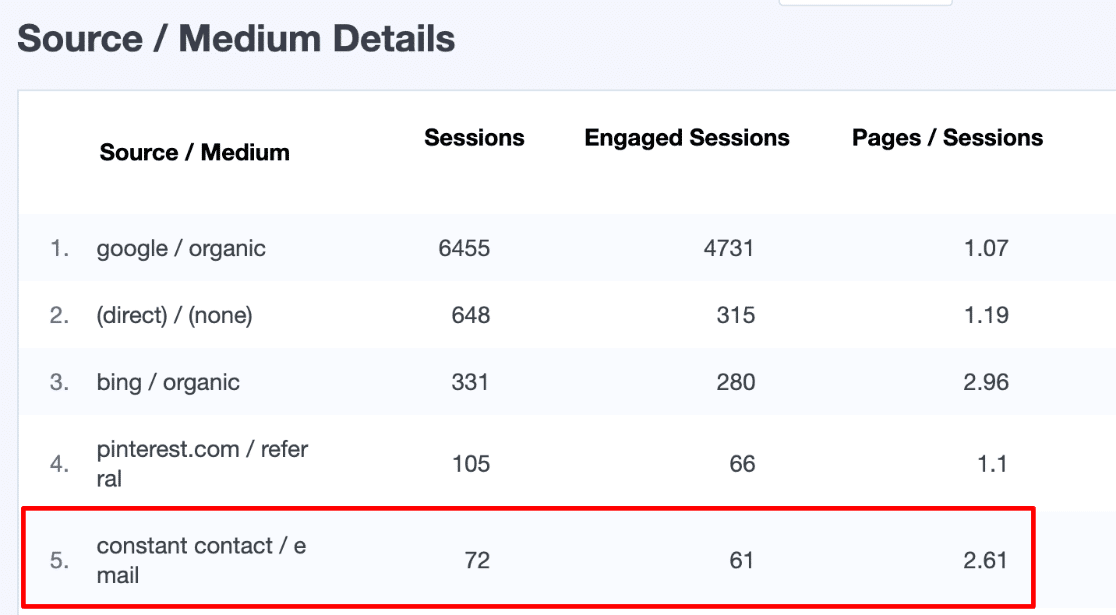
Remember in Step 3 when I mentioned using UTM parameters? This is where they really come in handy, as you’ll be able to see what your email traffic is doing on your site.
You’ll find metrics like:
- The top landing pages from email
- Which emails sent the most engaged traffic
- Which emails converted the most (by filling out a form or completing a purchase, for instance)
- What other pages your email traffic visited
- How many visits you’ve gotten from emails over the past week, month, or any date span you choose
- And more!
For a tutorial on tracking your email traffic, check out How to Set Up Google Analytics Email Tracking (4 Easy Steps).
Using WordPress? Make sure to take a look at the easiest way to track your email traffic: MonsterInsights.
MonsterInsights is the best Google Analytics plugin for WordPress. It can show you all your most important metrics right in your WordPress dashboard. Plus, you can use it to easily set up some tracking features that aren’t automatically included in Google Analytics, like eCommerce tracking, form tracking, author tracking, and more.
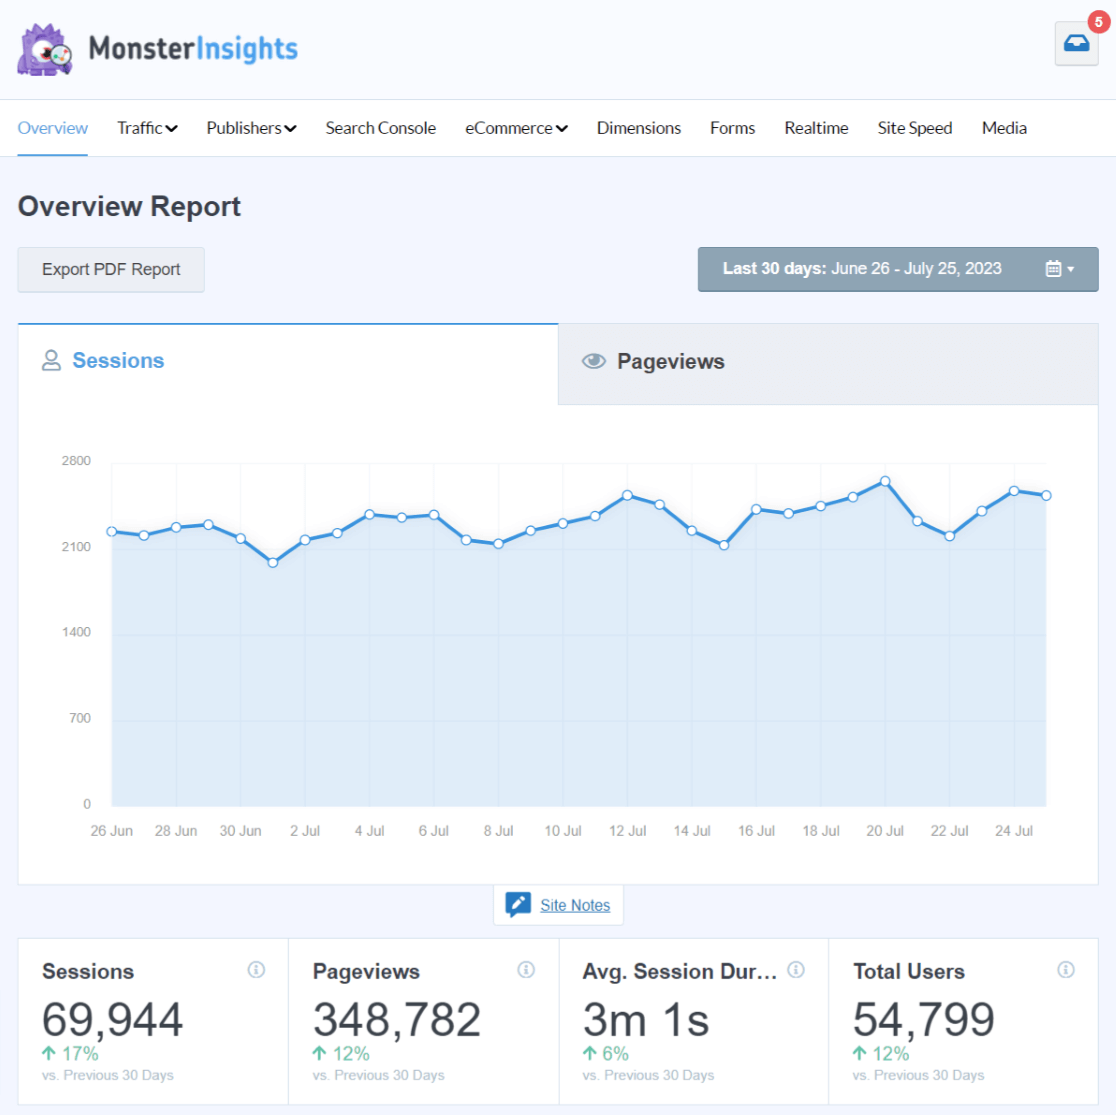
If you use UTM tracking tags, you’ll also be able to see how your email traffic is doing:
MonsterInsights even includes a URL builder tool that you can use to easily create the URLs for your emails:
Get started with MonsterInsights now!
So, now you know why I picked Constant Contact and how to get started with using it. Give it a try and see if it’s the right email marketing platform for you and your business.
If you liked this tutorial, you might also want to check out:
How to Build an Email List: 16 Highly Effective Ways
Effective Email Marketing: 15 Best Tips for Campaign Success
9 Email Marketing Metrics and KPIs to Watch
Finally, don’t forget to follow us on YouTube for more helpful reviews, tutorials, and Google Analytics tips.
Thanks for all the clearly explained information!
Muito bacana pensar em publi arena um artigo para iniciantes, adorei!