Do you want to learn how to add a WordPress Instagram feed to your website?
Instagram is an incredibly popular social media platform and marketing tool. By displaying your feed on your WordPress site, you can build social proof, increase engagement, build your social following, save time, and make more sales!
In this article, we’ll show you step-by-step how to add an Instagram feed to WordPress the easy way.
Why Create a WordPress Instagram Feed?
With a WordPress Instagram feed, the images you upload to Instagram automatically appear on your website, which is a really convenient way to showcase fresh content and encourage visitor engagement, without spending loads of time on site updates.
Here are some of the key benefits of connecting your Insta feed with WordPress to display photos and other media:
- Allows site visitors to see your newest posts and encourages them to return for the latest updates.
- Adds dynamic content to your site to keep it fresh and engaging.
- Lets you display product reviews, relevant hashtag feeds, and video testimonials to build social proof.
- Promotes your Instagram profile to expand your audience, grow your brand, and get more Instagram followers.
- Can improve your SEO and increase rankings by providing more relevant content for Google to index.
Those are some pretty awesome benefits for your business! Ready to find out how to embed your Instagram feed on WordPress easily? Let’s get started.
The Best Way to Add a WordPress Instagram Feed
To display an Instagram feed on your website, we’ll be using the best social media and Instagram feed plugin available, recommended by over 1 million users.
Smash Balloon Instagram Feed Pro lets you effortlessly add an Instagram photo feed to your WordPress site and display captivating content in an instant. Its user-friendly, guided flow makes it simple and fast to integrate an Instagram feed into WordPress and create an entirely customizable feed.
Plus, it automatically adopts your site’s design, ensuring a consistent visual experience, and has optimized performance for ultra-fast loading times.
The social media plugin easily connects with your Instagram API without requiring embed codes and works seamlessly with the best drag-and-drop page builders.
With tons of awesome features, no technical skills required, and CSS support for advanced users, it’s the best WordPress Instagram plugin for beginners and experts alike.
Instagram Feed Pro’s features include support for multiple Instagram accounts, hashtag feeds, Instagram stories, reels, videos, mentions, shoppable Instagram images, lightboxes, total design customizations, many layout options, and much more.
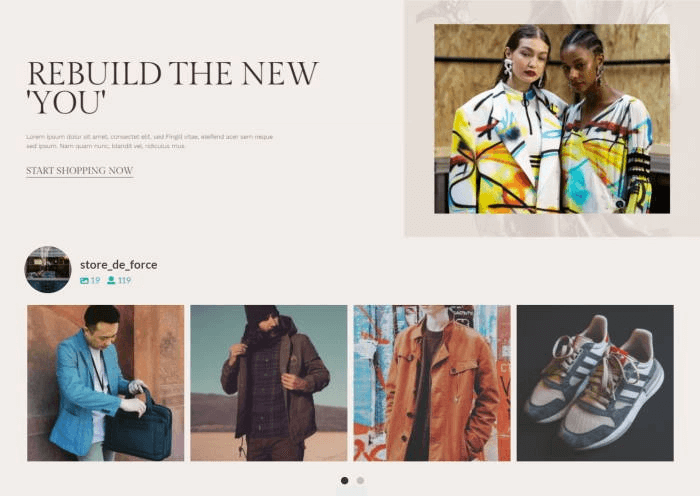
Using Smash Balloon, you can create and customize fully personalized feeds for your site within minutes, like the Instagram shoppable feed for eCommerce above.
Get started with Smash Balloon Instagram Feed Pro now!
Ready to create your own unique Instagram feed on WordPress? Let’s dive into the step-by-step instructions.
How to Add an Instagram Feed to WordPress
- Step 1: Install Smash Balloon Instagram Feed Pro
- Step 2: Create a New Instagram Feed
- Step 3: Connect Your Instagram Account to WordPress
- Step 4: Customize Your Feed’s Design
- Step 5: Embed Your Instagram Feed in WordPress
Step 1: Install Smash Balloon Instagram Feed Pro
First, you’ll need to install and activate the plugin. For detailed instructions, you can check out this tutorial on how to install a WordPress plugin.
Note: In our tutorial, we’ll be using the premium version of Smash Balloon as it provides full customization options with more features and functionality. If you’re just getting started or tight on budget, you can try it out with the free version, Smash Balloon Social Photo Feed.
Once you’ve installed and activated the plugin, you’ll need to activate your license key. Go to Instagram Feed » Settings from your WordPress admin.
Here, paste your license key (found in your purchase confirmation email or in your Smash Balloon account), and press Activate. Then, click Save Changes in the top right.

You’re ready to create your first WordPress Instagram feed.
Step 2: Create a New Instagram Feed
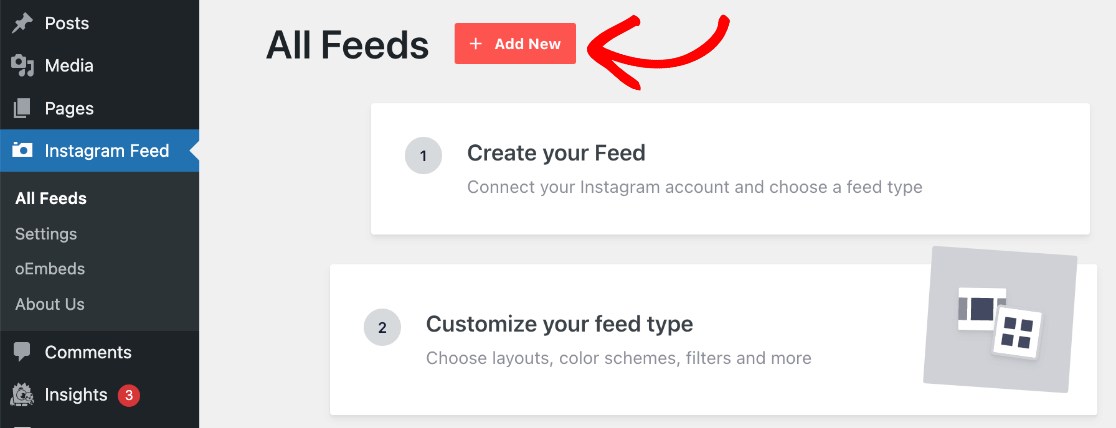
To set up a new Instagram feed on WordPress, head to Instagram Feed » All Feeds. Press the button at the top, + Add New.
Next, Select Feed Type, and choose from the first 3 options:
- User Timeline – Display the Instagram photos and videos from your profile.
- Public Hashtag – Show an Instagram post with your chosen hashtags.
- Tagged Posts – Display posts that your Insta account is tagged in.
Note: Social Wall is used to combine feeds from Smash Balloon’s multiple social network plugins (Twitter, Facebook, YouTube, and Reviews) to create a social wall WordPress page on your site.
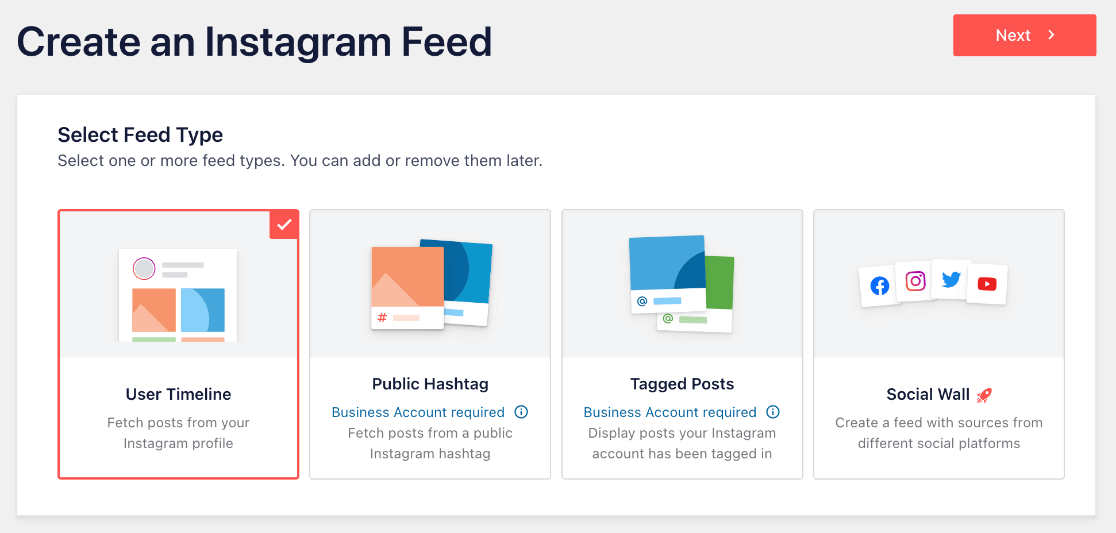
If you’d like to use Public Hashtag or Tagged Posts, you’ll need an Instagram business account. Using a business account also gives you access to advanced features like analytics, contact buttons, and live Instagram stories.
Check out Smash Balloon’s tutorial for converting a personal Instagram to a business account. Or, you can select User Timeline to use with any account, which is what we’ll be using.
After selecting your feed type, press the Next button.
Regardless of your chosen type, you’ll need to connect your new feed to your Instagram account in the next step.
Step 3: Connect Your Instagram Account to WordPress
On the next screen, click the blue button + Add Source.
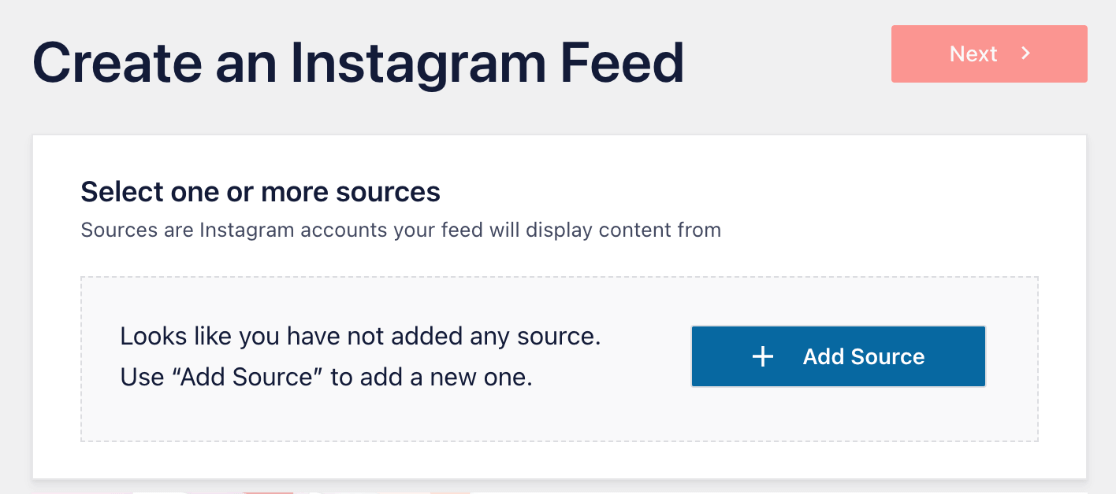
Now, you’ll be taken to your Smash Balloon account. Choose the type of Instagram account you’re connecting.
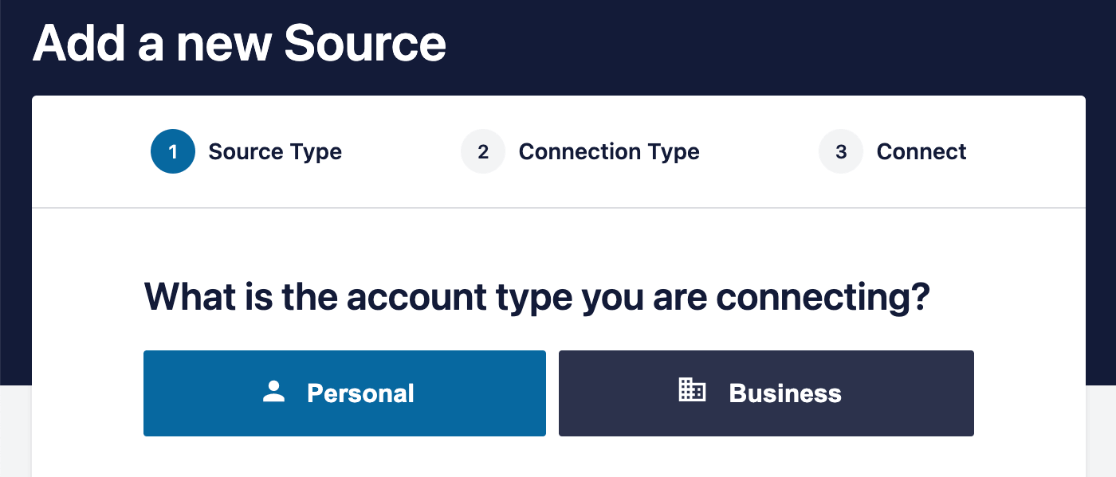
Press the button to Connect with Instagram.

Now, you’ll be redirected to Instagram to give Smash Balloon access to your feed. Make sure both permissions are checked blue and press Allow.
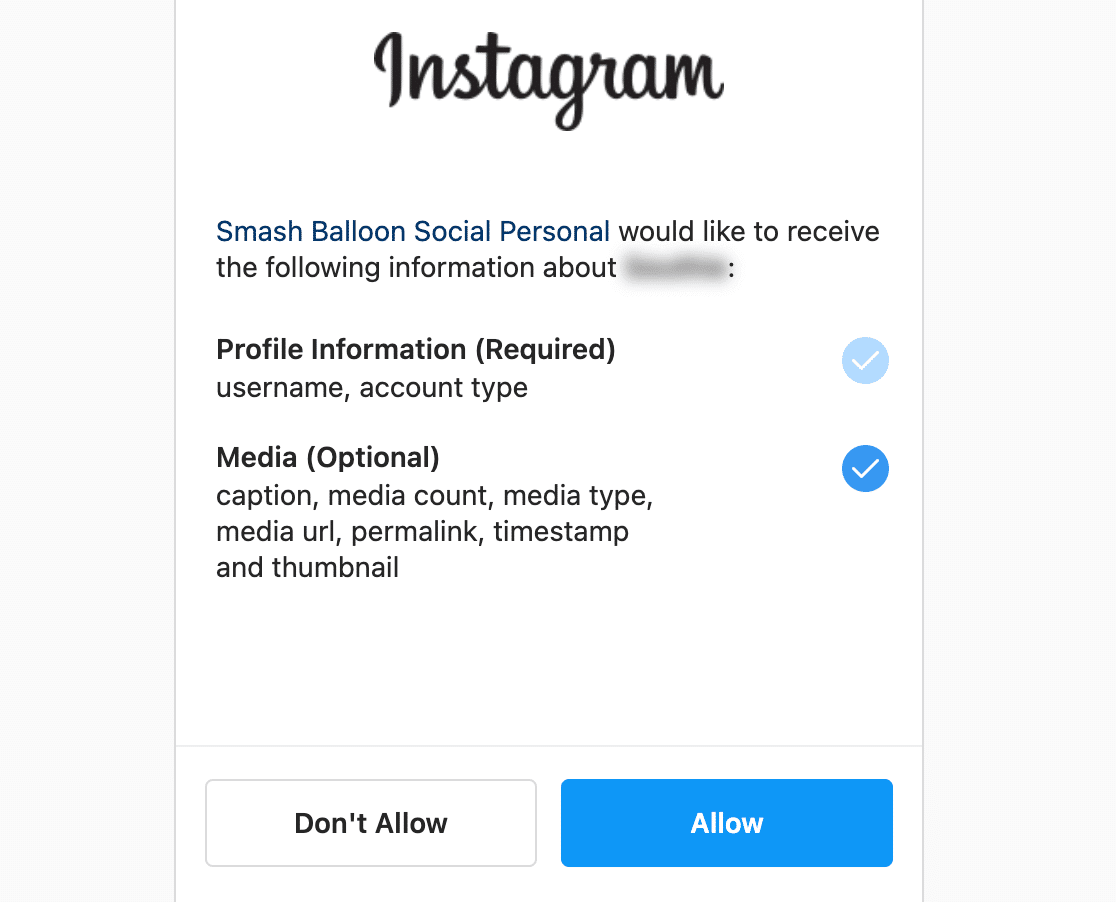
From here, you’ll be redirected back to your WordPress website. Click to select your new Instagram feed source, and press Next in the top right.
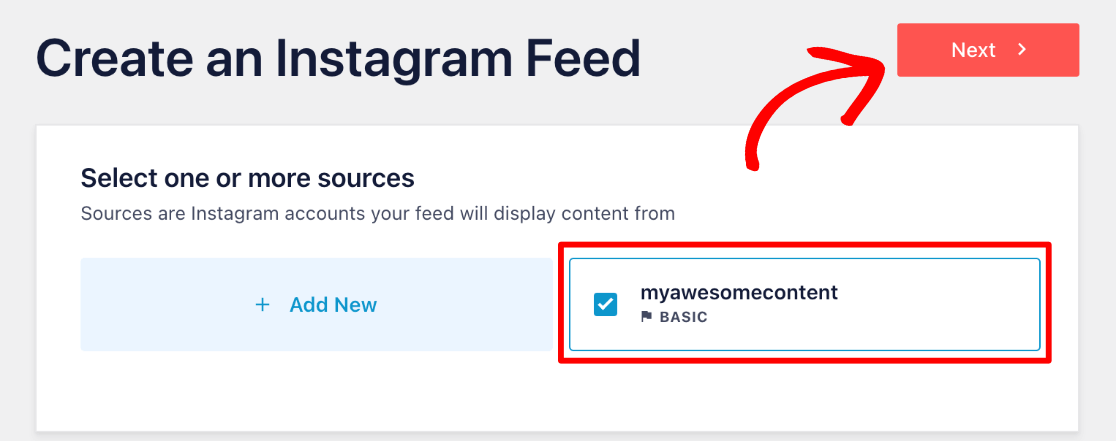
Congrats, you’ve learned how to connect your Instagram feed to WordPress! Now it’s on to the fun part, where you’ll get to design your feed and customize it to match your brand.
Step 4: Customize Your Feed’s Design
First, you’ll need to select a template for your WordPress Instagram feed (don’t worry, you can change it in the editor later). We’re going to use Default. Press the Next button.
Tip: If you’re using a personal account, you may see a popup to add your profile photo and bio. You can add them later by navigating to Instagram Feed » Settings and using the settings icon next to your feed source, or you can use the editor to set them for each feed.
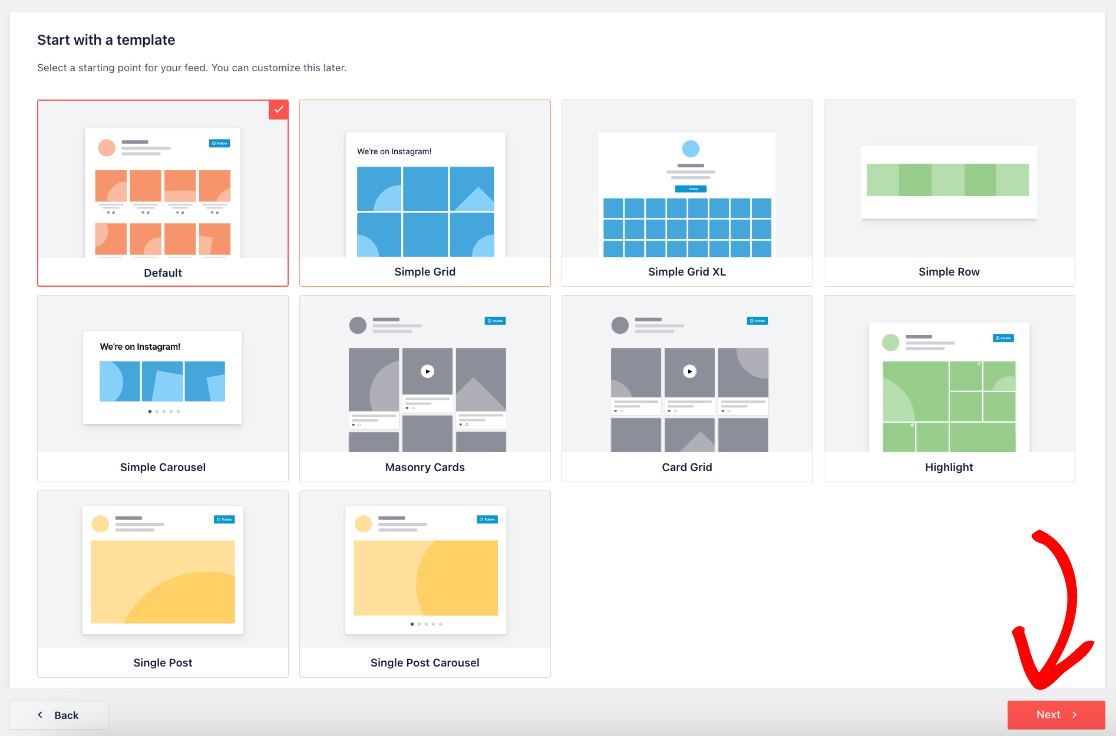
Next, you’ll arrive at the live editor where you can customize your WordPress Instagram feed to look exactly the way you want.
In the left sidebar, you’ll find all the options you can change, such as layout, color scheme, header design, lightbox, post style, load more and follow button, and much more.
Note: Remember, we’re using the Pro version. If you’re using the free plugin, you won’t have all the same customization options and features available, but you can still work with the options you do have, or head to Smash Balloon’s pricing page to upgrade.
The live preview updates as you make changes, which is really convenient for playing around with different layouts and options before you settle on your final Instagram feed design.
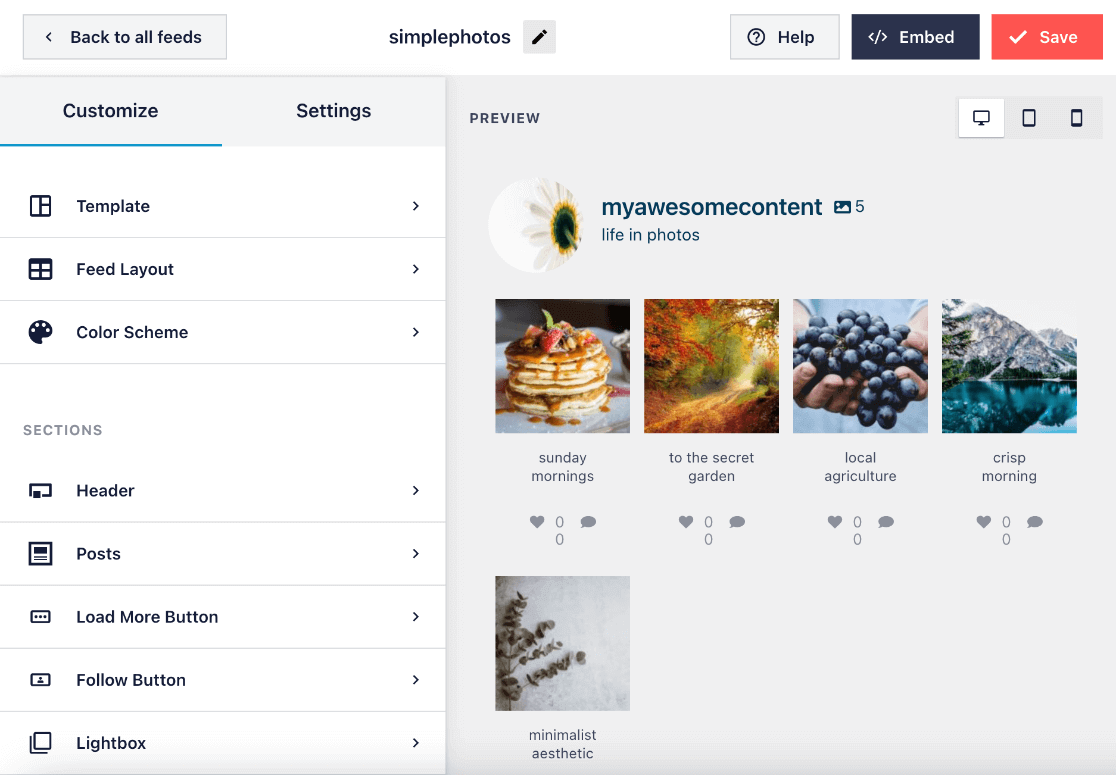
There are lots of different customizations, and most of them are self-explanatory. We suggest you continue to play around with the different options until you’re happy with how your Instagram feed looks.
That said, we’ll share some tips and common changes you may want to make.
Tips for Customizing Your Instagram Feed
For more layout options, click Feed Layout. You can change how your posts are arranged with a Carousel, Masonry, Highlight, or Grid layout. Then, you can further customize the layout with height and padding to change the spacing between your media.
With the carousel layout, you can also customize the number of rows, loop type, interval time, pagination, navigation arrows, and autoplay.
Similarly, a highlight layout lets you pick which posts are highlighted by creating a post pattern and using offset, or you can choose to highlight by post ID or hashtag.
If you’d like to see how your feed looks on different device sizes, just click the device icons in the top right of the live editor.
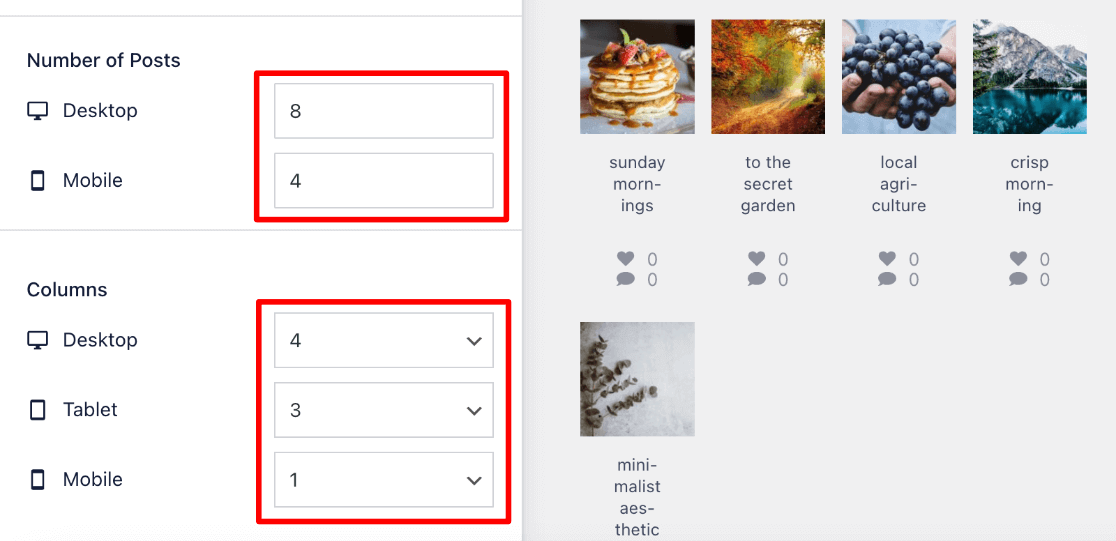
Smash Balloon will display the same number of Instagram posts on mobile and desktop by default. It may be a good idea to change this since smaller devices have smaller screens and less processing power. Under Feed Layout, you can change the fields under Number of Posts.
Right below this, you can change the default number of Columns to display for each device type. This can also be helpful if you want to create smaller thumbnails for a more lightbox-focused design.
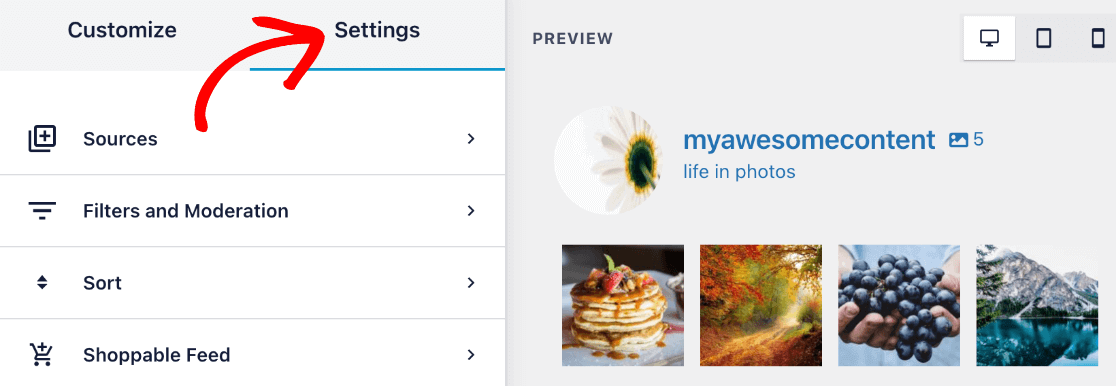
You can click the Settings tab from the sidebar to set more preferences for your Instagram feed, such as enabling a Shoppable Feed, changing the Sort order of your posts, adding Filters to control which posts appear on your WordPress website, and caching your feed.
When you’re finished customizing, click the Save button in the top right corner.
Step 5: Embed Your Instagram Feed in WordPress
You made it to the last step! Now it’s time to learn how to embed your Instagram feed on your WordPress website.
After saving your design, click the Embed button.

You’ll have 3 options for how you’d like to embed your Instagram feed in your website. We’ll go over each one below, but make a note of the number next to feed= in your shortcode (it’s 1 in our case).
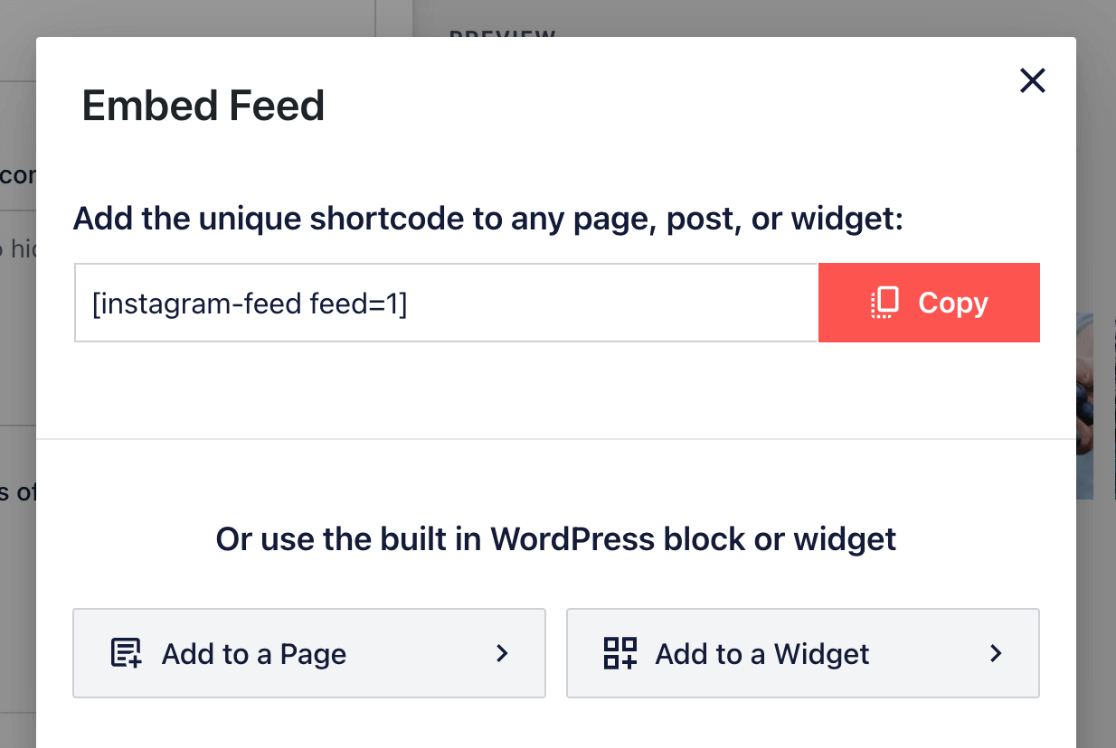
1. Use Shortcode to Embed
If you use the shortcode, you can simply press the Copy button and paste your Instagram feed shortcode into any page or post using a WordPress shortcode block.
You can always find the shortcodes for your different feeds by going to Instagram Feed » All Feeds. Here, you’ll see your shortcodes next to each feed.
2. Add Your Feed to a Page
If you choose Add to a Page, you’ll see a list of your pages, and you can select the one you’d like to embed your feed into. It’ll automatically take you to the WordPress editor for that page. You can also use this option anytime you’re editing a post or page.
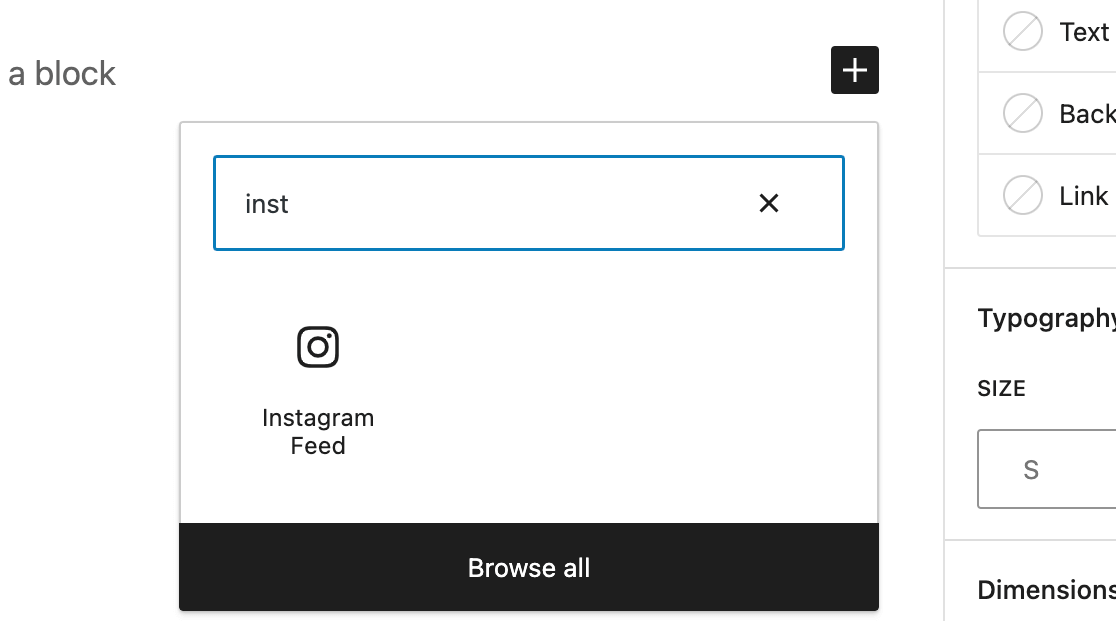
While in the WordPress editor, click the + icon to add a new block. Start typing Instagram Feed, and you’ll see the block option appear.
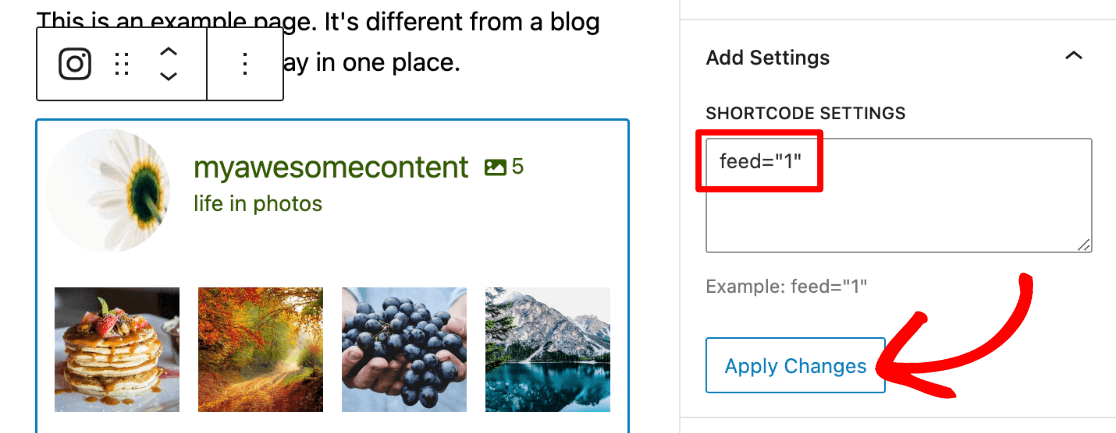
The block will use one of your feeds by default, if you have multiple feeds you’ll want to choose which one is displayed. Under Shortcode Settings in the sidebar, change feed=” ” to the correct number. Then, press Apply Changes.
3. Add an Instagram Widget
You can also add your Instagram content as a feed widget, which is a great option if you want to easily showcase a feed on all your pages, like in a sidebar or footer.
If you click Add to a Widget from the embed options, you’ll be taken to the widget area for your site. (You can also find it by going Appearance » Widgets).
Here, just click the blue + icon at the top of the page to add a new widget, and start typing Instagram Feed in the left sidebar. When you see it, you can drag it to the widget location of your choice.
Note: Your WordPress theme must support widget areas to use this option, but many themes support common widget locations.
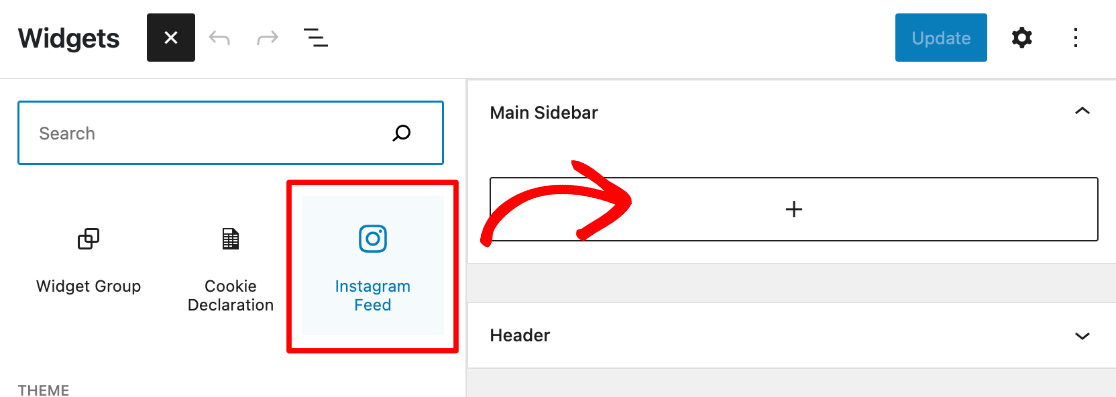
If it’s not displaying the single feed you want, you can change the feed= number under Shortcode Settings in the sidebar, as we did in the page editor during the previous embed option.
Press Update in the top right to make your feed widget live.
That’s it! You successfully learned how to create a WordPress Instagram feed!
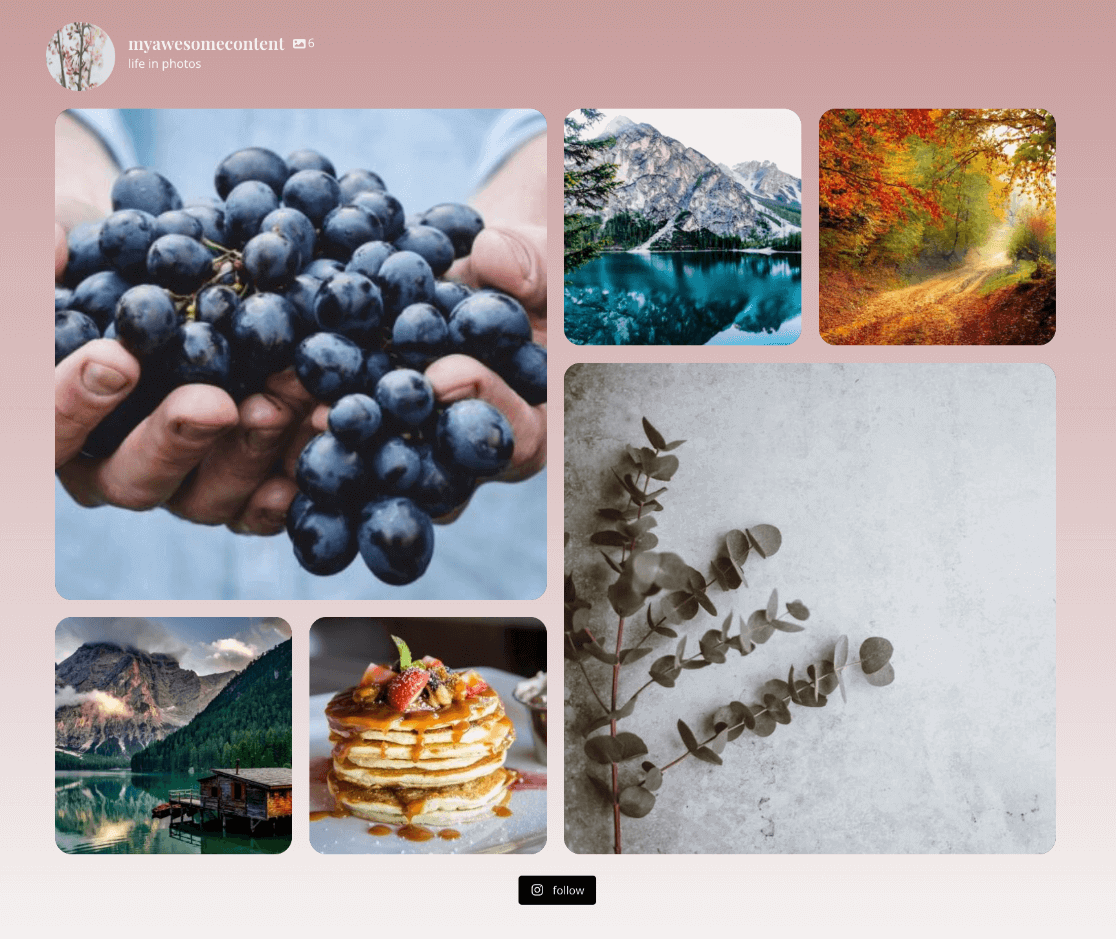
Check out the final Instagram photo feed we made with Smash Balloon.
Now that you’ve set up an awesome Instagram feed on your WordPress site, use MonsterInsights to track the traffic and conversions from your new feed page!
If you enjoyed this article, you’ll definitely want to check out How to Set up Google Analytics Social Media Tracking.
Not using MonsterInsights yet? What are you waiting for?
Don’t forget to follow us on Twitter, Facebook, and YouTube for the best WordPress tutorials and Google Analytics updates.


I used SMash Balloon for over 2 years on my site and it was ALWAYS BROKEN – I finally got fed up and removed it.
Hi Sandi – I spoke with the Smash Balloon team and they are sorry that you had such a poor experience. If you ever decided to give any of their products another chance the support team would be excited to help make sure everything goes smoothly.