Do you want to create an AJAX form on your WordPress site?
An AJAX-enabled form allows your site visitors to submit a form without refresh and offers a way better user experience. Also, it helps get more leads by showing instant follow-up actions.
In this article, we’ll show you to easily create a WordPress AJAX form that submits without refresh (step by step).
What Is AJAX? Why Enable AJAX in WordPress Forms?
AJAX stands for Asynchronous Javascript and XML. It’s a group of technologies which allow web applications to communicate with the server and deliver the requested data without refresh.
In AJAX, the loading scripts work ‘asynchronously’ which means they operate independent of other processes in the background. This is why web applications can retrieve and serve data without reloading the entire web page.
If you want to see a real example of AJAX in WordPress, then you can try adding a new category from your WordPress post editor page.
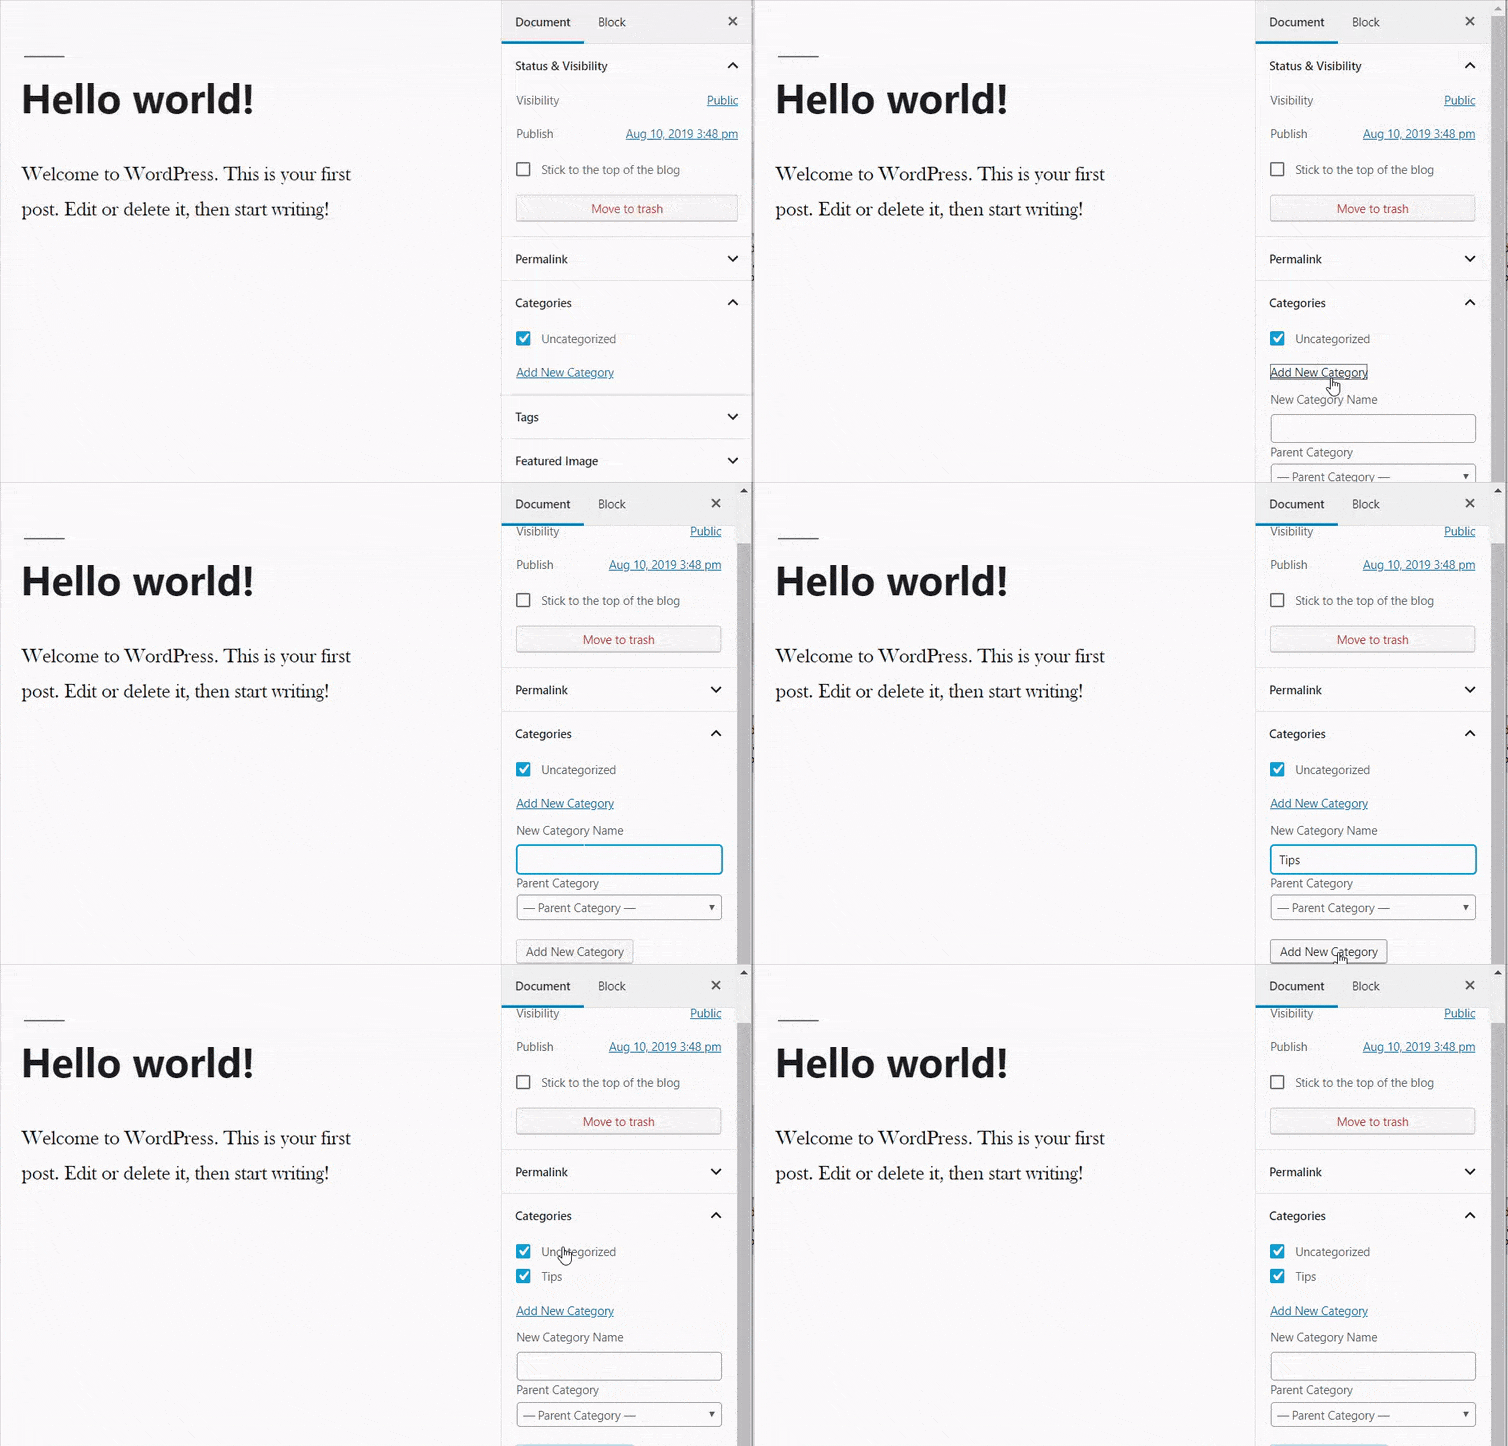
As you can see in the GIF, WordPress allows you to add categories without reloading the page.
Implementing the AJAX technology in your WordPress contact forms can be really helpful in many ways. Here’re just a few of them:
- Better user experience – AJAX forms offer better user experience by letting users submit the form and see the confirmation message instantly on the same page.
- Faster loading speed – AJAX loading reduces server hits and improves your website speed.
- Get more leads – Helps to get more leads by showing instant follow up actions in the modals and popups containing your form.
With that said, let’s take a look at how to create an AJAX form in WordPress which lets you submit without page refresh.
Creating a WordPress AJAX Form – Step by Step
The process of creating an AJAX form may differ according to the WordPress form plugin you’re using on your website.
Some of the popular plugins like WPForms and Formidable Forms have a built-in option to enable AJAX submissions while other plugins miss out this feature.
For this tutorial, we’ve chosen WPForms. It’s the most user-friendly WordPress form plugin available in the market. It allows you to easily create a contact form, order form, survey, and other types of forms and enable AJAX submissions.
Now let’s take a look at how to build a WordPress AJAX form with WPForms step by step.
Step 1: Create a New Form
The first thing you need to do is install and activate WPForms plugin on your website. For more details, see this beginner’s guide on how to install a WordPress plugin.
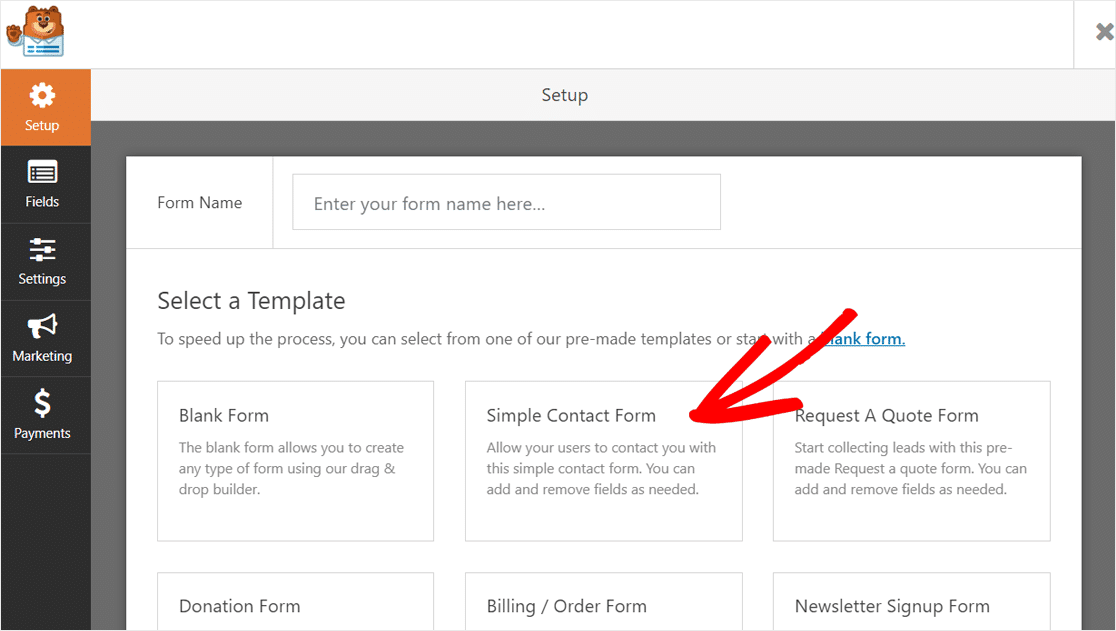
Upon activation, you’ll need to visit WPForms » Add New to create a new form. After that, WordPress will open WPForms form setup page with form templates to get started. We’re going to start with the Simple Contact Form template.
Next, it’ll open the WPForms form builder.
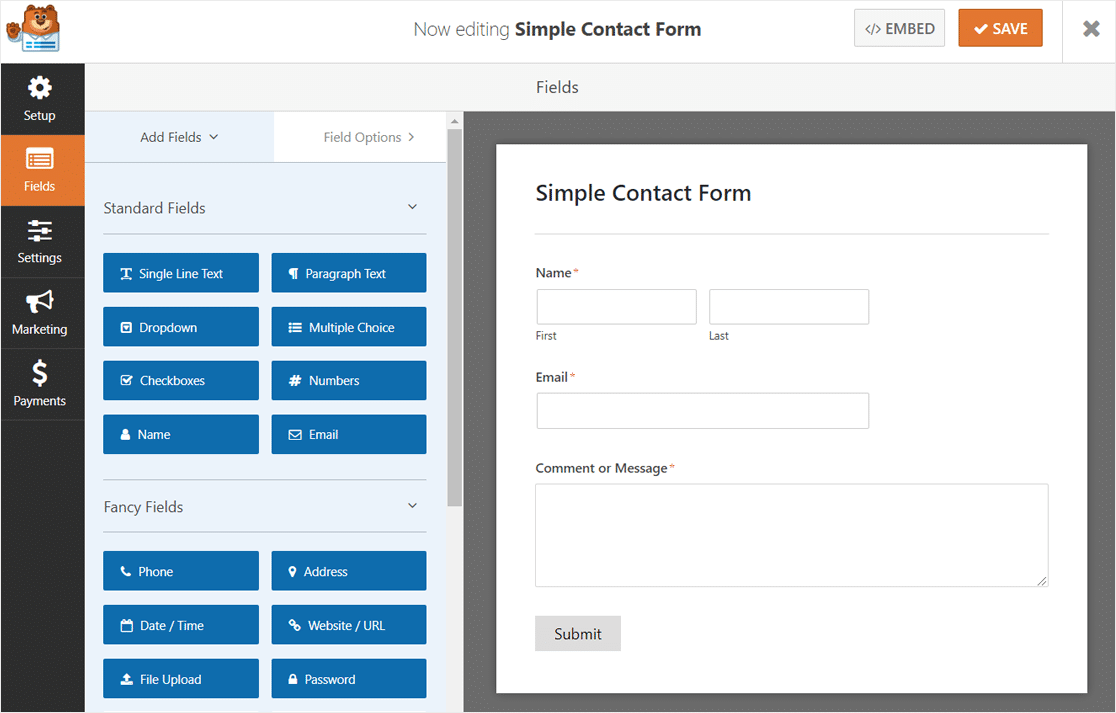
Now you can easily customize your form by adding new fields, editing field options, etc.
For example, we’ll add a File Upload field to the form. Locate the File Upload field under the Fancy Fields on the left panel, then drag and drop it in the form builder on the right.
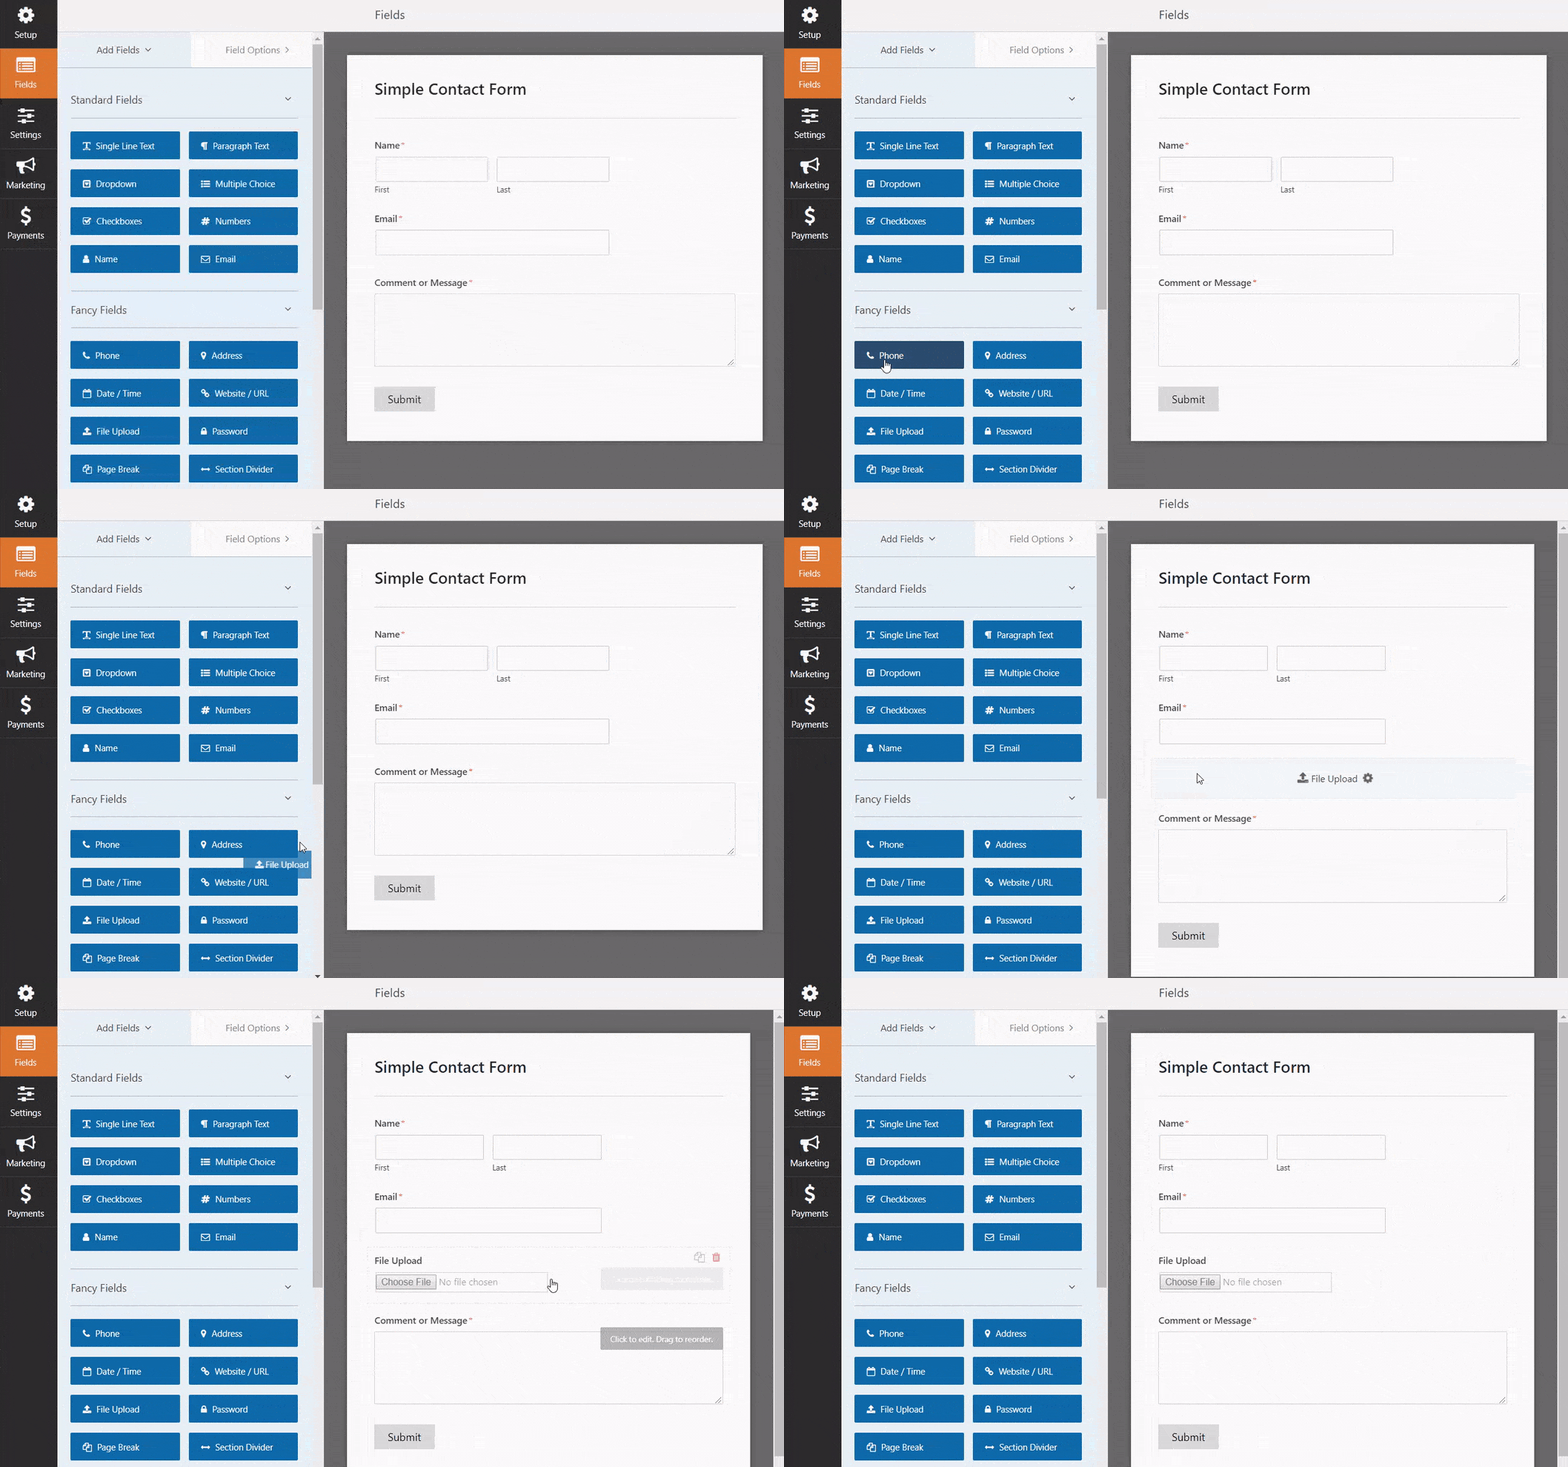
If you need more fields, then you can easily add with the drag and drop as shown above.
Once you’re happy, click on the Save button at the top right corner on your screen. Now your form is almost ready.

Step 2: Enable AJAX Form Submissions
The next step is to enable AJAX form submissions in your WordPress form. Simply, click on the Settings option on the left options panel.
After that, WPForms General Settings page will appear. On this page, locate the Enable AJAX form submission checkbox at the bottom of the right-hand panel, and check the box.
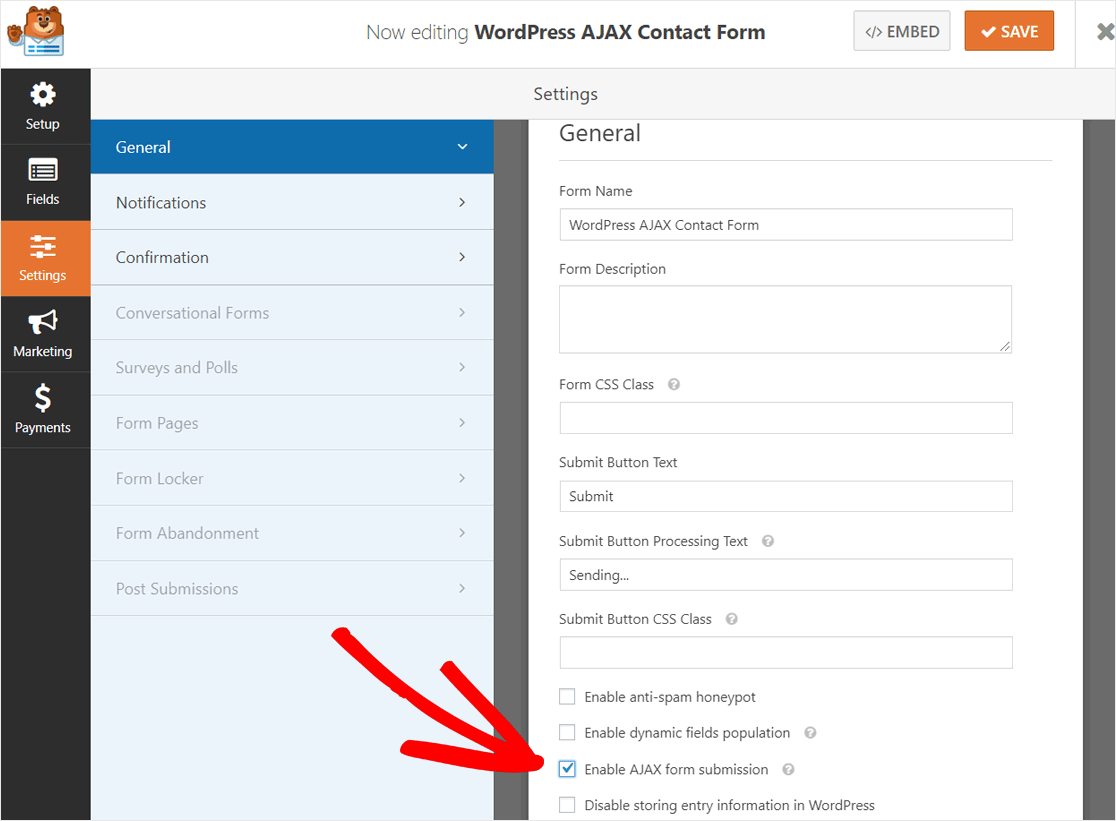
This page also lets you customize your form name, form descriptions, submit button text, enable anti-spam honeypot, Google reCAPTCHA, and more.
Once you review all the options, click on the Save button at the top right corner to save your settings.
Next, you can configure form notifications by clicking on the Notifications option.
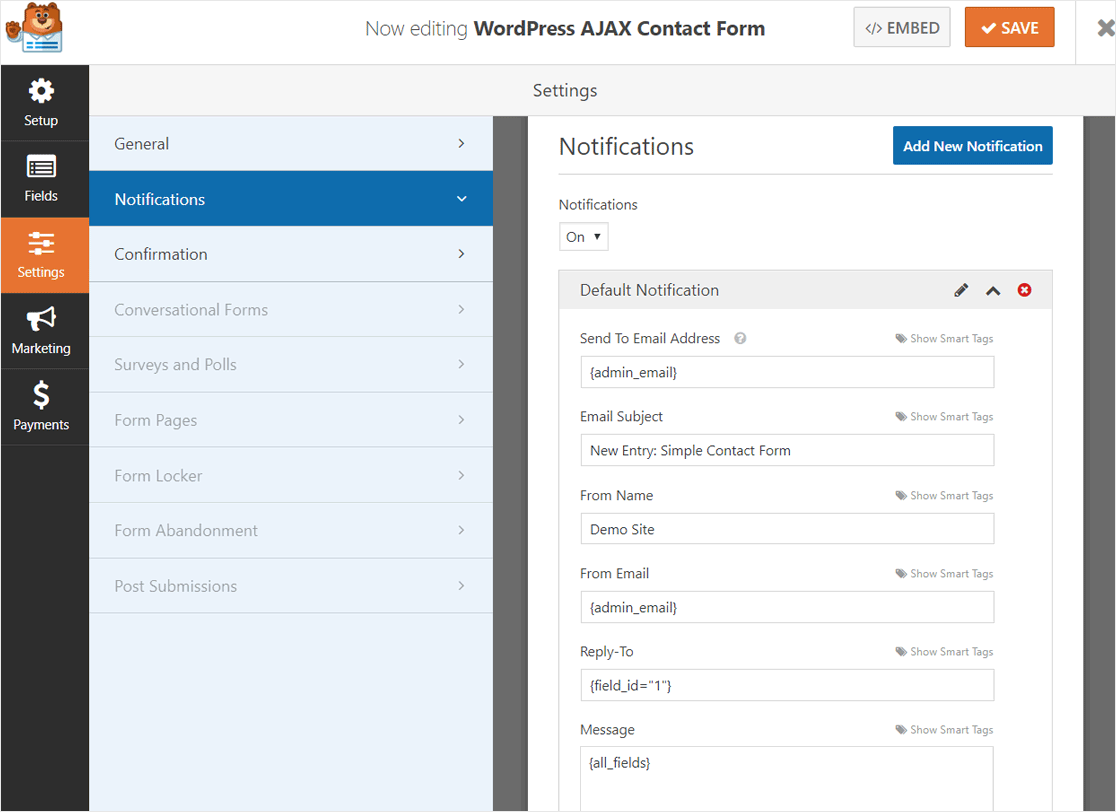
By default, WPForms sends a notification email to the site administrator when a user submits a form.
If you want to send the same notification email to more people in your team, then you can add their email addresses or use smart tags. For step by step guide, check this article on how to create multiple form notifications.
Next, you need to configure confirmations to configure what to show after a user submits your AJAX form. Click on the Confirmation option.
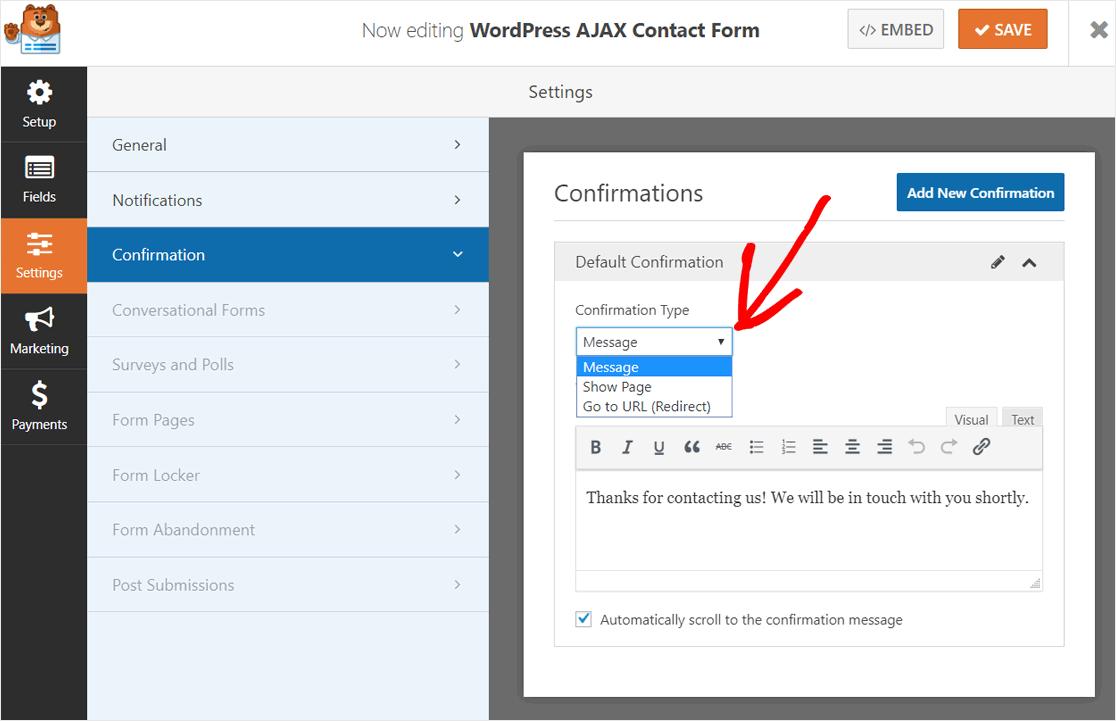
WPForms allows you to use three types of confirmations: message, show page and go to URL (redirect).
For an AJAX form, it’s best to use the default Message option. You can customize your confirmation message to thank users, and lead them to another action.
Once done, click on the Save button at the top right corner.
After that, you can exit the form editor as your form is completely configured. Click on the Close icon next to the Save button.

Step 3: Publish Your AJAX-Enabled WordPress Contact Form
Now that your AJAX-enabled contact form is ready, you can add it to a page, and publish live.
Create a new page or edit an existing one where you want to add the AJAX form. On your page editor, click on the Add New Block icon and then select WPForms block.
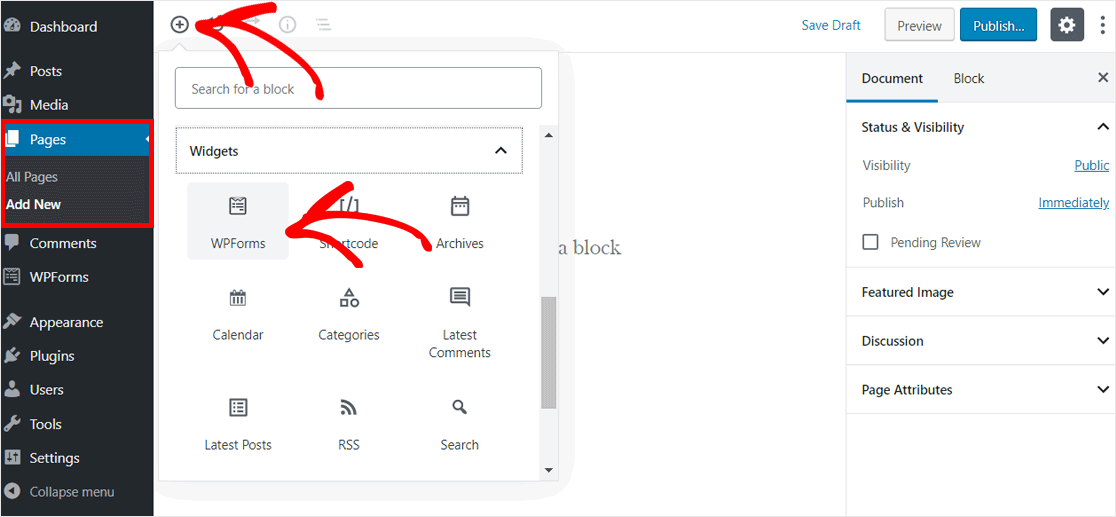
After that, you can see the WPForms block added to your page editor.
Next, you need to select the AJAX form that you created earlier using the dropdown option. Once done, WordPress will automatically load the form.
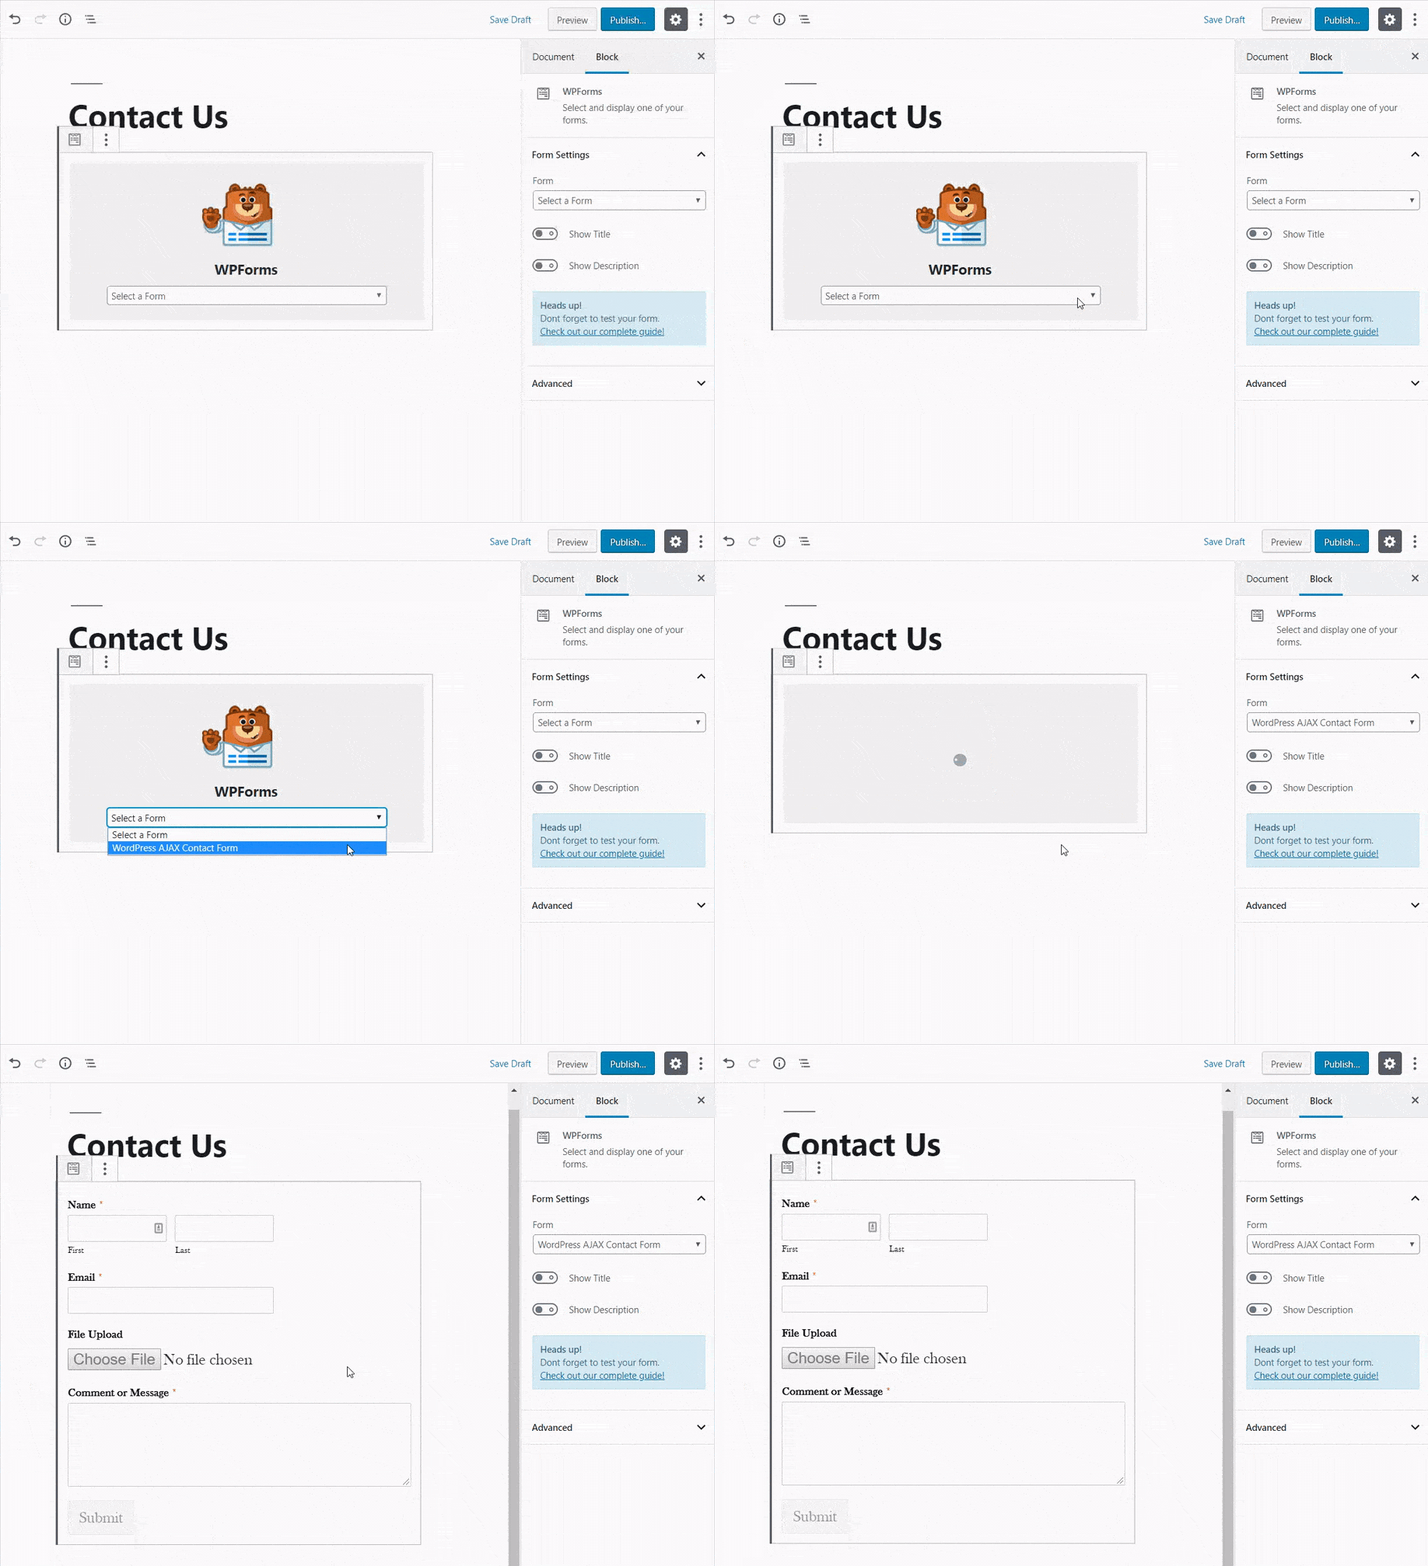
Now you can publish or update your page and preview it to see your AJAX form in action. Here is how our AJAX-enabled WordPress contact form works on our demo website.
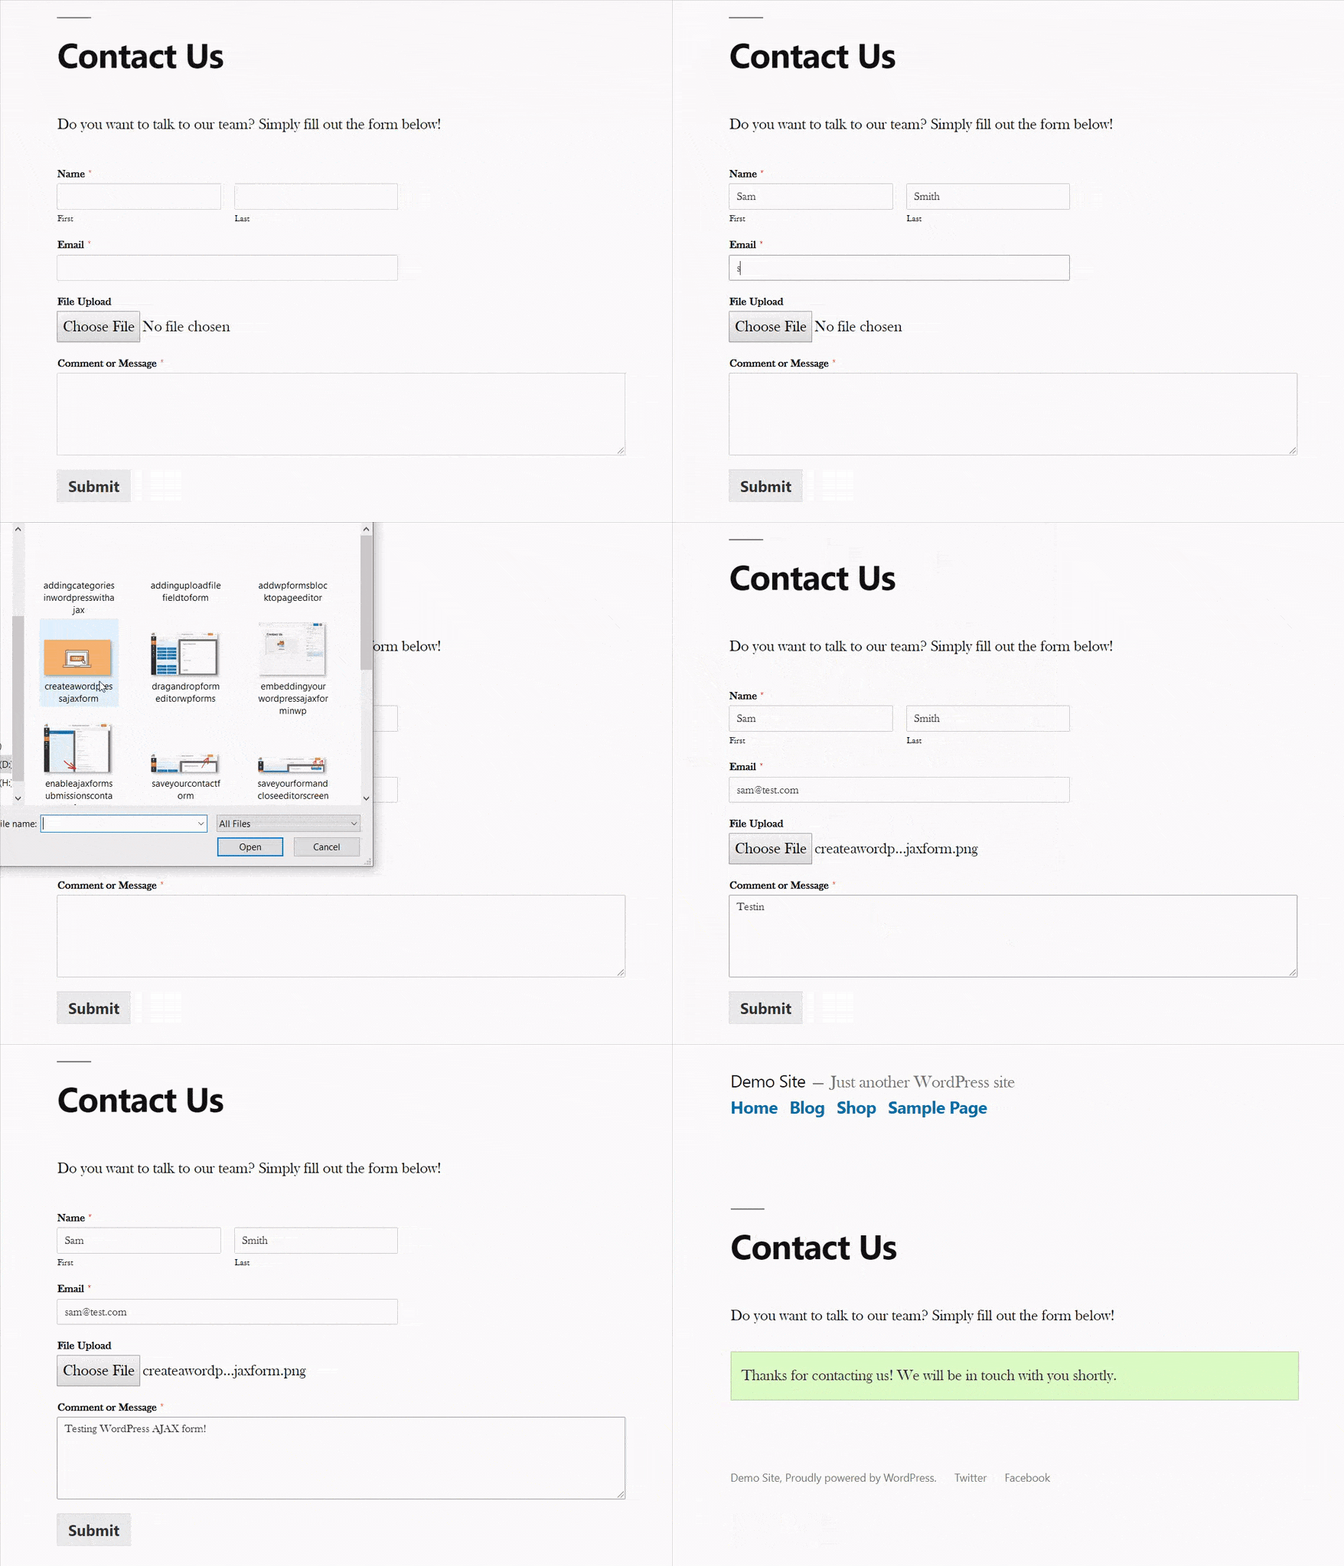
We hope this article helped you to learn how to create a WordPress AJAX form that submits without refresh. You may also want to see our guide on how to create an AMP contact form in WordPress and how to create a file upload form in WordPress.
And don’t forget to follow us on Twitter and Facebook for more helpful WordPress tutorials and Google Analytics tips.
