Adding tracking pixels to your website can be confusing as heck. Where do they go? How do you access that file? You might even have to ask for help from a developer.
If you’re running Meta (Facebook) ads, installing this tracking code is necessary for measuring conversions, building retargeting audiences, and optimizing your ad performance.
Adding a Meta Pixel to your WordPress site doesn’t have to be complicated or require a developer, though! Thankfully, the beauty of WordPress is that there are some fantastic plugins you can use to make the whole process MUCH simpler.
In this article, I’ll walk you through the simplest way to install your Meta Pixel so you can track conversions from your ads right away.
Table of Contents
What is a Meta (Facebook) Pixel?
A Facebook (Meta) Pixel is a tracking code that helps businesses monitor user interactions on their website. It collects data on website visits, conversions, and ad performance, enabling businesses to optimize their Facebook ads. The pixel tracks actions like purchases, sign-ups, and page views to improve ad targeting.
Plus, it can help categorize your visitors into different audiences so that you can use retargeting ads to laser target them.
Meta Pixel Video Walkthrough
How to Create a Meta (Facebook) Pixel
If you haven’t created a Facebook pixel yet, you can do it in just a couple of clicks! Already have a pixel created? Jump to our tutorial on how to add your pixel to WordPress.
Step 1: In Events Manager, Connect Data Sources
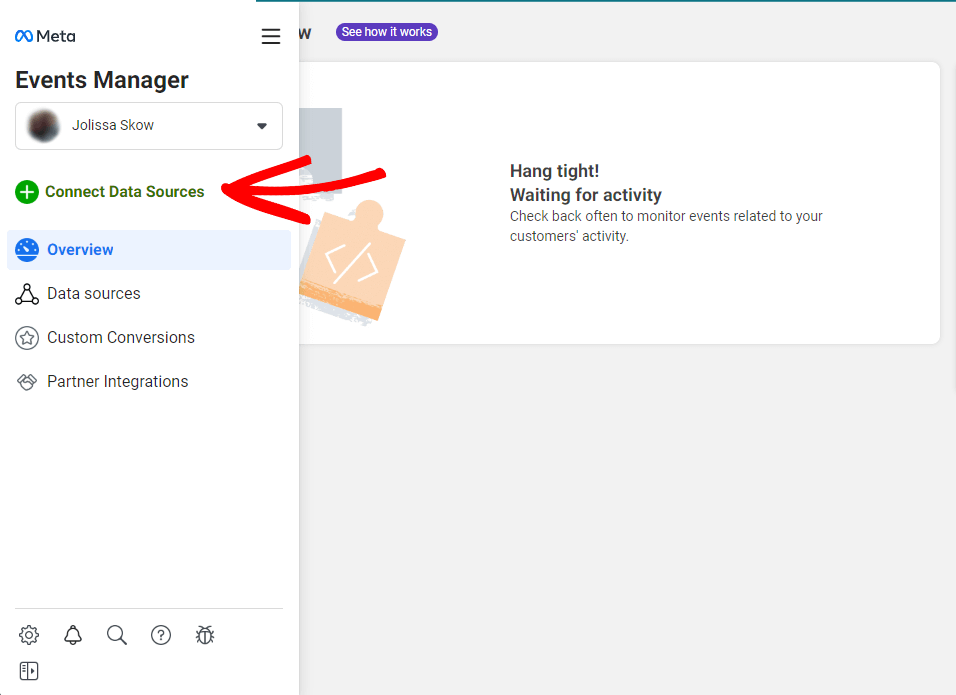
To create a Facebook pixel, head to the Facebook Events Manager and, in the side navigation, choose Connect Data Sources:
Step 2: Create Your Pixel
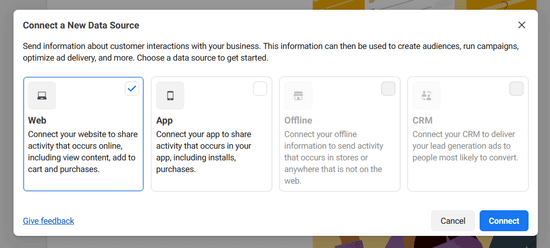
Now, go ahead and click Web, then the blue Connect button:
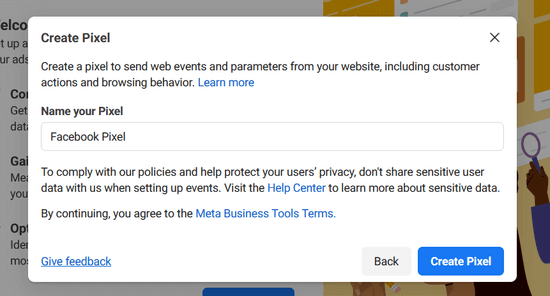
Then, name your pixel whatever you’d like and click the Create Pixel button:
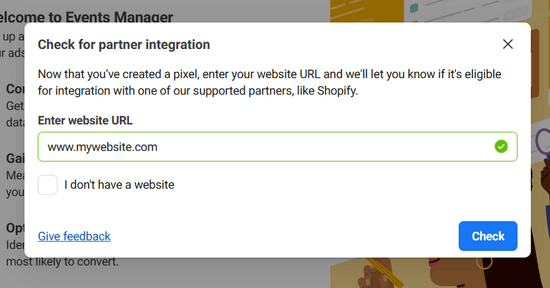
In the next step, you’ll be asked to input your website’s URL. Go ahead and do that and click Check:
Step 3: Choose Install Options
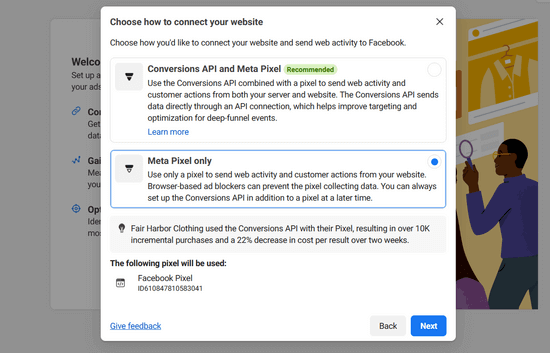
Now, the tool will walk you through install options. We actually won’t need the code when installing with MonsterInsights, but we’ll go through this part anyway.
Choose Meta Pixel only, then click Next:
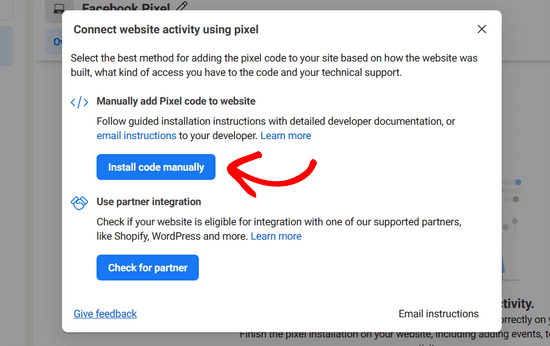
Finally, choose the Install code manually button. This will show you the base code that you’ll need to install if you choose, but when installing with MonsterInsights, we won’t need it.
That’s it, your pixel is created! Let’s install it on your website.
Add a Facebook Pixel to WordPress: Easiest Way
The hands-down easiest way to add your Facebook pixel to WordPress is with MonsterInsights.

MonsterInsights is the best Google Analytics plugin for WordPress, and with its PPC Ad Tracking addon, you can install your Meta (Facebook) Pixel and track conversions from your ads in just a couple clicks.
With the addon, you can track Meta ad conversions on your WooCommerce, Easy Digital Downloads, LifterLMS, MemberPress, MemberMouse, WishList Member, or GiveWP site. Or, use the addon on any other type of website to track page views.
Plus, you’ll get access to tons of other Google Analytics features, such as:
- One-click eCommerce tracking
- Form conversion tracking
- Google and Bing ad conversion tracking
- Author tracking
- Outbound link tracking
- Video play tracking
- And much more
To access the PPC Ad Tracking addon, you’ll need MonsterInsights Pro. Get started now!
For a full walkthrough of how to set up MonsterInsights, check out this guide on How to Add Google Analytics to WordPress the Right Way.
Once you have the plugin set up, you can continue on in this Facebook Pixel installation tutorial.
Step 1: Install the MonsterInsights PPC Tracking Addon
After you install MonsterInsights, the next step is to install the MonsterInsights PPC Tracking addon. To do that, head to Insights » Addons and scroll down to PPC Tracking. Click Install:
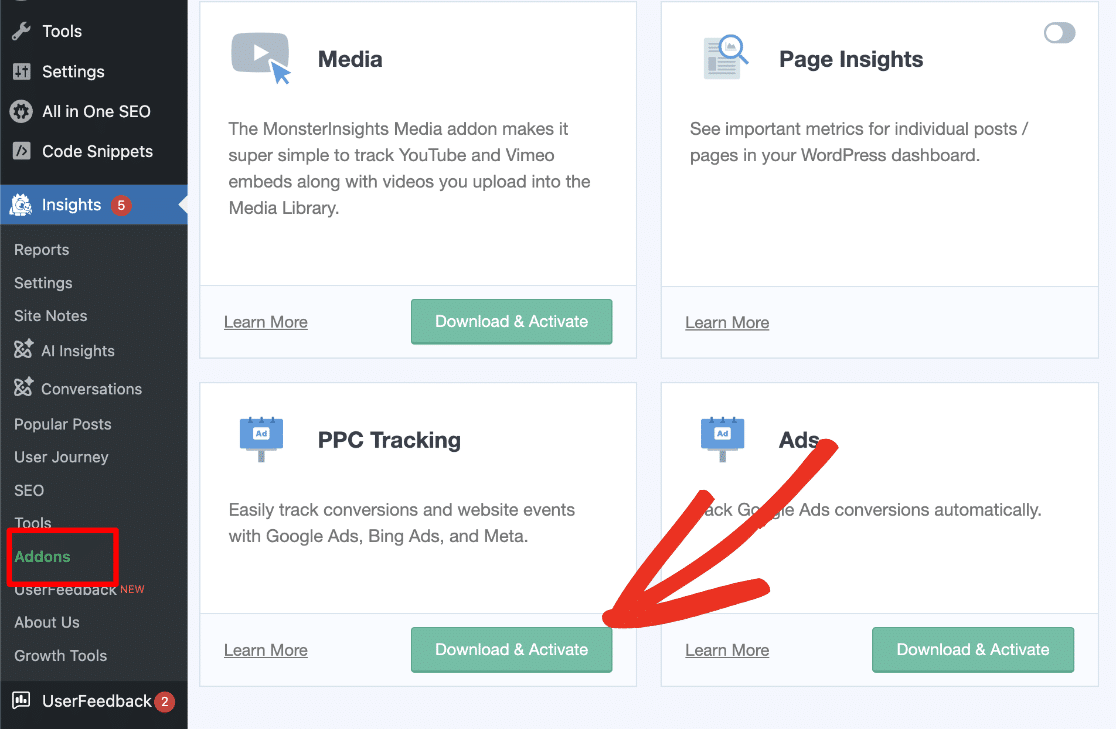
The addon will activate automatically after installation.
Step 2: Copy Your Pixel ID
To add your Facebook pixel to WordPress, all you’ll need is your pixel ID. To find it, head back to the Events Manager and it’ll be on the right-hand side:

Go ahead and copy it. We’ll use it in a moment.
Step 3: Paste Your Facebook Pixel ID in WordPress
To add your Facebook pixel to WordPress, all you have to do is navigate to Insights » Settings » Conversions:

Then, scroll down to the Ads Tracking box and paste your ID into the Pixel ID field:

That’s it! You don’t have to install any other code for your pixel to begin tracking conversions and pageviews.
How to See Facebook Traffic in WordPress
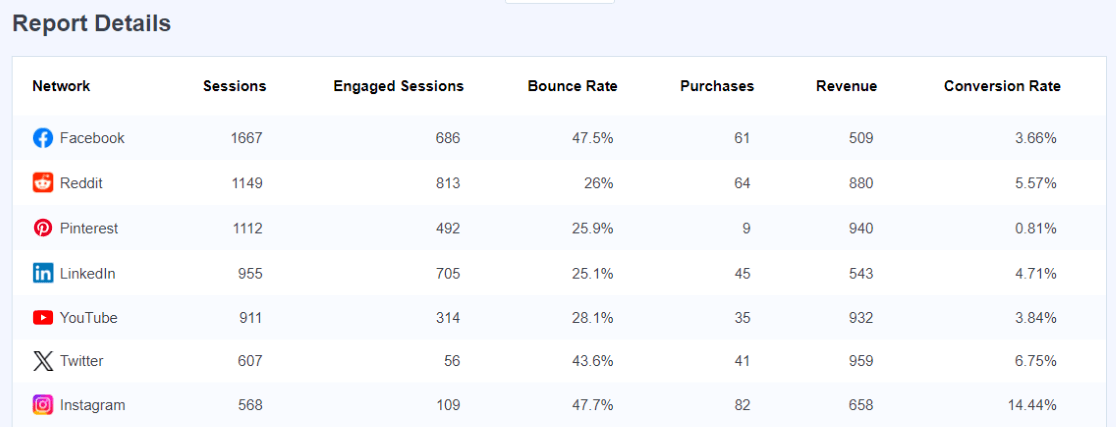
With MonsterInsights, you’ll be able to see your Facebook traffic right inside your WordPress dashboard. See at a glance if your visitors from Facebook are engaged and/or completing conversions on your site.
Just head to Insights » Reports » Traffic » Social media:
For more on connecting Facebook to WordPress, check out How to Connect Google Analytics to Facebook (Easiest Way).
That’s it! Now you know a super easy way to install your Facebook pixel on your WordPress site.
If you liked this article, you’ll probably also want to check out:
How to Connect Google Analytics to Facebook (Easiest Way)
9 Facebook Ad Targeting Tips to Skyrocket Your Conversions
How to Track Meta (Facebook) Ads in Google Analytics Easily
Not using MonsterInsights yet? What are you waiting for?
And don’t forget to follow us on Facebook and YouTube for more helpful reviews, tutorials, and Google Analytics tips.
Meta (Facebook) Pixel + WordPress FAQ
How do I add a Facebook pixel to my WordPress site?
To add a Facebook pixel to your WordPress site, install MonsterInsights Pro. Then, head to Insights » Settings » Conversions and paste your pixel into the Pixel ID box.
How do I manually add a Facebook pixel to my website?
To manually add your pixel, copy and paste the code from Facebook Events Manager into the header.php file of your website, just above the closing </head> tag.
Remember, this file is overwritten any time you update your theme. To easily manage your code snippets without losing them every time you update your theme, try a plugin like WPCode.
How do I add a Facebook page to my WordPress site?
If you want to add your Facebook feed to your WordPress site, grab the Smash Balloon Social Post Feed plugin to add your Facebook page to your WordPress site for free.
Do I need a developer to install a Meta Pixel on WordPress?
No, you don’t need a developer to install a Meta Pixel on WordPress. Using a plugin like MonsterInsights makes the process simple enough for anyone to do, regardless of technical skill level.
How do I know if my Meta Pixel is working correctly?
You can verify your Meta Pixel is working by using the Meta Pixel Helper Chrome extension. After installation, visit your website and the extension will show if your pixel is firing correctly and if any events are being tracked.

Lovely to see you adding this to MonsterInsights Pro and saving me adding yet another snippet… Any idea when this will be live? Not showing on my v8.14.0 installation on WP 6.2 yet.
Hey Tim! Thanks, we’re pretty stoked about it too! It’s out and ready to rock. The trick to getting it to appear is making sure you have the old Ads addon deactivated, and the new one activated instead. In the future, the old Ads addon will be deprecated to avoid the confusion.
Does this use conversions API? If not then the data will not be accurate if a user blocks ads. FB has their own plugin and there are other that use the conversion API. Prefer not to use another plugin for this.
Hi Bruno – We do not use the conversions API at this time but it’s been added as a feature request.
I’d like to second the Conversion API feature request.
Cool, I’ll add your vote, Jules!
Please add another vote for API
I added your vote, David! Thanks for your comment.
Another vote for conversion API!
You got it, Brittney! Added your vote.
We would also like to see the conversion API function. Is there any news on this in the meantime?
Hi Alicia – We just released a new version of MonsterInsights last week that uses the conversion API! Make sure you’ve updated your plugin to MonsterInsights 9.1. Here’s the announcement: https://www.monsterinsights.com/monsterinsights-9-1-new-summary-report-ads-tracking-upgrade/
This –> https://www.monsterinsights.com/wp-content/uploads/2023/03/ppc-ads-tracking-meta-1.png.webp Does not display on our Monster Insights App.
Hi Kevin – Please submit a support request here: https://www.monsterinsights.com/my-account/support/
Is there support for Conversions API yet? this is super critical in 2024. thx!
Hey Byron – Not yet, but it’s a highly requested feature! I’ll add your vote. We’ll keep your email address and you’ll be alerted if we add it.
Is this being worked on for release anytime soon? Does its “highly requested feature” move it to production?
Do not want to add a Facebook plugin just to overcome problem.
Hi Richard,
You’re in luck – I can go ahead and share that we are working getting the Meta Conversion API ready to go for our users. Unfortunately I can’t give you a specific timeline for its release, but it is being worked on now!
Excellent support. On behalf of us all, many thanks for your positive and proactive development work.