Are you trying to set up Google Analytics 4 on your WordPress site but not sure where to start? Or are you worried about making mistakes that could affect your tracking?
Don’t worry, I’ll show you the easiest and most reliable way to add Google Analytics 4 (GA4) to WordPress. Whether you’re completely new to Analytics or already have a GA4 account, this step-by-step guide will walk you through everything you need to know.
In this guide:
What is Google Analytics 4?
Google Analytics 4 (GA4) is the latest version of Google’s web and app analytics platform. It uses event-based tracking instead of session-based tracking, offering deeper insights into user behavior. GA4 includes AI-driven insights, cross-platform tracking, and enhanced privacy features to comply with data regulations.
GA4 has many of the same features and statistics as the previous version of Analytics, plus a few new ones.
Google Analytics 4 is a powerful tool for WordPress users, but it’s not super beginner-friendly. Even intermediate users may find it difficult to learn and find the data you need.
So, while you should definitely use Google Analytics 4 to see how people are using your website, adding a website analytics tool like MonsterInsights will make it much easier to use.
The Best Way to Add GA4 to WordPress
To set up Google Analytics 4 on WordPress, you’ll need to connect it to your site. The absolute easiest way to do that is with the MonsterInsights Google Analytics plugin.
Not only can the plugin connect GA4 analytics to your WordPress website, but it also provides solutions to many of the downsides of setting up and using GA4.
MonsterInsights is the best plugin for connecting Google Analytics 4 to WordPress. It allows you to easily connect your WordPress site with Google Analytics, so you can view all the data that matters most right in your WordPress dashboard.
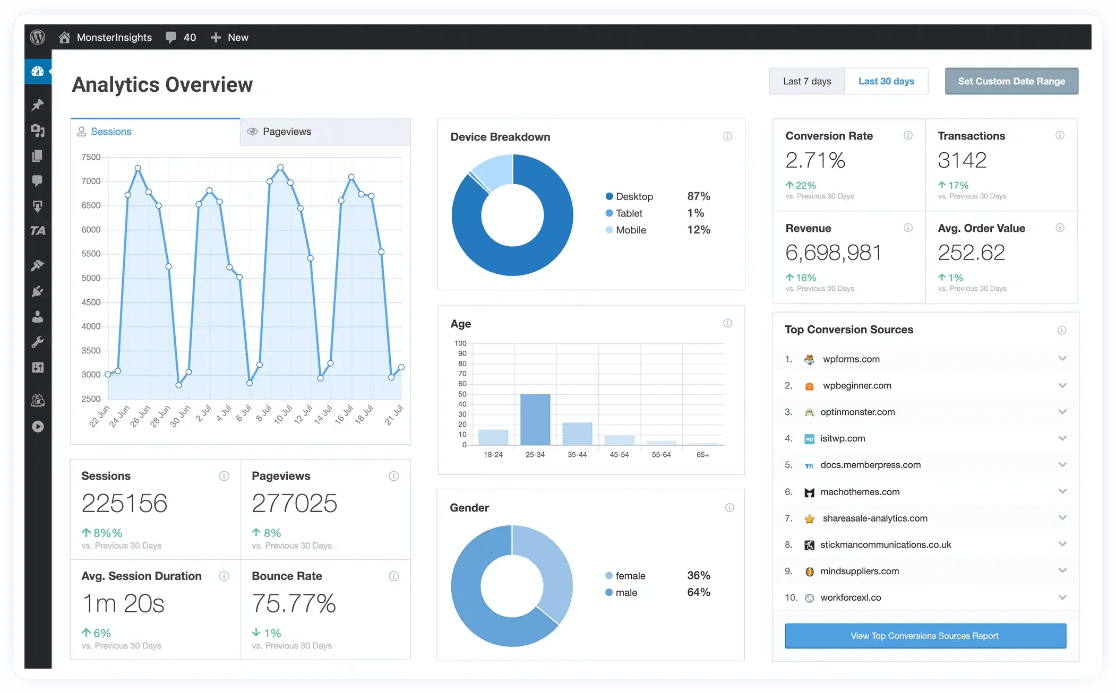
Plus, with the click of a button, you can set up sophisticated tracking features such as event tracking, eCommerce tracking, form tracking, custom dimension tracking, outbound link tracking, and much more.
For more on how MonsterInsights enhances and simplifies how you use Google Analytics 4, check out MonsterInsights vs. Google Analytics: What’s the Real Difference?
How to Add Google Analytics 4 to WordPress: Tutorial
- Create a Google Account
- Sign Up For Google Analytics + Create a Property
- Set up MonsterInsights
- Adjust Settings
Step 1: Sign In to Google
The first thing you’ll need to do is log in or sign up for a Google account.
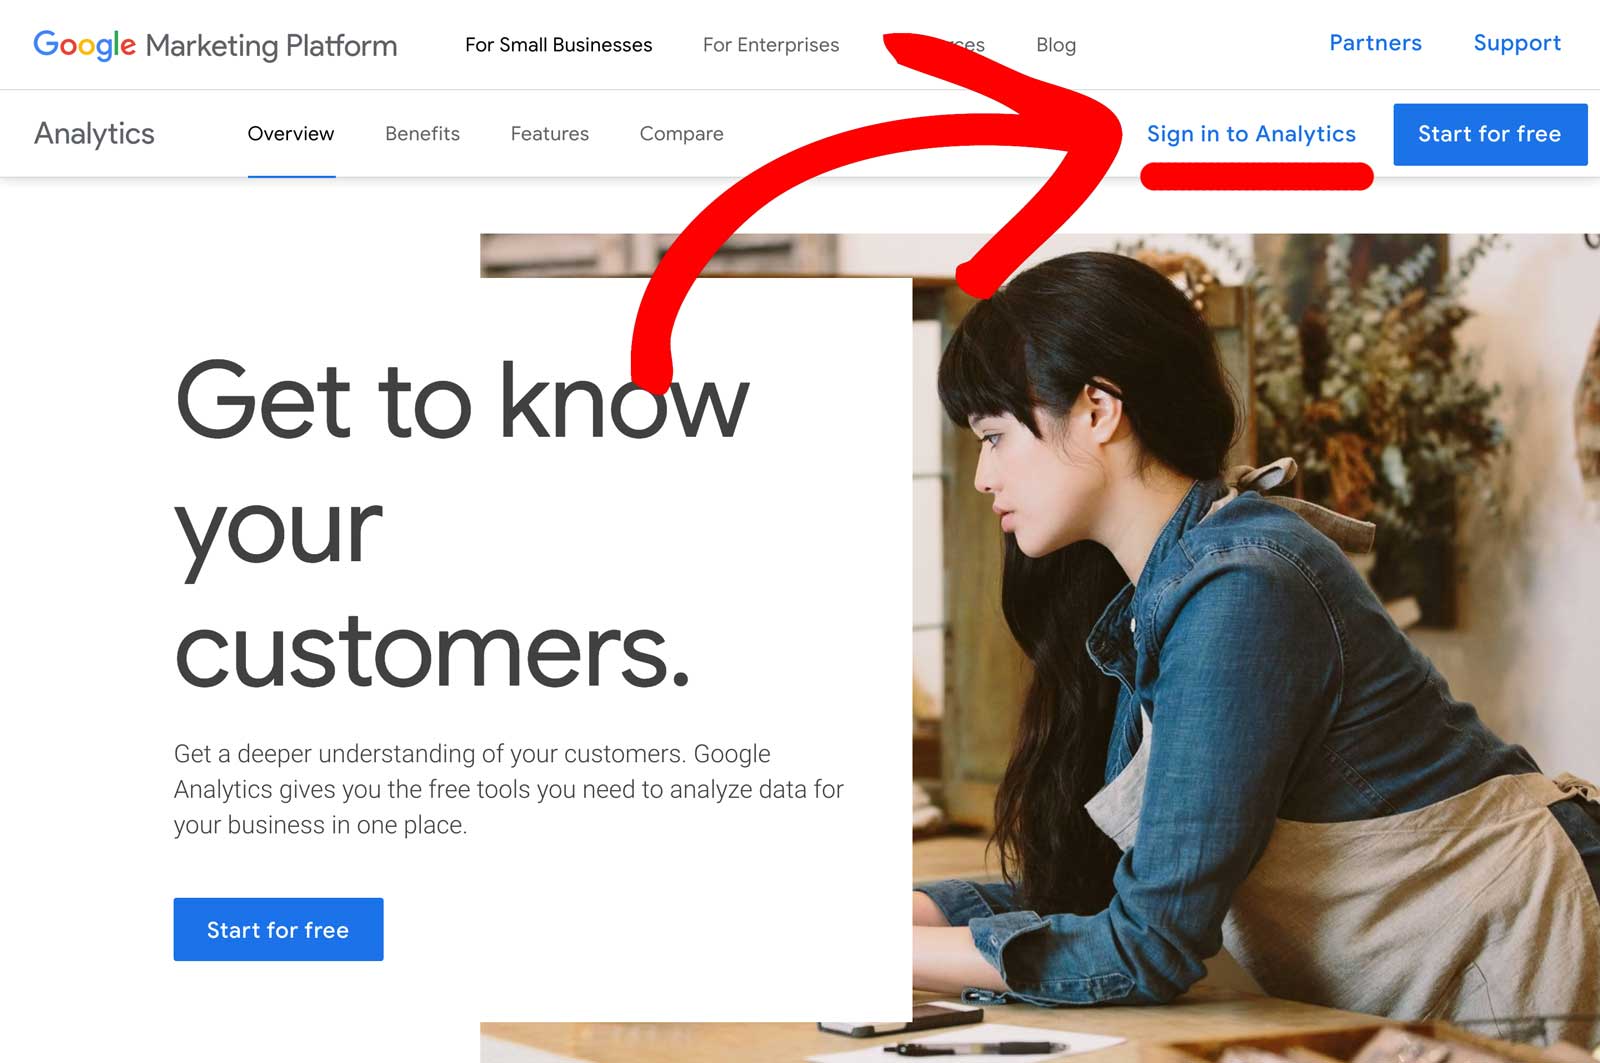
To get started, you’ll need to open the Google Analytics website and click the Sign in to Analytics link or Start for free button in the top right corner of the page.
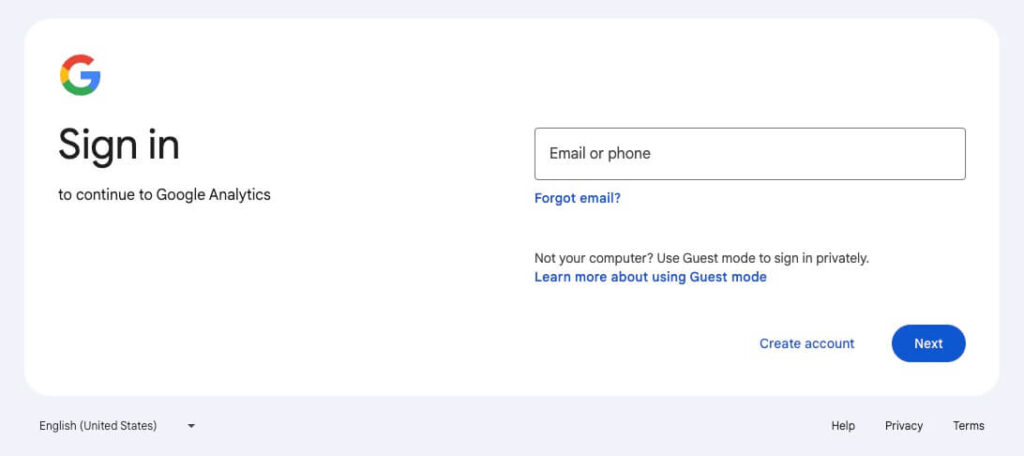
Next, you can log in to your existing Google account if you have one, or click the Create account link to create a new Google account.
Step 2: Sign Up For Google Analytics + Create a Property
If you don’t have a Google Analytics account yet, click the Start measuring button on the next screen. If you already have an account and you’ve created a Property, skip to Step 3. 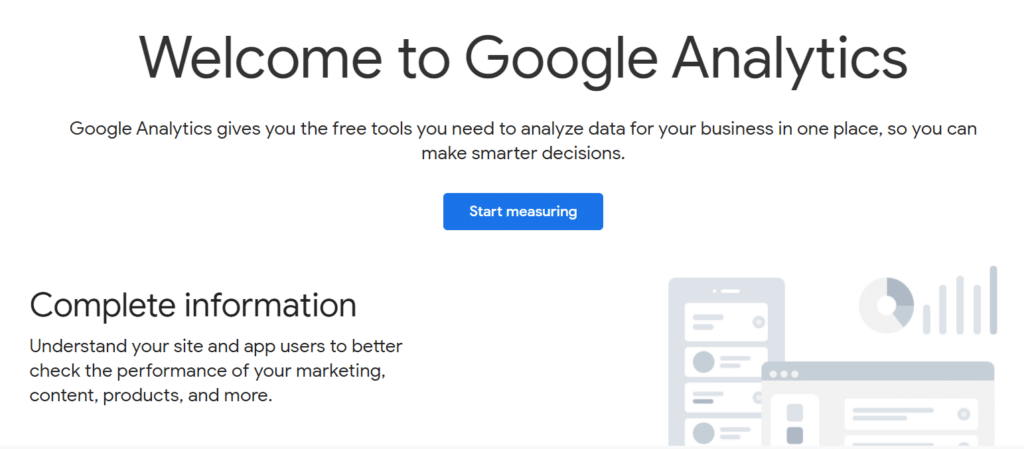
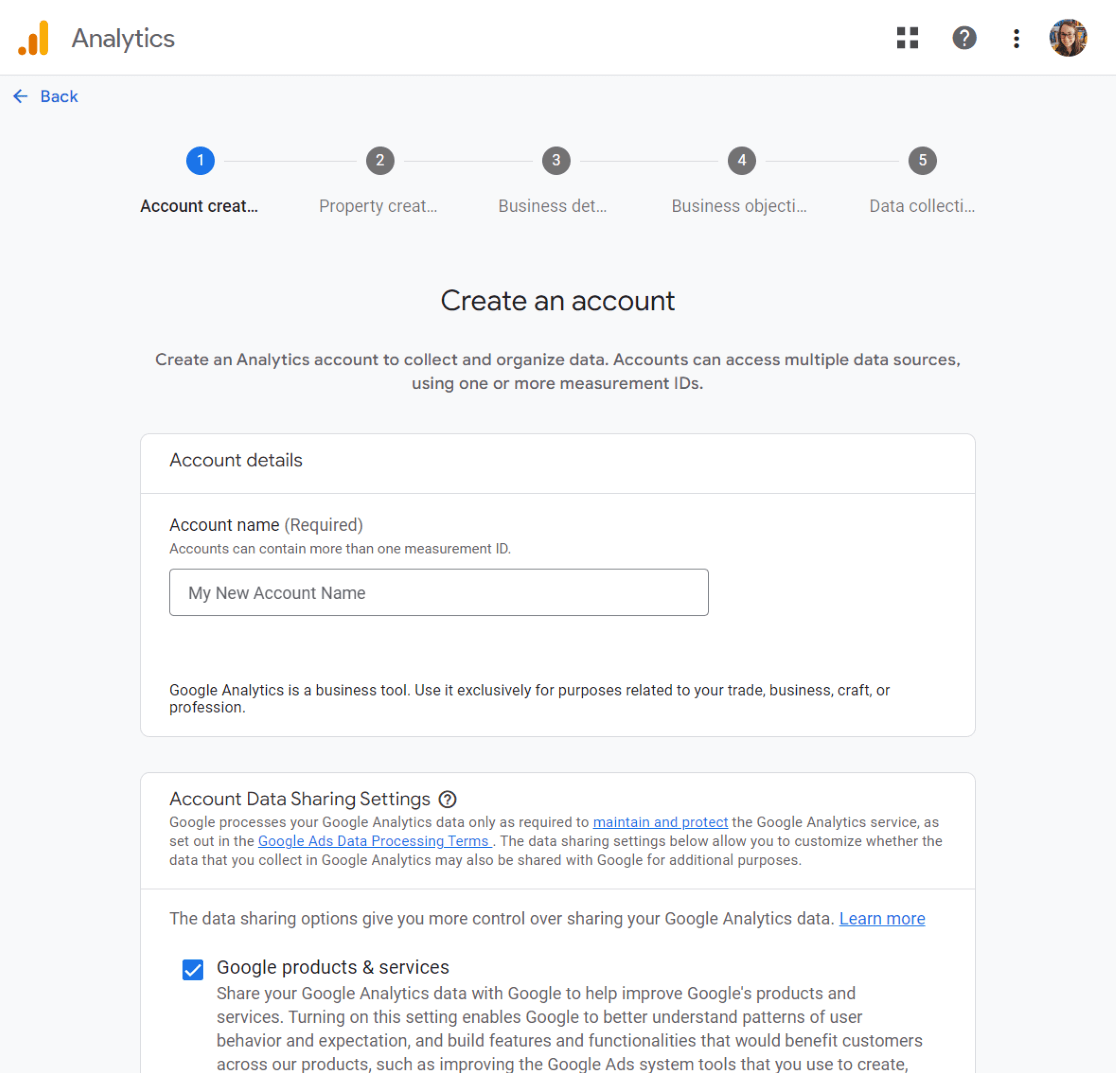
Now, you’ll need to enter the Account name for your Google Analytics account. You’ll also see different data sharing settings, make sure you check all the boxes and then click Next.
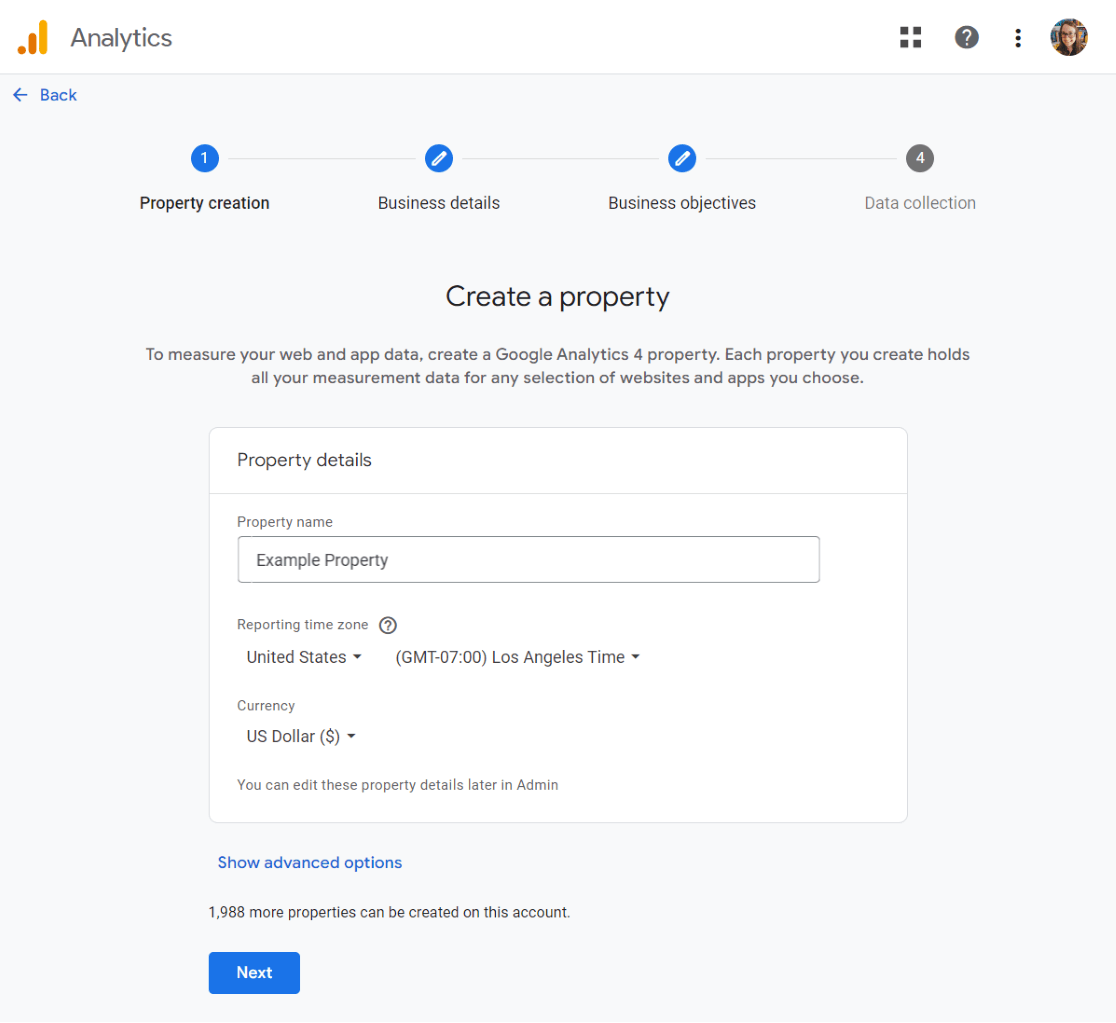
Now, you’ll have to enter the property details of your website. Start by entering a name, select a reporting time zone, and currency. Hit Next.
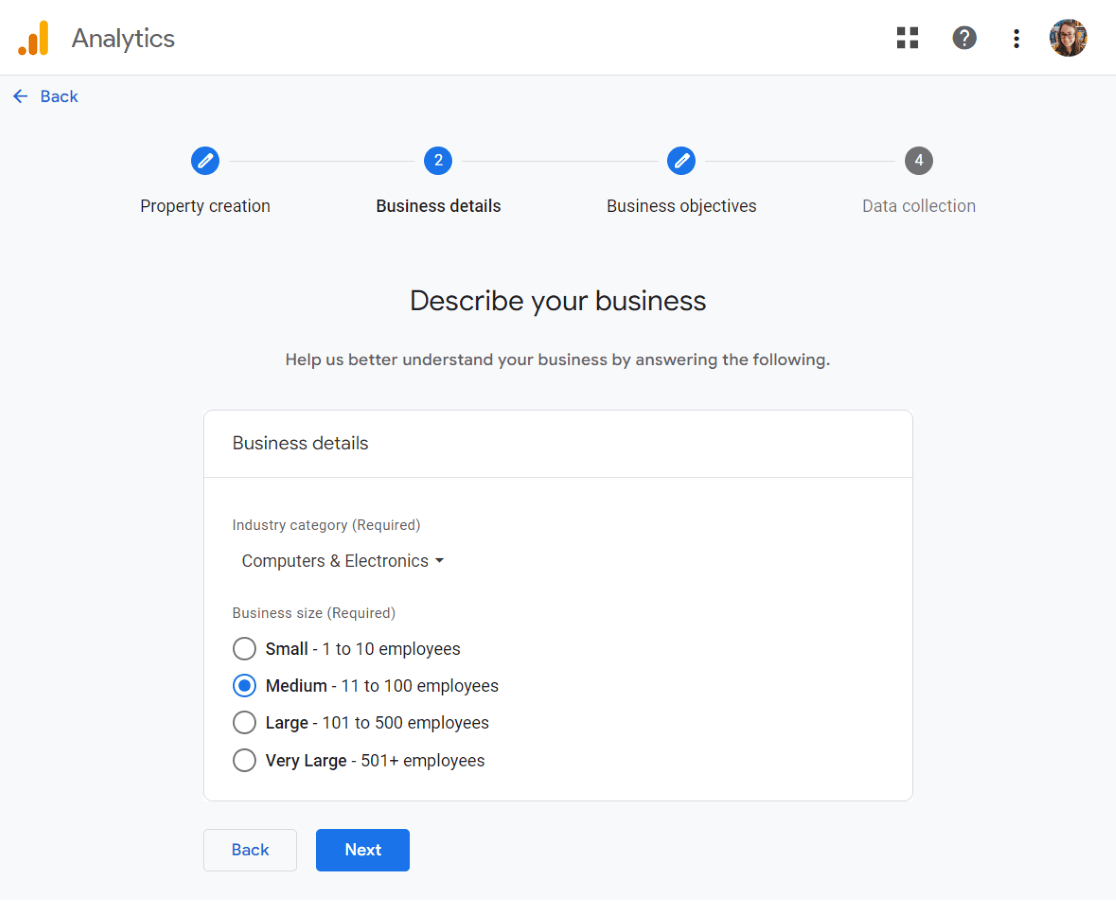
Choose your industry category and your business size, then click Next.
Finally, choose your business objectives. We suggest choosing Other so that your account will populate with all of the Google Analytics reports under standard headings.
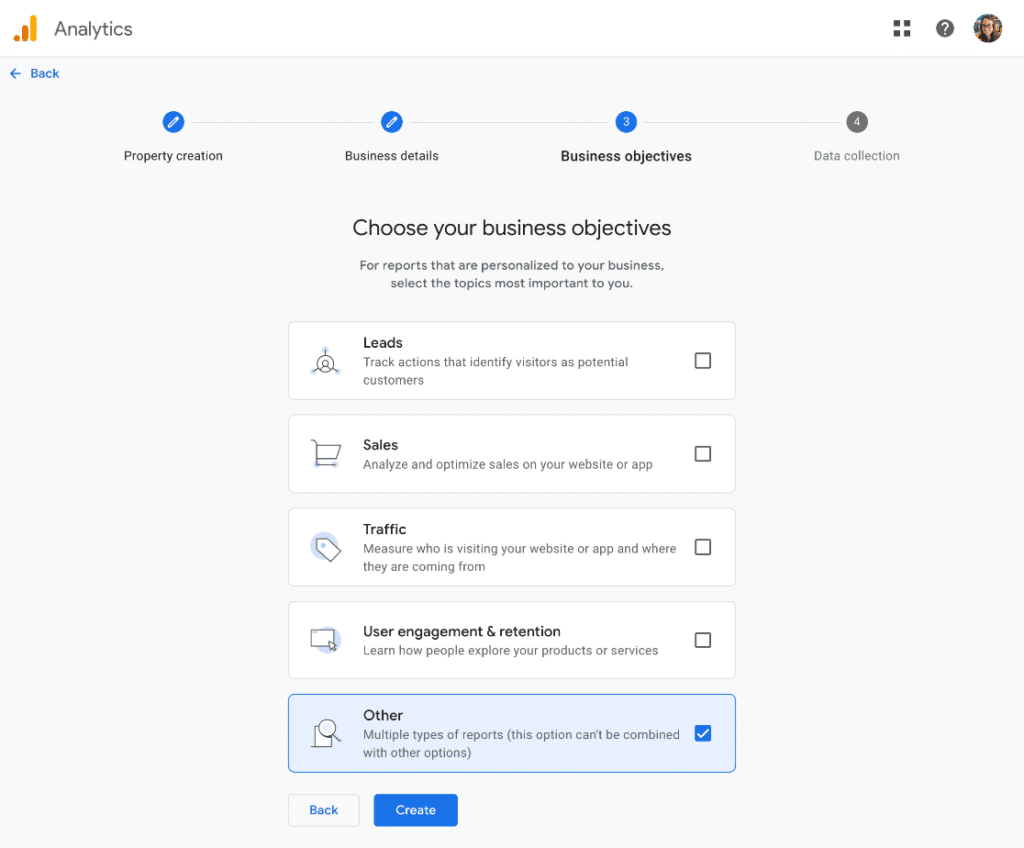
Click Create.
Step 3: Set Up MonsterInsights
Normally, you’d have to insert your Google Analytics tracking code into your WordPress website’s code.
But with MonsterInsights, you don’t need to worry about using any code.
Instead, you can get started by downloading MonsterInsights. To do that, you’ll need to get a MonsterInsights license and download the plugin zip file.
Once you have the zip file, navigate to the site where you want to install MonsterInsights and go to the WordPress admin dashboard.
Then navigate to Plugins » Add New and click the Upload Plugin button at the top.

On the next screen, you can click the Choose File button to select the zip file you just downloaded. Then click the Install Now button to upload the file and install the plugin on your site.

Once the plugin has been uploaded and installed, you can click the Activate Plugin button to activate it on your site.
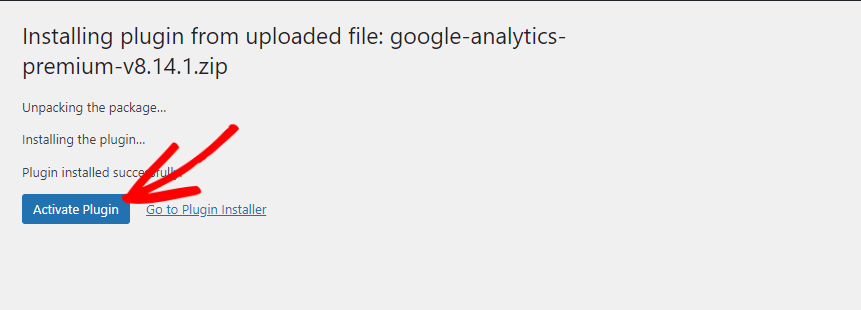
After the plugin is activated, the plugin setup wizard will open to guide you through the setup process step by step.
At first, you’ll see the ‘Welcome to MonsterInsights!’ message and options to choose the category of your website. There’re 3 options: Business website, Publisher (Blog), and eCommerce.
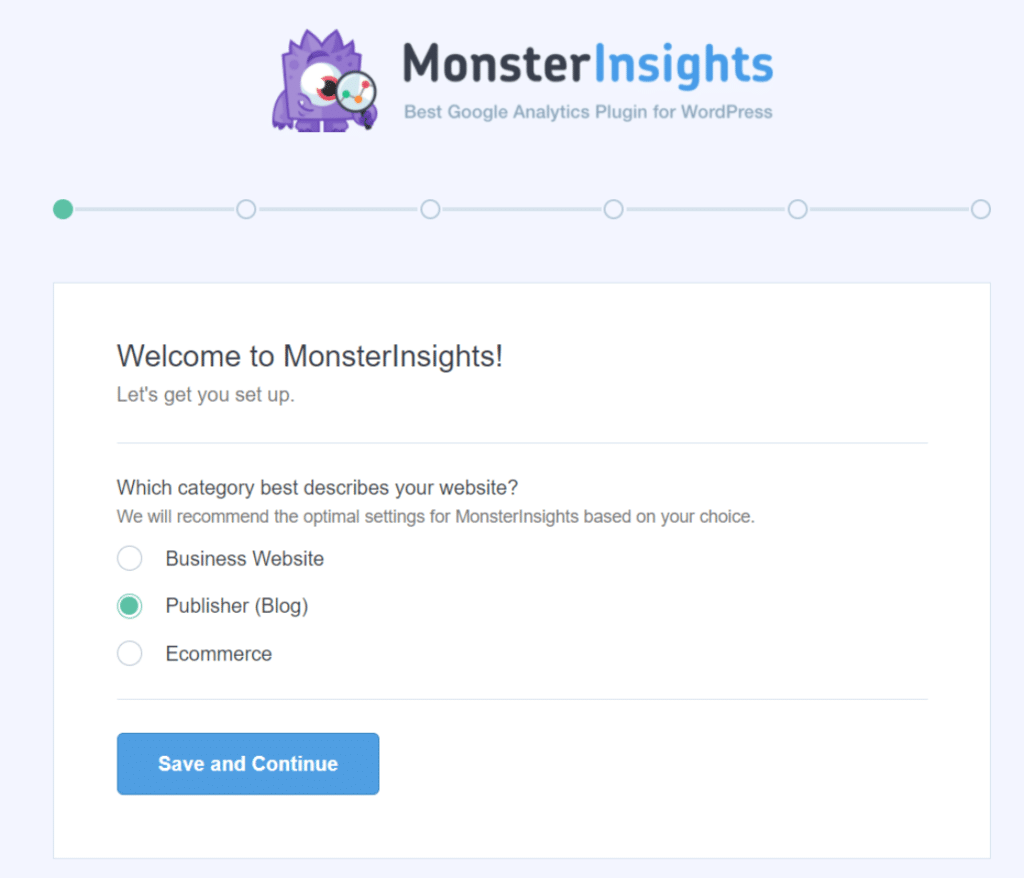
Select a category that best describes your website, and then click the Save and Continue button.
If you want to skip the setup wizard for now, you can click the Exit Setup button at the top.
In the next screen, you’ll need to connect the MonsterInsights plugin to your website by providing your license key.
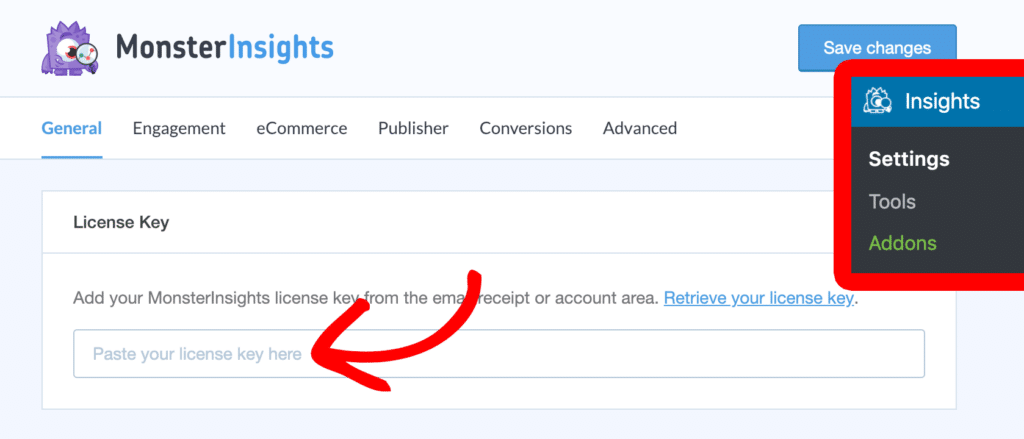
You can find your MonsterInsights license key in your email receipt or account area on the plugin website.
Once you enter your license key, it’ll verify your account, and then you can click on the Connect MonsterInsights button.
After that, you’ll see an option to connect your Google Analytics with your MonsterInsights account. Select your account to continue authentication.
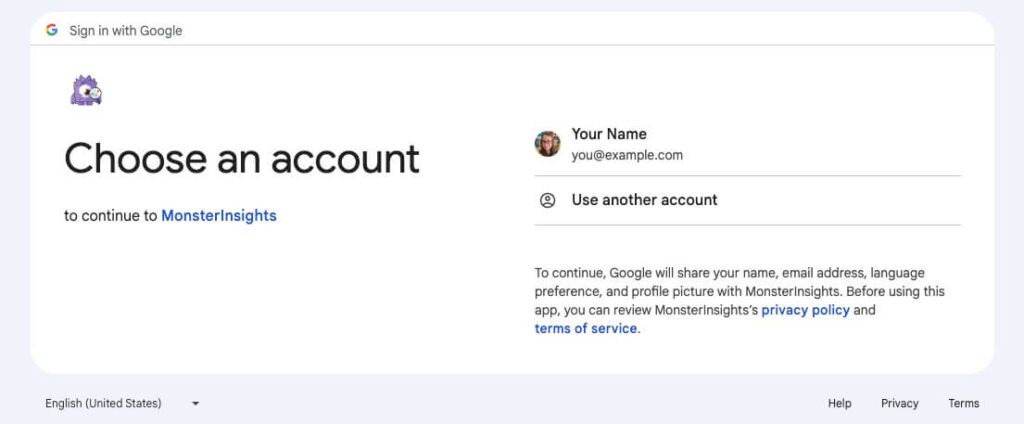
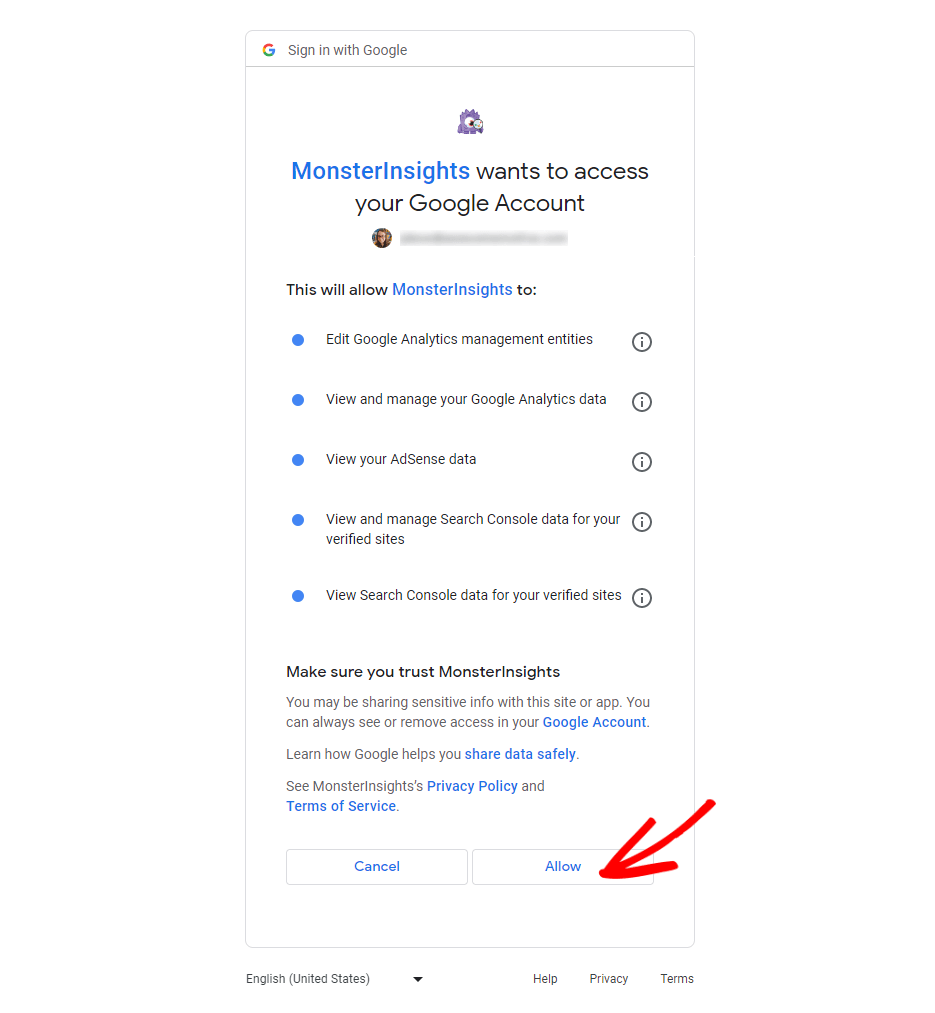
Next, you’ll need to allow MonsterInsights the proper permissions.
After that, you’ll need to pick a profile to complete the connection. If you have multiple websites connected to your Google Analytics account, then you’ll need to choose the right website property here.
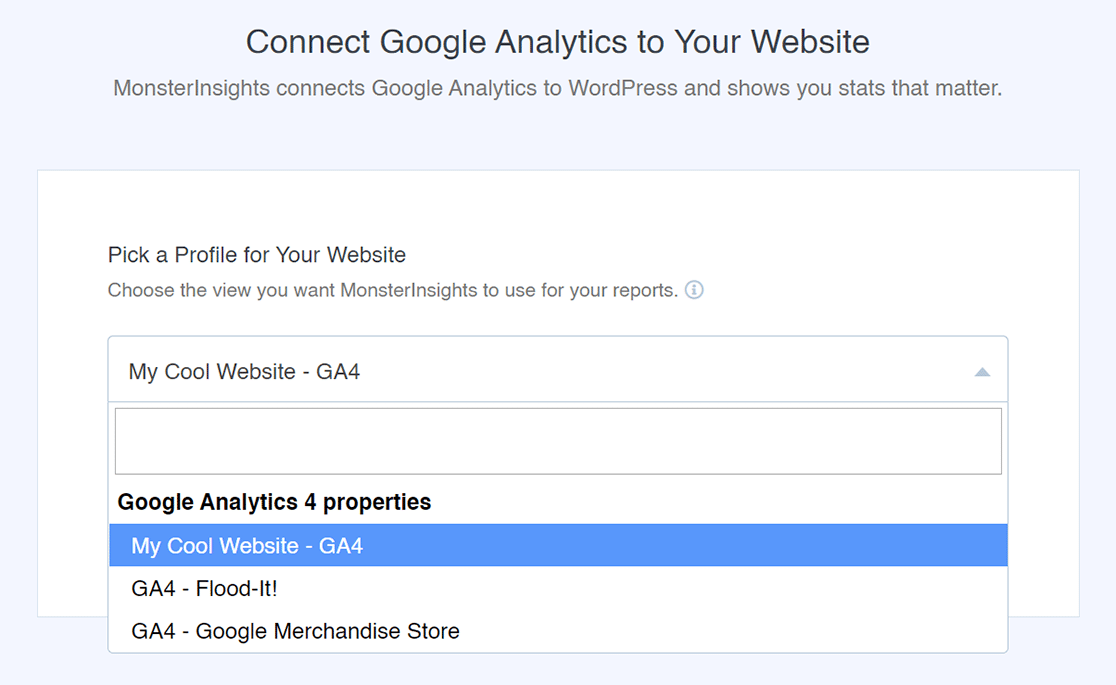
Choose your property, and then click the Complete Connection button.
After that, it will finalize the authentication process in a few seconds and then take you back to your MonsterInsights setup page.
Now, you can see the recommended settings for the Google Analytics plugin.
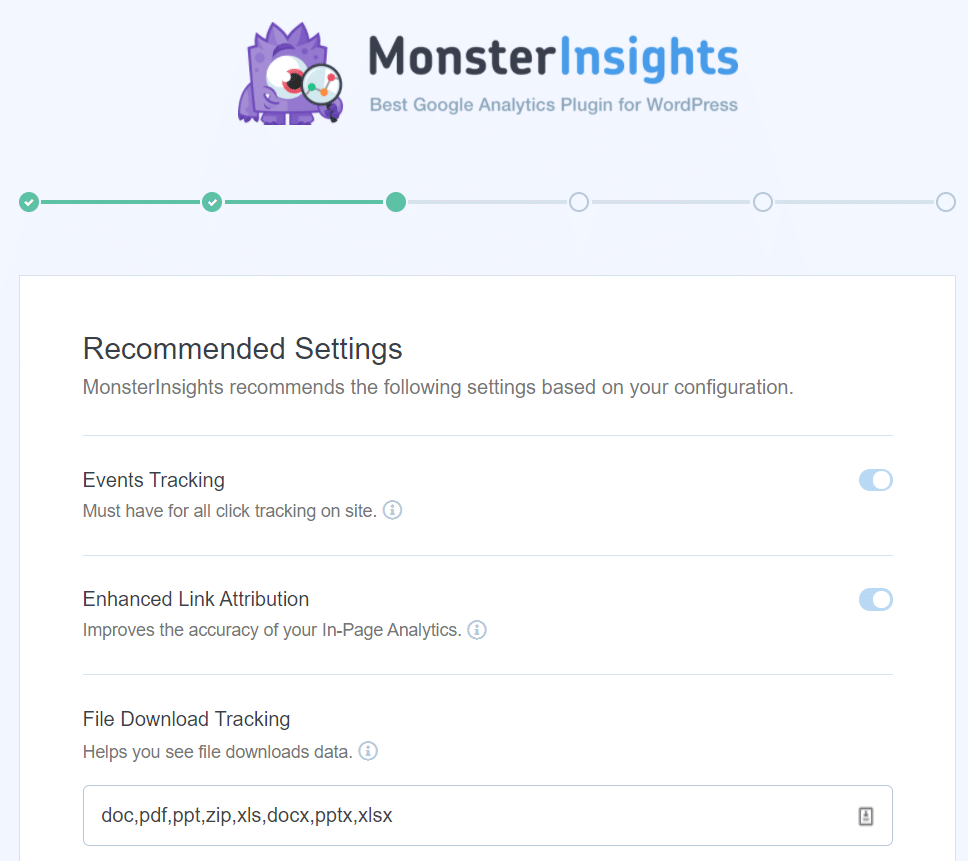
This page includes some of the most important settings as the following:
- Events tracking – Enabled by default.
- Enhanced Link Attribution – Enabled by default.
- File Download Tracking – Most used file types (doc, exe, js, pdf, ppt, tgz, zip, xls) added by default.
As you scroll down, you’ll see more settings.
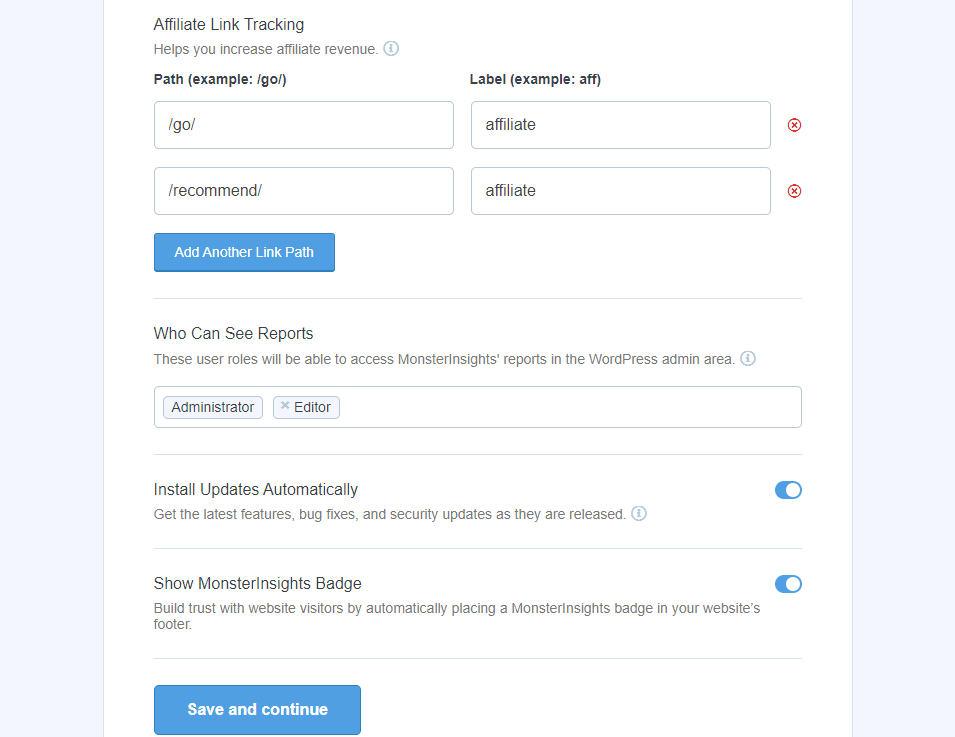
- Affiliate Link Tracking – It has 2 affiliate link paths added by default, and lets you add more affiliate link paths.
- Access to MonsterInsights Reports – You can choose who can see the MonsterInsights reports.
- Automatic Plugin Updates – You can enable or disable the option to install updates automatically.
- Show MonsterInsights Badge – Choose whether or not you want to show a MonsterInsights badge in your website’s footer. You’ll be able to access a few options for how this looks later.
Review and configure these recommended settings, and then click the Save and Continue button at the end.
On the next screen, you’ll see options for even more tracking options, addons, and helpful plugins.
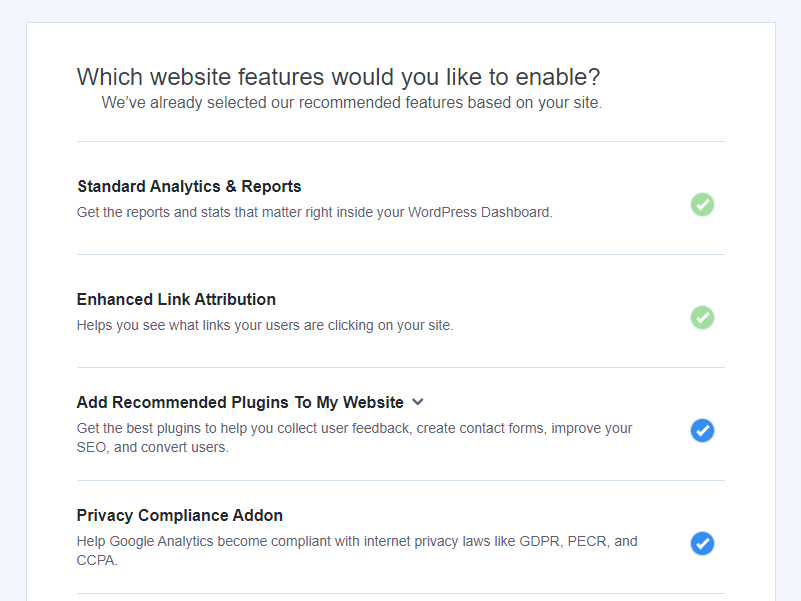
The first four items are:
- Standard Analytics & Reports – The standard MonsterInsights reports you’ll get in your WordPress dashboard.
- Enhanced Link Attribution – This can help you see where users click on your site.
- Add Recommended Plugins To My Website – We recommend adding four plugins to your website here. Check this option to install all four or expand it to pick and choose from the plugins:
- UserFeedback – Ask visitors questions about how they use your website, what content they prefer, what you could improve, or anything else you want to know.
- All In One SEO – The best WordPress SEO plugin that integrates with MonsterInsights
- Website Backup and Migration – Back up your website’s files and databases for free with Duplicator, the #1 backup plugin for WordPress.
- Smart Form Builder by WPForms – The most popular WordPress form plugin, trusted by over 5 million websites. Easily create contact forms, payment forms, surveys and more.
- Conversion Tools – Get OptinMonster, the #1 conversion optimization plugin to convert your growing website traffic into subscribers, leads, and sales.
- Privacy Compliance Addon – Helps Google Analytics become compliant for GDPR, CCPA, and more
When you scroll down, you’ll find even more options:
- Advanced Reports – Get access to advanced reports inside MonsterInsights, such as search keywords, a real-time report, publishers and eCommerce reports, and more
- eCommerce Tracking – Instantly enable eCommerce tracking
- 20+ Advanced Tracking – Even more advanced tracking, such as author tracking, form conversion tracking, scroll tracking, and more
- Media Tracking – Enable embedded video tracking. See how many times videos are watched, how far they were watched on average, and more.
After that, you’ll see a new screen with this message ‘Awesome! Tracking and Analytics are All Setup’. It means the setup process is complete, and you’ve successfully installed Google Analytics in your WordPress site.
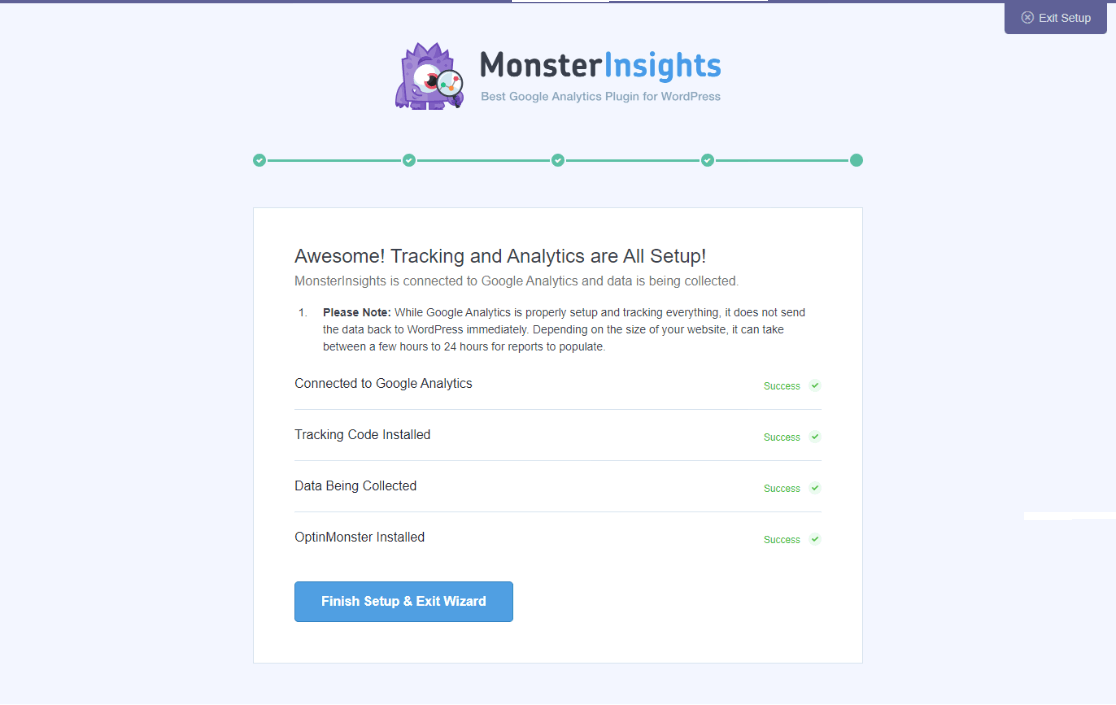
This screen also notifies you about when you can start seeing your website reports. Depending on the size of your website, it can take up to 24 hours. Don’t forget to click on the Finish Setup & Exit Wizard button.
Step 4: Adjust Settings
Turn Off Enhanced Measurement
If you set up your own Data Stream in GA4 (instead of letting MonsterInsights create one automatically), then you’ll need to turn off Enhanced Measurement. To do that, go to Admin » Data Streams, then click on your data stream:

Now, click on the switch to turn off Enhanced measurement.
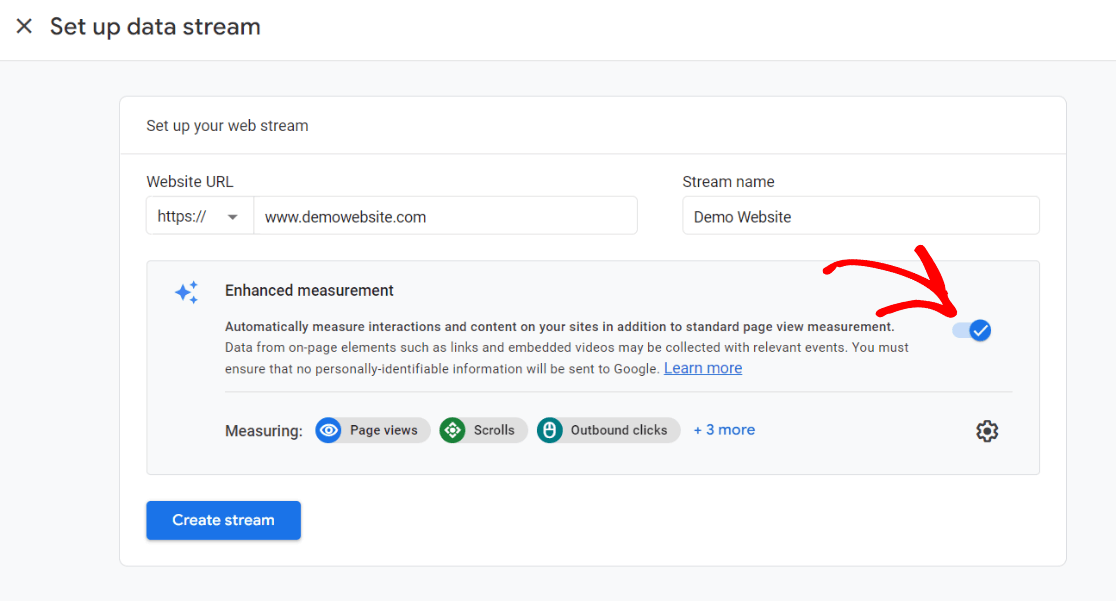
After clicking the switch, a message will pop up asking if you’re sure you want to turn it off. Click Turn off.
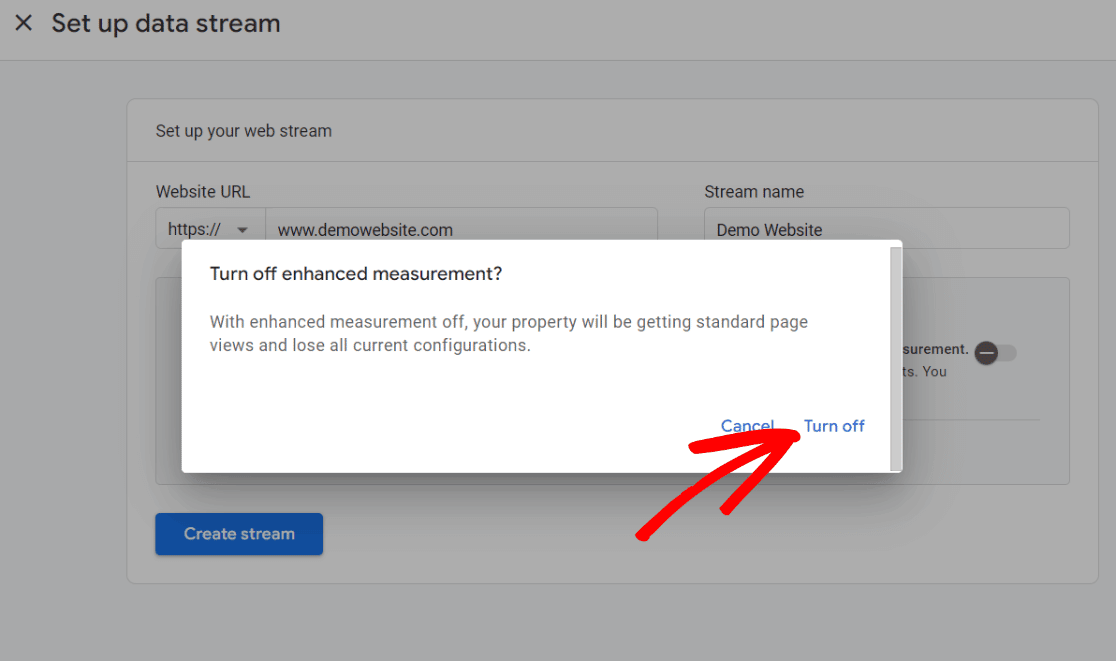
This is a very important step! MonsterInsights adds a lot of custom, enhanced tracking, and leaving this on can actually result in skewed, incorrect data.
Adjust Data Retention Settings
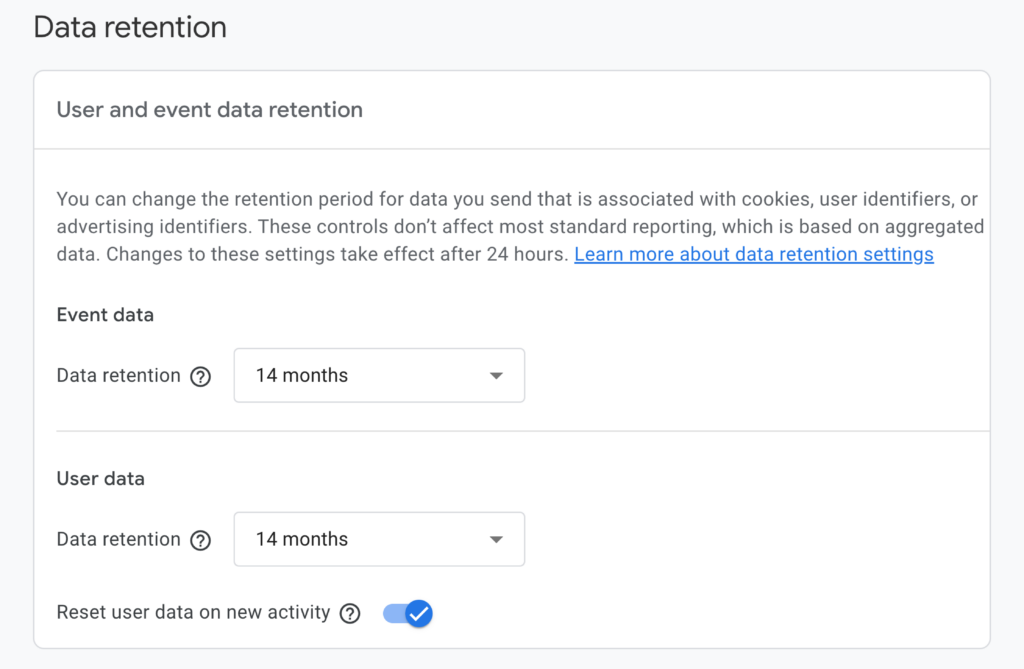
By default, your data retention settings will be set to 2 months. If you want to be able to use your data in custom reports beyond 2 months (which most people do), head to Admin » Data Settings » Data Retention:
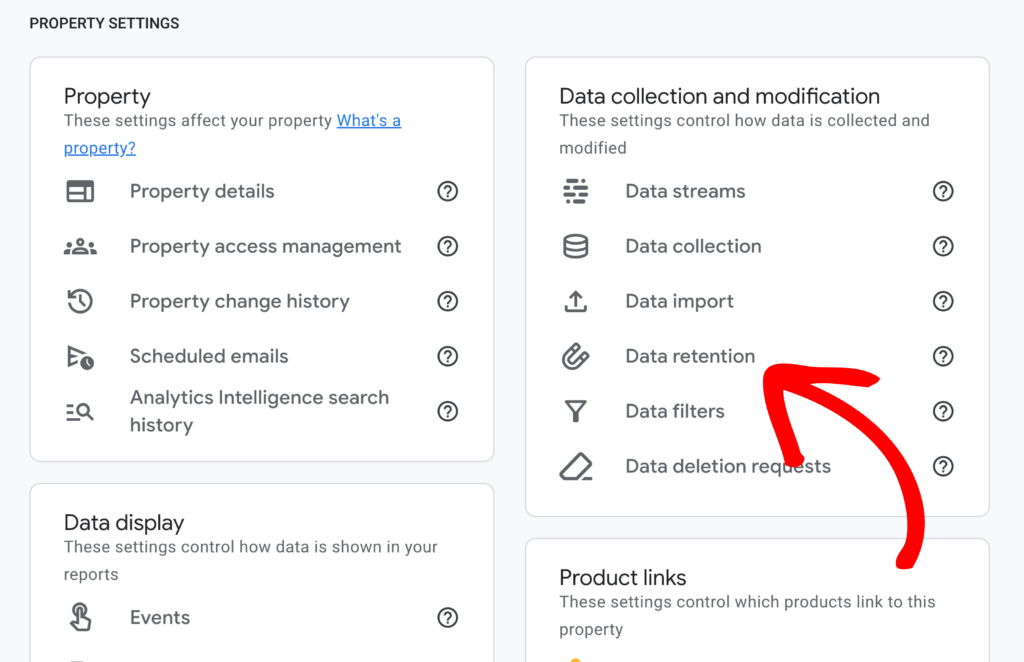
Now, use the dropdowns to change your settings to 14 months:
That’s it! You’ve successfully added Google Analytics 4 to WordPress.
Google Analytics 4 & WordPress Frequently Asked Questions
How do I install Google Analytics 4 in WordPress?
Install Google Analytics 4 in WordPress by creating a GA4 property in Google Analytics, generating a Measurement ID, and adding it to WordPress using the MonsterInsights plugin.
Can I add Google Analytics 4 to WordPress for free?
Yes! You can add Google Analytics 4 to WordPress for free using the MonsterInsights Lite plugin. Download it in the Plugins » Add new area inside your WordPress admin.
How to add GA4 to WordPress without plugins?
Add GA4 to WordPress without plugins by copying the GA4 tracking code from Google Analytics. Edit your theme’s header.php file in Appearance » Theme Editor. Paste the code before the </head> tag. Save changes and verify the installation using Google Analytics real-time reports. Please note, we do not recommend this method. See why in this guide: How to Add Google Analytics to WordPress Without a Plugin
That’s it!
We hope you learned how to connect Google Analytics 4 to WordPress easily. Looking for some ideas for what you can do with Google Analytics? Check out 9 Google Analytics 4 SEO Hacks to Increase Search Traffic.
Need help setting up event tracking in GA4? Check out How to Track Link Clicks in Google Analytics 4 and WordPress.
And don’t forget to follow us on LinkedIn and YouTube for more helpful Google Analytics tips.

Super cool guide. I had fun and felt it was so easy with your pictures and well placed linsk to “my next step to setup my GA4 accounts. I have a few… (14)
Really cool… I will bookmark this for the future.
My next step – I am sure your have this covered… Setting up / checking that conversions track correct with currency and value?
Hey Peter! Awesome, so glad you found it helpful! As for whether we have ecommerce and conversion tracking covered, we’re working hard on updating our content (and creating new posts) about GA4! So stay tuned on that. For now, we do have this one: Google Analytics 4 Goals: Why They’re Gone & How to Adapt.
Great little tutorial. Thank you. Have successfully created a GA4 profile and added the dual tracking.
Awesome, Rob! Smart to prepare for the upcoming Universal Analytics sunset.
Hi, I already have UA set up on my wordpress site with Monster Insights. I have created a GA4 property in Google analytics to add to it. However, the Google ID doesn’t begin with a G, it is just a series of numbers. What do I put in the dual tracking box?
Hi Jonathan,
Here are instructions on how to find the Measurement ID (that begins with a G-): https://www.monsterinsights.com/docs/how-to-set-up-dual-tracking/
I already have a property in Universal Analytics I would like to switch to Google Analytics. do i need to perform some operation? on the Monster insights dashboard
Hi Jakub,
Thanks for your question! Here’s how to upgrade to GA4: https://www.monsterinsights.com/google-analytics-4-upgrade-how-to-upgrade-why/
And here’s how to set up dual tracking in MonsterInsights with both UA and GA4: https://www.monsterinsights.com/docs/how-to-set-up-dual-tracking/
I’m trying to track my e-commerce conversions from a 3rd party gateway. So my customers leave my site to pay on a sure payment gateway then returned to my site after payment. Can monsterinsights help with tracking this
Hi Teresa,
MonsterInsights Pro should be able to handle that for you. If you do find that you run into issues don’t hesitate to reach out to us.
Thanks for your in depth guide! I don’t remember creating a GA4 property, but it is already set up. Is it possible that it got created automatically? I just added the measurement ID. In step 5, it says, “If you set up your own Data Stream in GA4 (instead of letting MonsterInsights create one automatically), then you’ll need to turn off Enhanced Measurement.” How can I find out if MonsterInsights or I had set it up? Should I turn off Enhanced Measurement or not?
Hi Annie – great question. It sounds like it was probably automatically created by MI, but it would never hurt to make sure! If you click on the data stream under Admin » Data Streams, you can see if the toggle is set to on or off. If it’s on, just click it to turn it off 🙂
Does it matter which code appears in the code first? UA or GA4
Thanks
Sean
Hi Sean,
If you’re using MonsterInsights, you don’t have to worry about changing the code at all. If you’re manually adding the code, you actually don’t have to change it for GA4. Here’s some info: https://support.google.com/analytics/answer/9744165
So I have google analytics 3 installed via monster insights plug-in. My tech guy tried to add G4 code via a header/footer plug-in. G4 is showing 1/3 – 1/4 the users that G3 is showing. I’m assuming the header footer was the wrong way to go if I have monster insights?
Hi June,
Yes, using 2 Google Analytics codes on your site never turns out well! Did you know that you can dual track both of them with MonsterInsights? Just use the dual tracking box! Here’s information on how to set that up: https://www.monsterinsights.com/docs/how-to-set-up-dual-tracking/. If you need more help, don’t hesitate to reach out to our support team. Find a contact form in the support tab in your account, or on the Lite support page if you’re using our lite version.
May i know why the plugin does not exist “Measurement Protocol API Secret” in my wordpress plugin? there is only “Connect Google Analytics + WordPress” & “Manually Enter Your UA Code” in Google Authentication section..
Hi there,
You’ll need to connect MonsterInsights with Google Analytics first. Go ahead and click the Connect MonsterInsights button to begin. You can follow these directions: https://www.monsterinsights.com/how-to-properly-setup-google-analytics-in-wordpress/