Do you want to know how to add a popup on WordPress?
Popups are incredibly useful for gathering visitors’ contact info, presenting special offers and sales, registering users for events, and more.
If you have a WordPress website, you should seriously consider adding popups as part of your sales and marketing strategies.
What is a popup?
A popup is a window that appears on a website or application to display information or prompts, such as notifications, advertisements, or calls to action. Popups can include modals, overlays, or alert boxes and are often used to capture user attention or collect input.
You’ve probably noticed that many websites ask for your email address with a simple contact form popup box.
Are popups hard to make?
It’s not difficult to create popups. In fact, it’s easy to create custom popups on a WordPress site, even for people with little technical experience. You can use WordPress plugins to make popups, gather email addresses, and even add those emails to your email lists automatically, with just a few clicks.
In the rest of this post, I’ll show you 3 different ways to build a popup using the most popular popup builders on WordPress.
In addition, I’m going to use a different plugin to create a lead capture form. We’ll combine our contact form plugin with our popup WordPress plugin and embed the form into our popup when we create a popup campaign.
Let’s get started!
Method 1: Build a WordPress Popup with OptinMonster and WPForms
OptinMonster is the most widely used popup-building plugin for WordPress, with over a million active installations. As you can tell by the name, it’s designed for making opt-in forms and popup boxes.
An opt-in form is simply a form that asks a user to “opt in” to receiving emails or marketing communications. But of course, popups are used for much more than that.
This plugin makes it easy for beginners and experts alike to create beautiful, highly engaging popups for a variety of purposes.
Aside from ease of use, OptinMonster offers these powerful features:
- Drag and drop popup builder lets beginners design custom popups
- Over 400 templates and 6 campaign types to fit any need
- Many different triggering options to show popups where and when you want
- Exit-Intent®, InactivitySensor™, and other technology features increase conversions
- Works on any website, not just WordPress (plugin isn’t required)
OptinMonster does have the ability to create a simple opt-in form. However, for more powerful forms with more design options, we suggest a dedicated forms builder plugin.
Luckily, OptinMonster lets you add forms right into their popups with a few clicks. You won’t need to know any programming or web development to add a form using the method below.
In this example, we’re going to use WPForms, the best forms plugin for WordPress you can get.
WPForms automatically connects with OptinMonster when you install both plugins. This makes it incredibly easy to build professional-looking popups that contain your custom forms.
Let’s begin by installing WPForms.
Install WPForms on WordPress
To install WPForms on your site, go to WPForms and purchase a license. Get WPForms Pro to get access to 500+ templates, payment processing, surveys, and other advanced features.
You can make a form for your popup with any of the plans offered, though.
After you get your license, download the WPForms plugin from your account by clicking Download WPForms. While you’re on that screen, you can also copy your license key by clicking the clipboard icon next to License Key.

Now, go log into your WordPress site and install the plugin. You’ll click Plugins » Add New first. Then, click the Upload Plugin button and select the WPForms file that you downloaded.

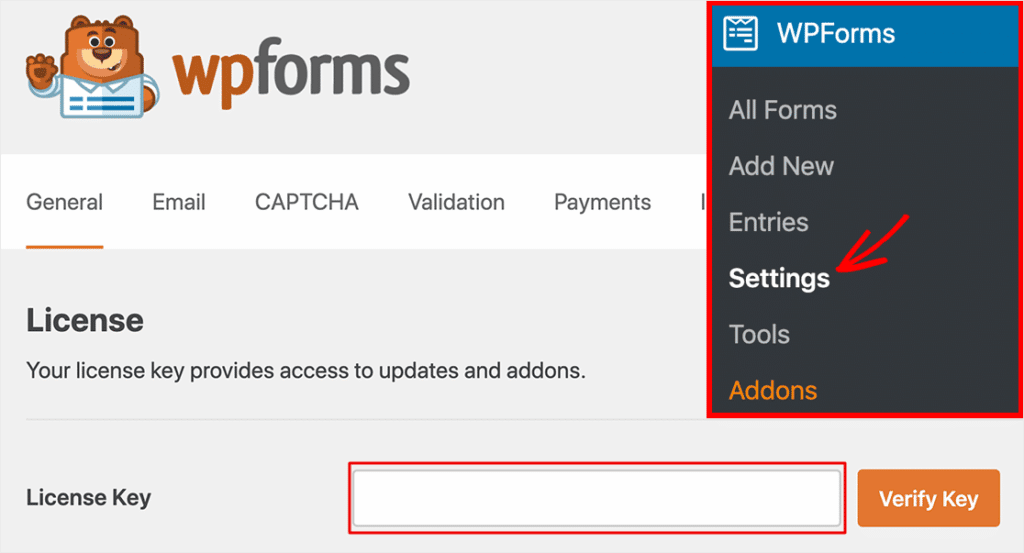
At this point, you can click Install to finish installing and activating WPForms. Once the plugin is active, go to WPForms » Settings » General and enter your license key that you copied earlier. Click the Verify Key button and you’re all set!
Make a Lead Capture Form in WPForms
To start making a new form in WPForms, click on WPForms » Add New in the WordPress dashboard. You’ll be prompted to select a template as a starting point.
But first, type an appropriate form name in the Name Your Form box at the top of the screen. We’ll name our example form Email Lead Capture – Newsletter Signup.
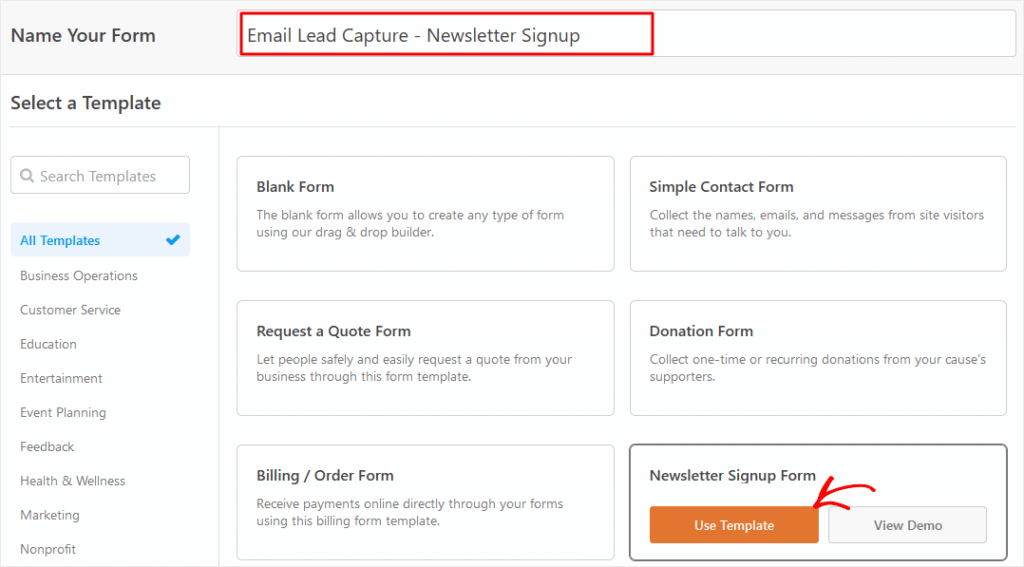
If you’re just getting started, we recommend using a template. Let’s select the Newsletter Signup Form template by clicking on Use Template.
All right, here’s our signup form template. As you can see, this is a simple form that only asks for a name and email address.
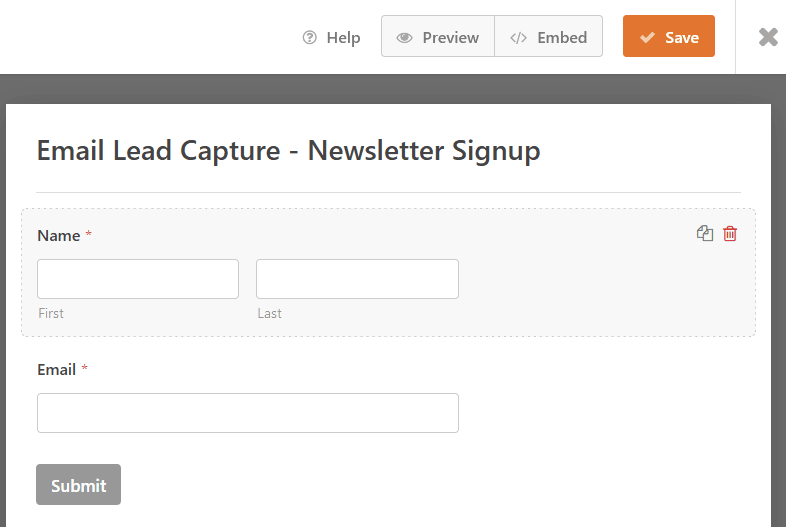
If you’re happy with the default settings, you can click Save now. However, let’s make one change to increase the chance of visitors completing our form.
Click in the Name field area and the Field Options box displays. Now, let’s make the Name field optional so that users don’t have to complete that part to submit the form. It’s required by default, so just click the Required switch “off” to make this field optional.
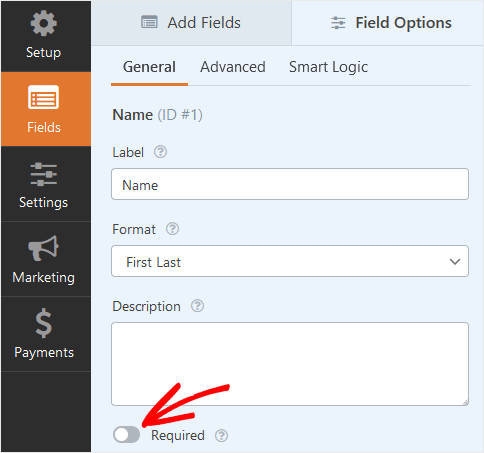
Now you can click Save to save this form for later use.
At this point, you’ll create a new popup and then add your saved form to the popup. So, the next step is to install a WordPress popup plugin.
Install OptinMonster on WordPress
In this step, we’ll install a free version of the OptinMonster plugin to build our popup on WordPress.
If you need more help, OptinMonster’s Basic plan comes with one Done-For-You Setup™. That means an OptinMonster conversion expert will help set up your first popup campaign to make sure your launch is a success!
To get the free OptinMonster plugin, sign in to WordPress and click Plugins » Add New in the dashboard menu.

Now, type optinmonster into the search field and enter. Find OptinMonster in the search results and click on the Install Now button.
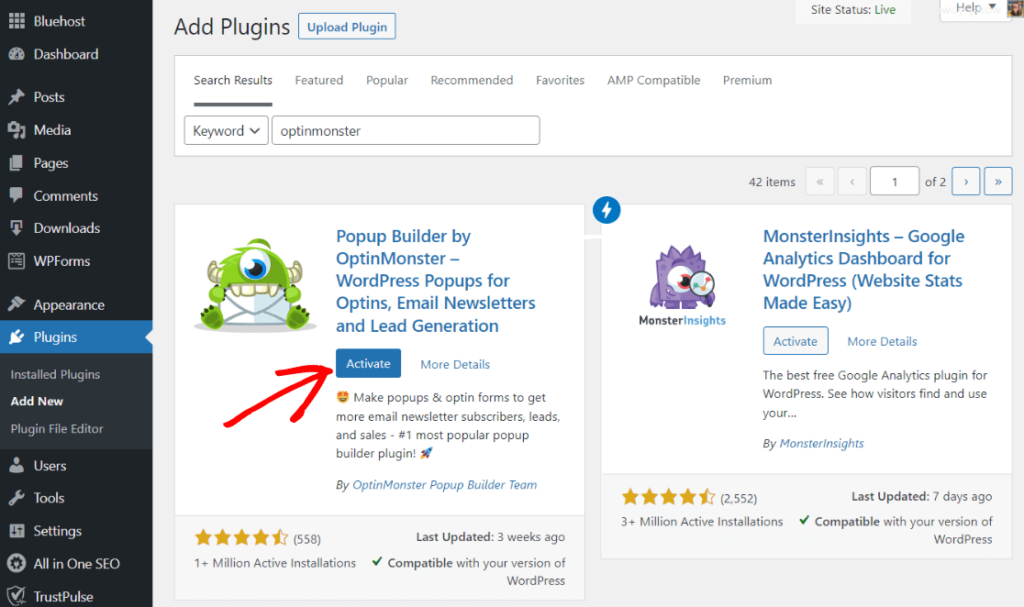
Once it installs, click Activate and you’re all finished!
Create a New Popup Campaign with OptinMonster
Now that you’ve gotten OptinMonster installed and activated, it’s time to make a popup.
First, click OptinMonster » Dashboard to see an overview screen that displays stats on your opt-in campaigns. Here, you can also start building a new popup. Just click Create New in the Popup tile.
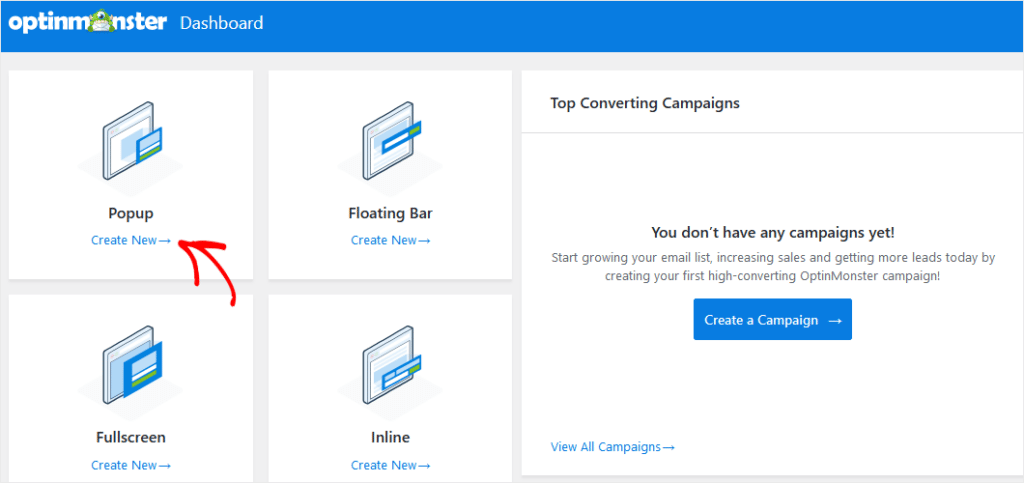
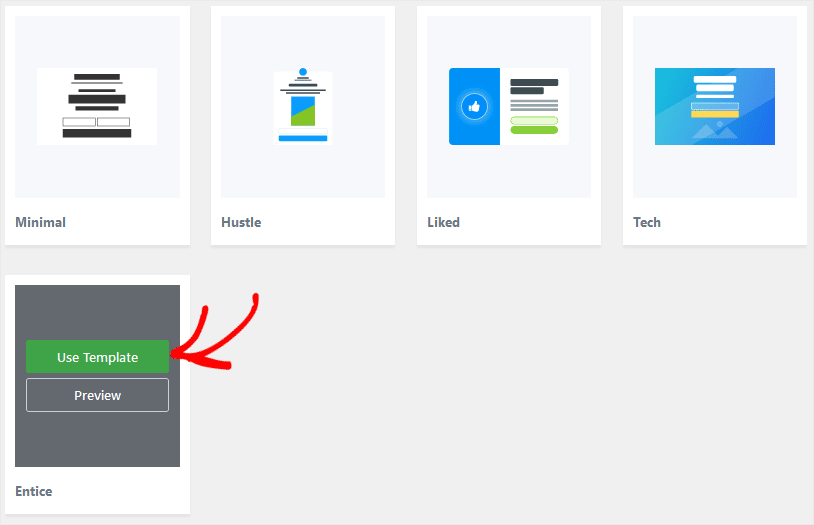
After that, you’ll see a new screen where you need to select a template for the popup box.
For this example, we’ll choose the Entice template. You can preview the template first, to make sure it fits your needs. Once you decide on a popup template, click Use Template.
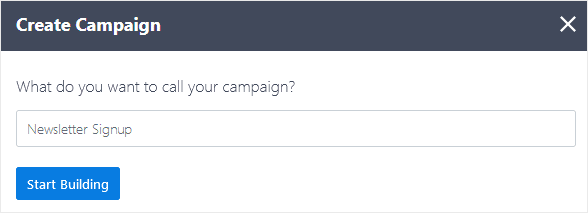
Now, you’ll be asked to name the popup campaign. We’ll call this example Newsletter Signup. Type your campaign name into the box and click Start Building.
When you click the button, you’ll open up OptinMonster’s drag-and-drop editor with your template ready to edit. Now, you can simply drag the WPForms block from the left side into your popup, wherever you want to place your new lead capture form.
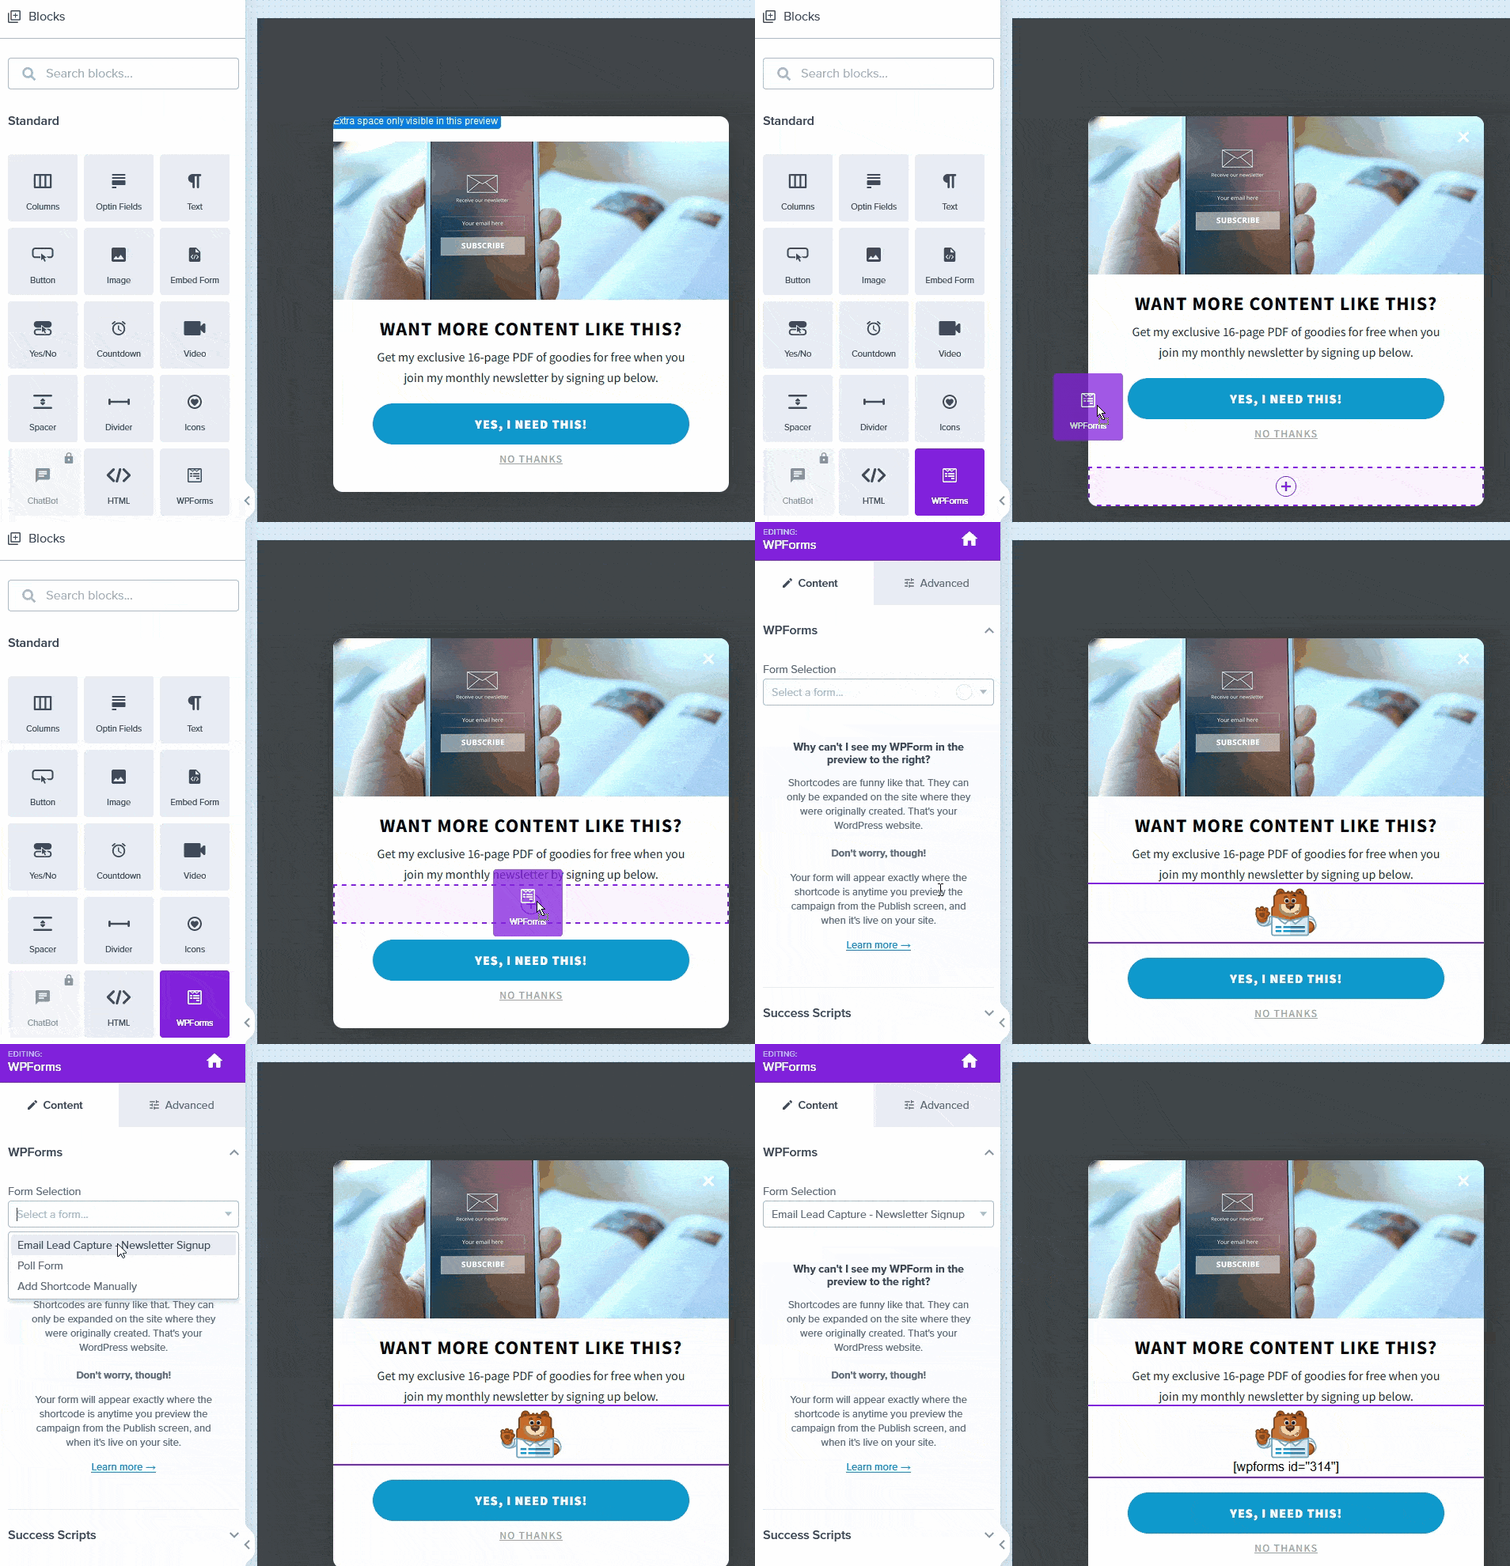
After you place the WPForms block, a dropdown list will automatically open where you can choose the form that you want to appear in the popup. So, here you’ll select the name of the form you created in WPForms: Email Lead Capture – Newsletter Signup.
Remove Extra Buttons
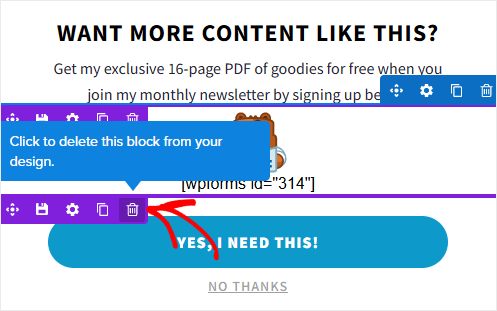
Now, one final step before saving your popup. Since the WPForms form has a Submit button included, you should delete the buttons from the OptinMonster template. To do that, just place your cursor inside the block and then click on the trash can icon to delete.
Click the Save button to save the popup and form, then click X to close the OptinMonster editor. You’ll go back to the WordPress dashboard and the OptinMonster Campaign Output Settings screen.
This is where you decide where and when to display your popup on your WordPress site. By default, popup campaigns show on every page to every visitor.
But, you can set a popup to only show on a single page, to only load on posts, or to only show to logged-in users, just for a few examples.
For this example, you can leave the output settings as is. However, to enable your popup to display, go to the Status dropdown and change the status to Published. Then click Save Changes.
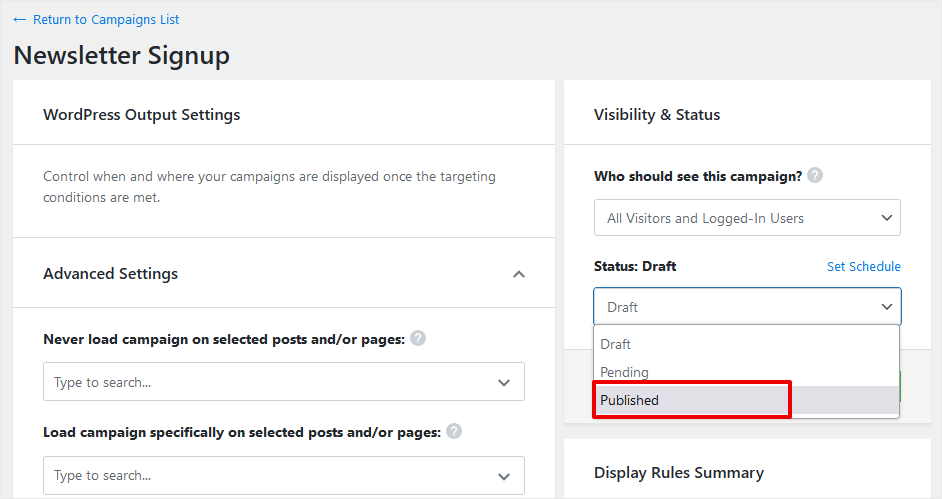
Okay, that’s it! Your new popup and lead capture form will now show up on every page of your website to start gathering new subscribers.
Here’s our sample after publishing:
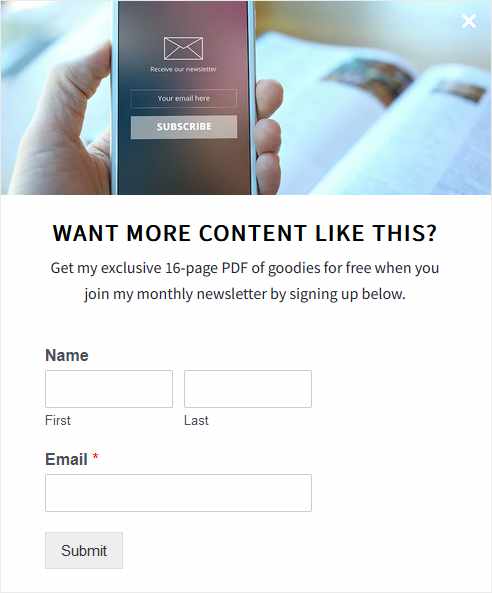
After your popup campaign converts a site visitor to a subscriber, you’ll find their contact information by going to WPForms » Entries in the WordPress dashboard.

WPForms has addons that allow you to automatically add new subscribers to an email list on Sendinblue, Constant Contact, and other popular email providers. This automates your marketing workflow to make communicating with subscribers super efficient.
That’s all for our first method of creating a popup. Let’s jump right into the second way to add a popup on WordPress….
Method 2: Make a Feedback Form Popup on WordPress with UserFeedback Plugin
If you want to know how to add a popup on WordPress to collect feedback from your customers, UserFeedback is the perfect solution.
UserFeedback is simple to set up and makes it easy to create a popup in WordPress. It also comes with a ton of templates to help you run an NPS survey, create a phone lead form, ask for post-purchase reviews, and so much more.
UserFeedback is already a small form popup WordPress plugin, so there’s no need to combine it with another plugin to successfully make a survey popup.
You can easily see your survey responses in the reports feature. Plus, it works perfectly with MonsterInsights to integrate your form submissions with your website’s analytics.
Install UserFeedback
First, go to UserFeedback and purchase the license that works best for you.
The Plus license will give you access to premium templates, branding customization, and a number of great features, but if you really want to take your popup surveys to the next level, we recommend the Pro license for access to more specific targeting, the ability to schedule surveys in advance (like during a promotion on your site), and many more features.
After you’ve purchased UserFeedback, we’ll follow the same steps that we used for WPForms to install and activate the plugin. You’ll know how to make a popup on WordPress in no time.
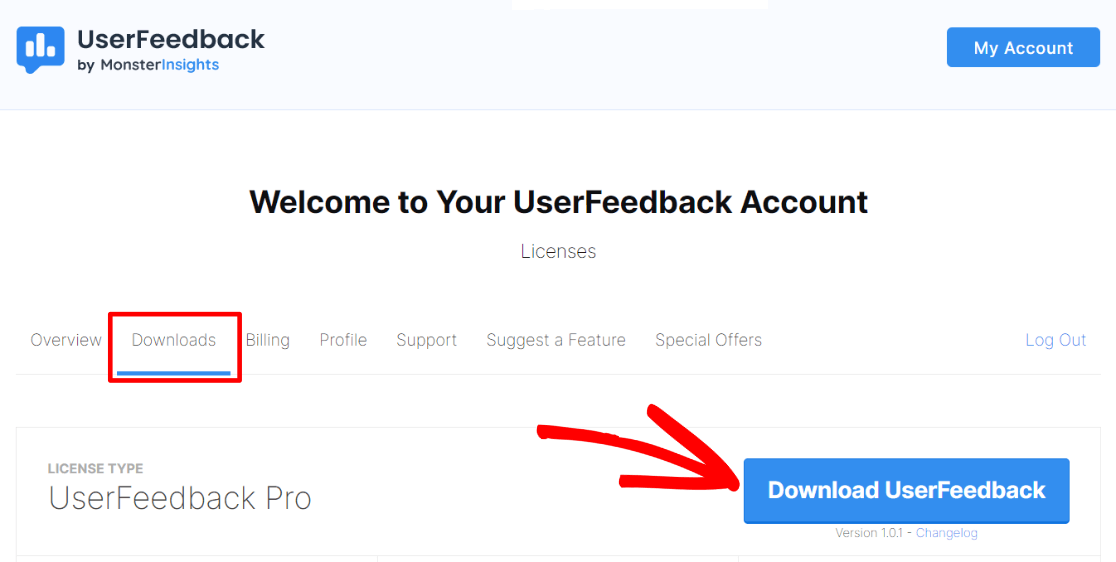
Click Downloads, press Download UserFeedback, and copy your License Key.
Now go to your WordPress website’s admin and navigate to Plugins » Add New. At the top, press Upload Plugin.

You’ll need to press Choose File and add the UserFeedback zip file that we downloaded before, or you can drag and drop it in the upload box. Then press the Install Now button.
After it’s finished installing, click the Activate Plugin button. When it finishes activating, it’ll automatically launch the setup wizard.
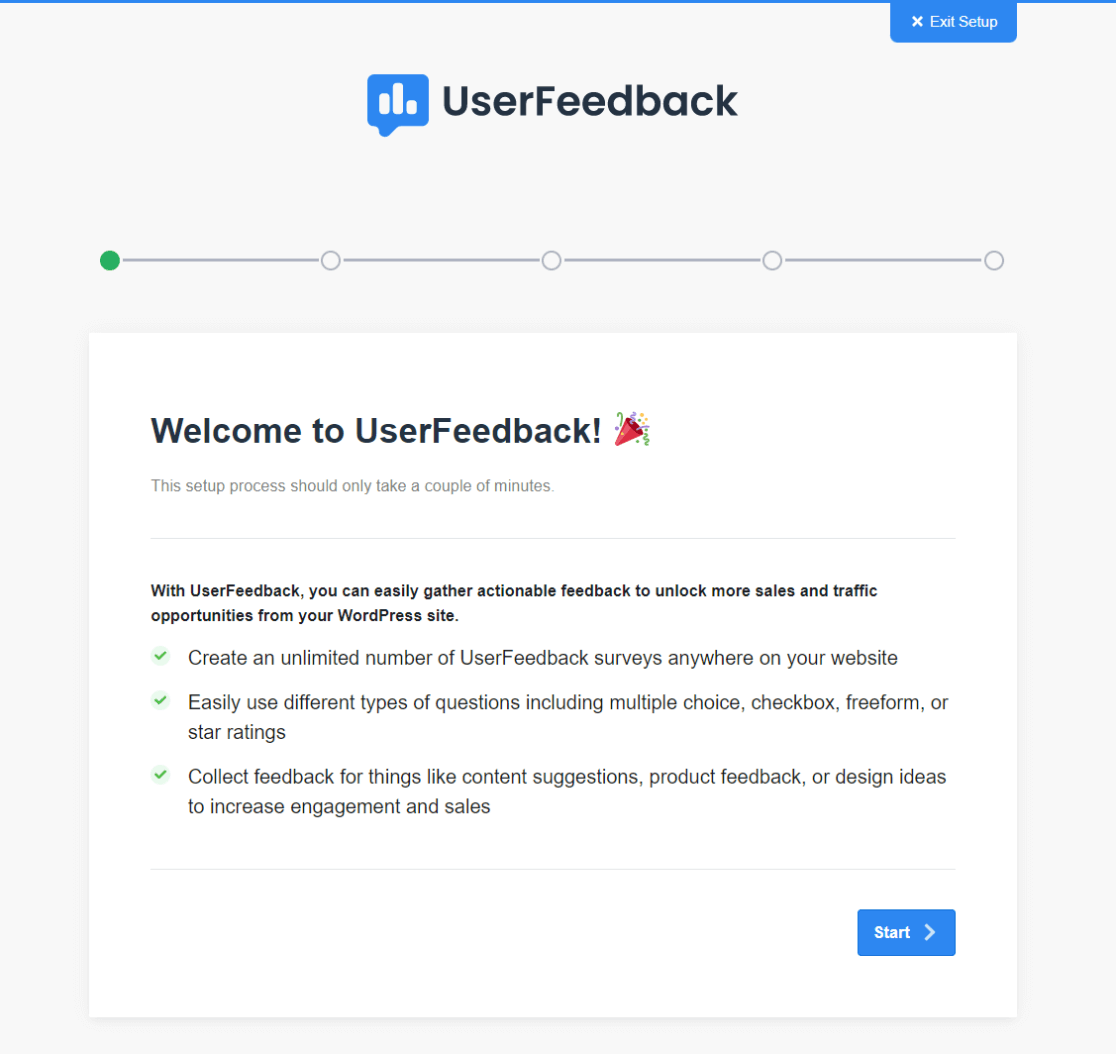
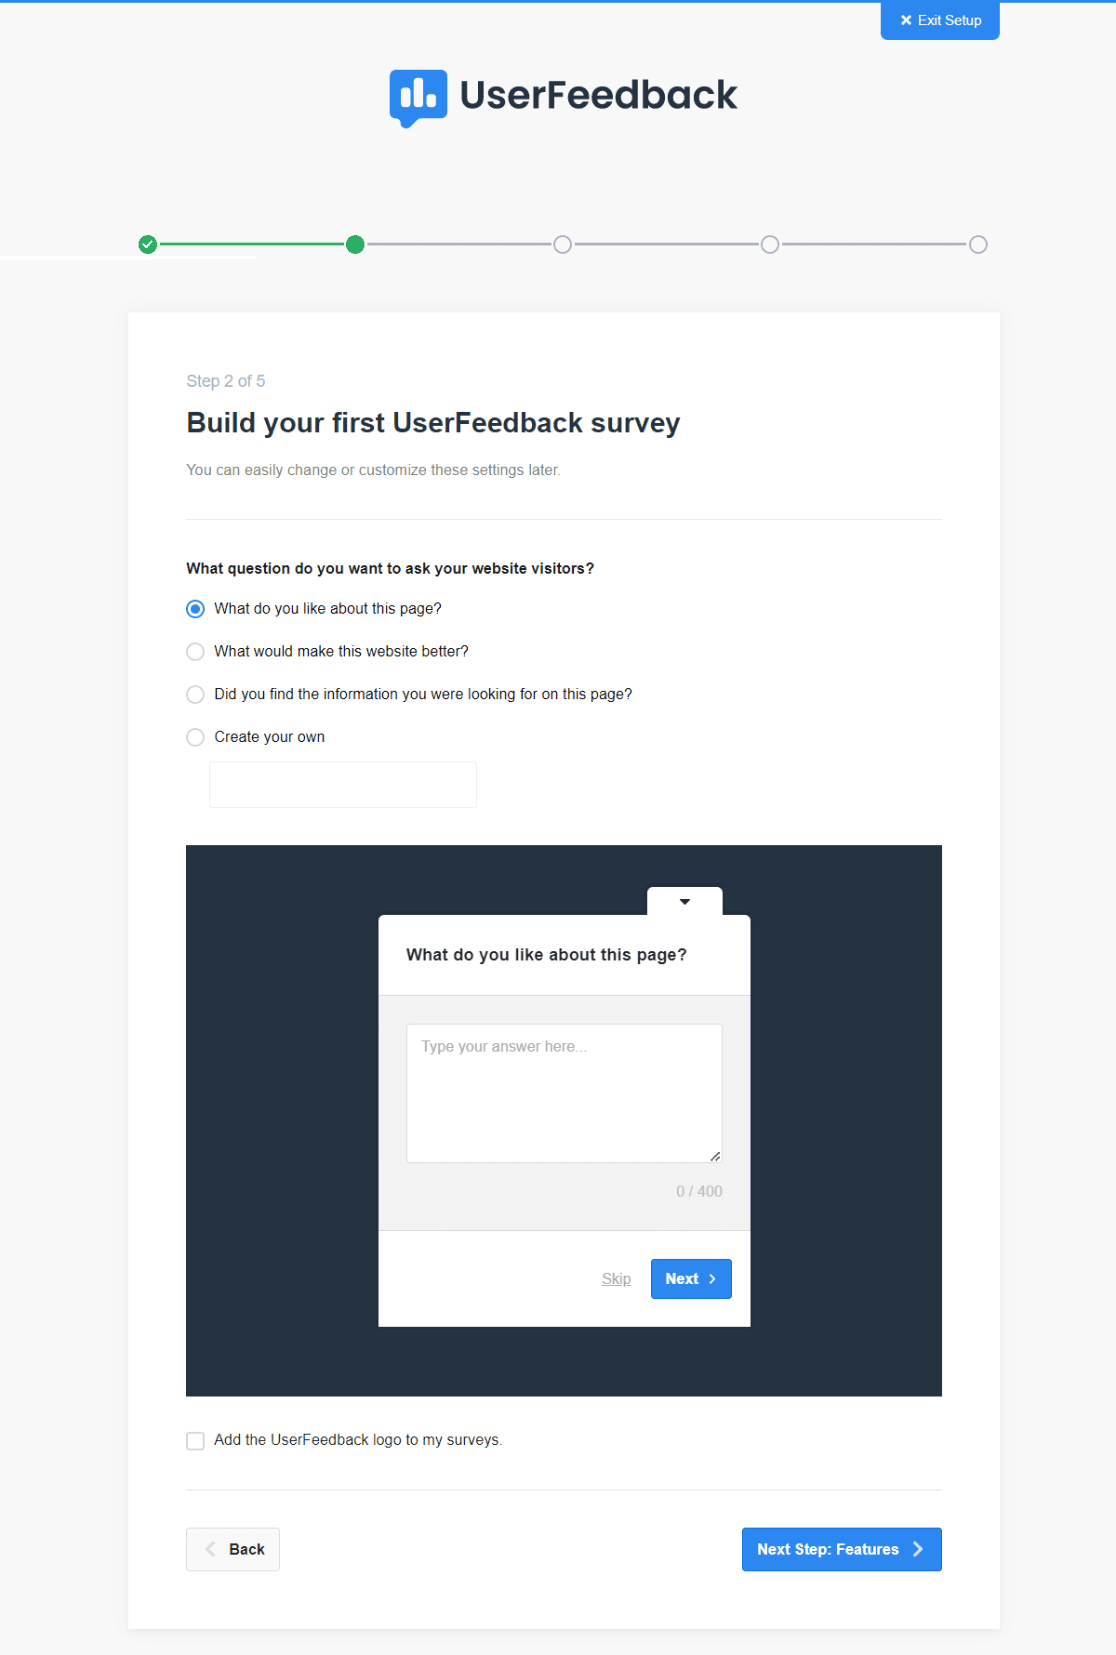
Go ahead and press the Start button at the bottom. Now it’ll walk you through how to make your first popup on WordPress. First, you’ll choose a question.
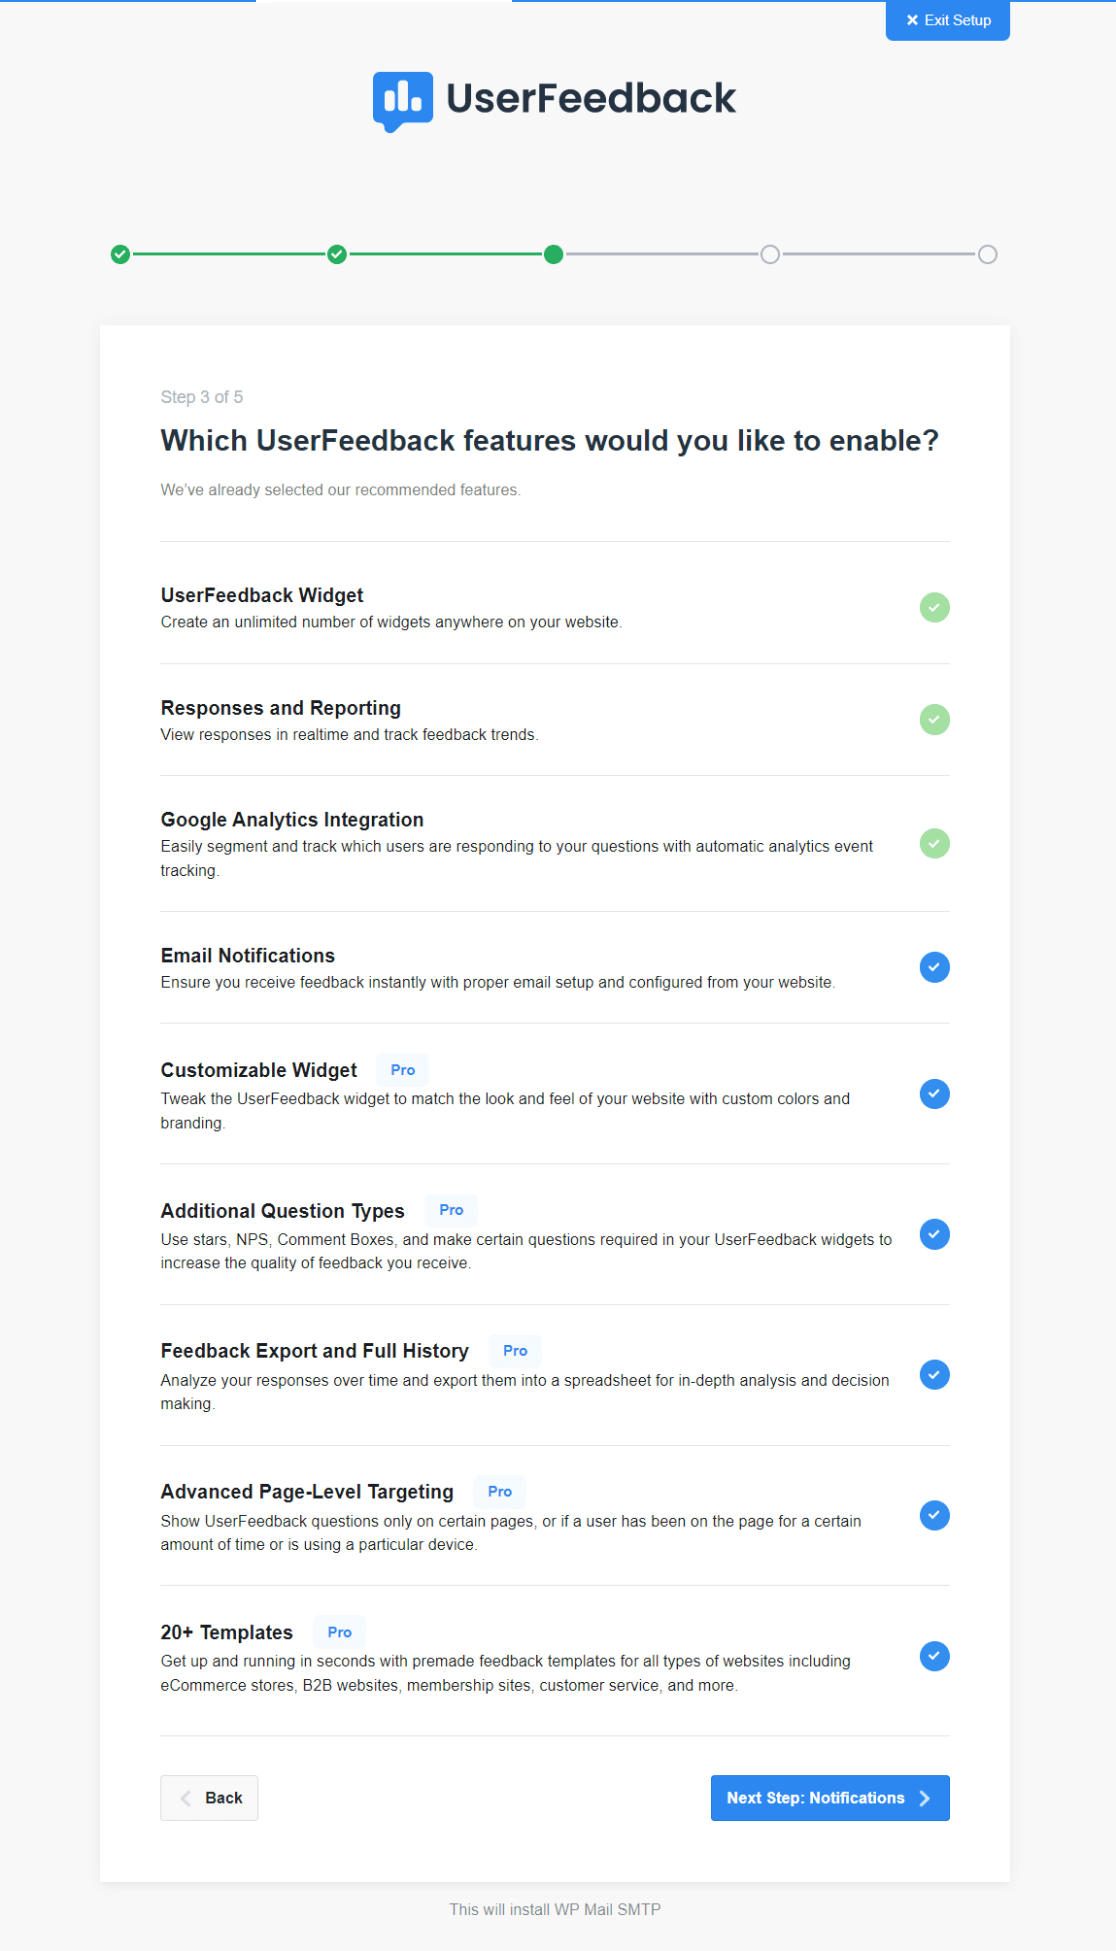
Now you’ll see a list of features to enable. We recommend leaving them all toggled on. Go ahead and click Next Step: Notifications at the bottom.
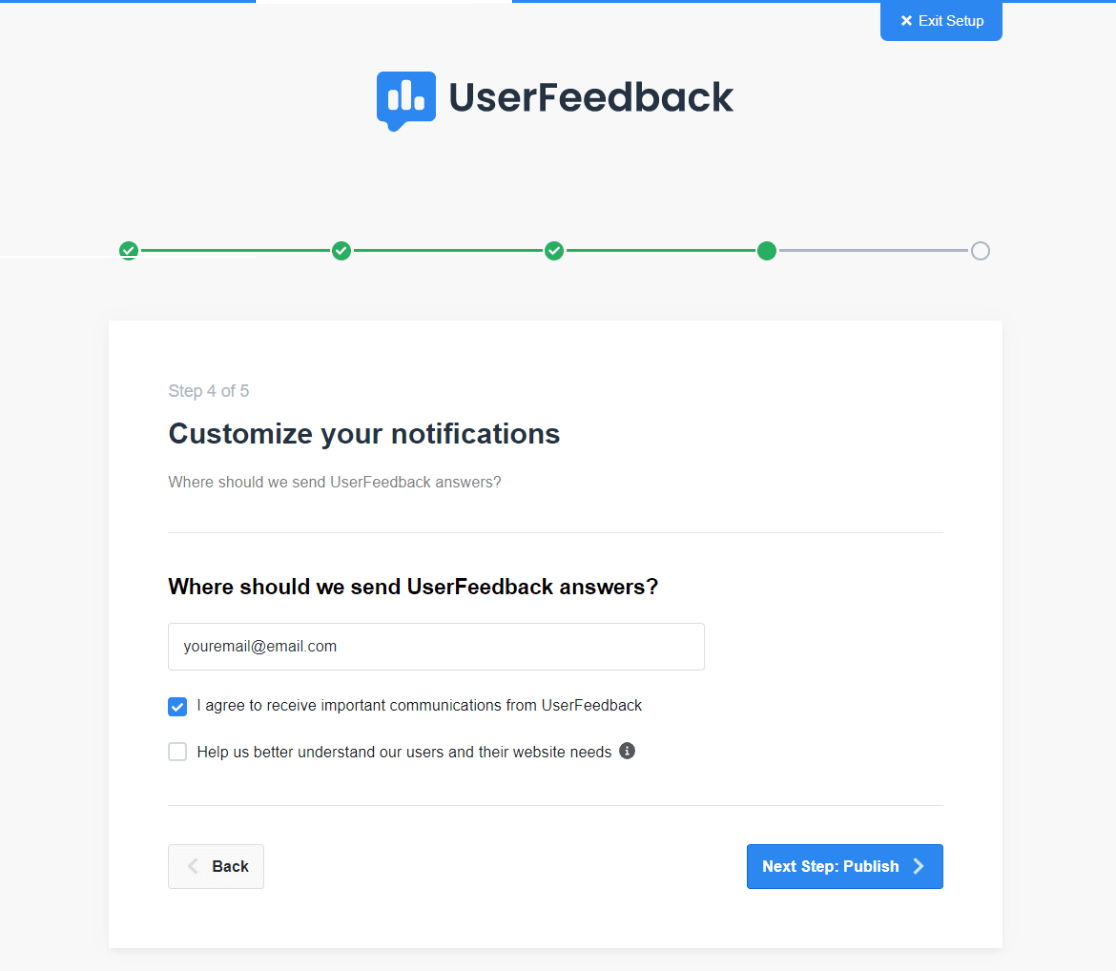
Next, you need to add the email where you would like to be notified about your popup form responses and set your communication preferences. Then, press Next Step: Publish.
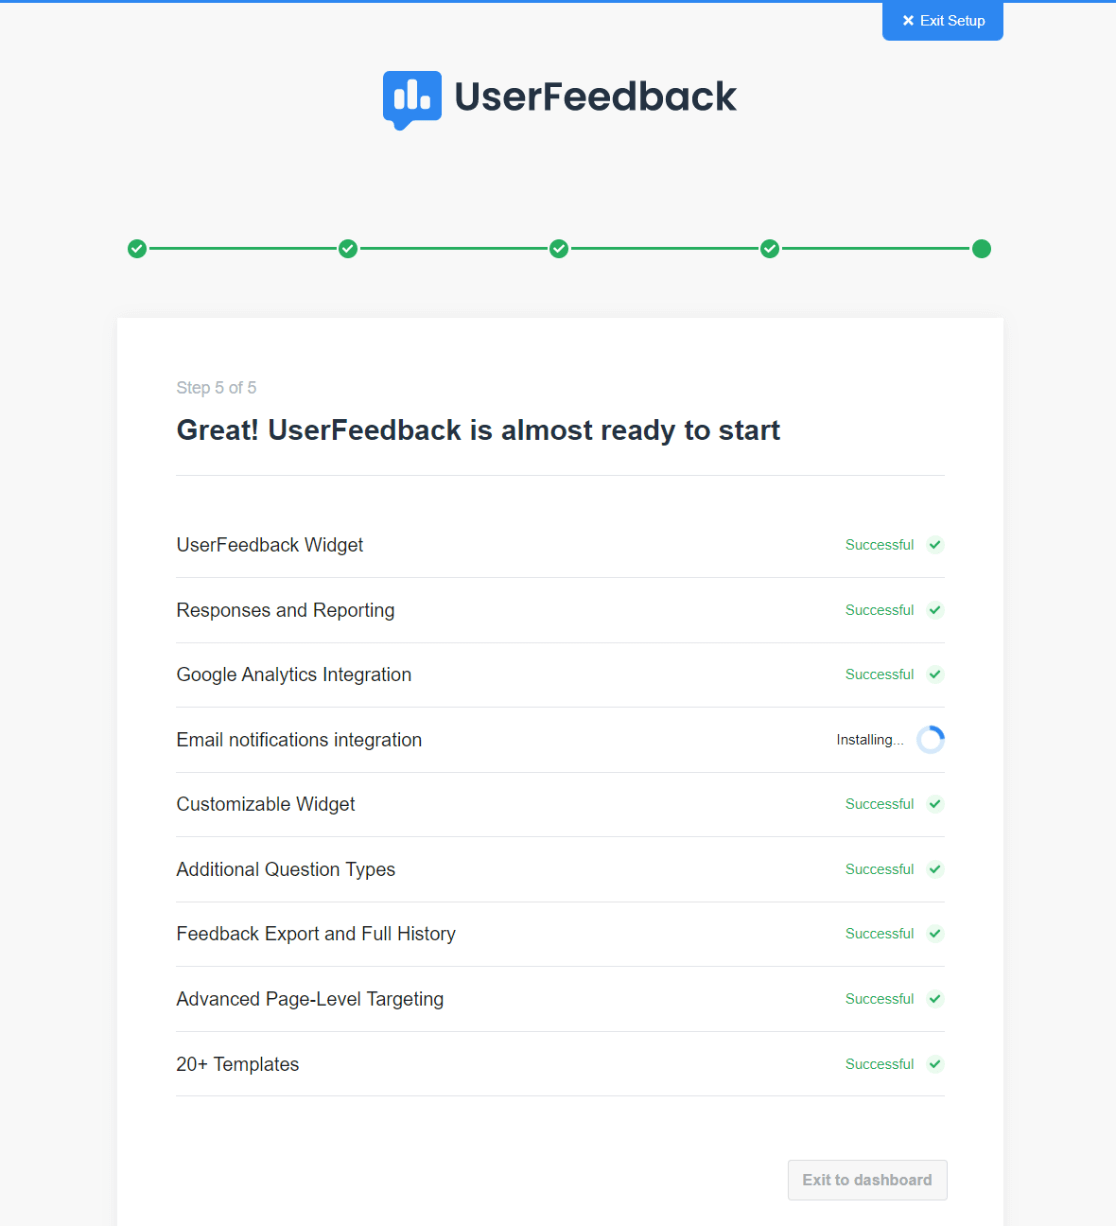
UserFeedback will now install all of the features and finish the setup. After every item finishes and says Successful next to it, press Exit to Dashboard at the bottom.
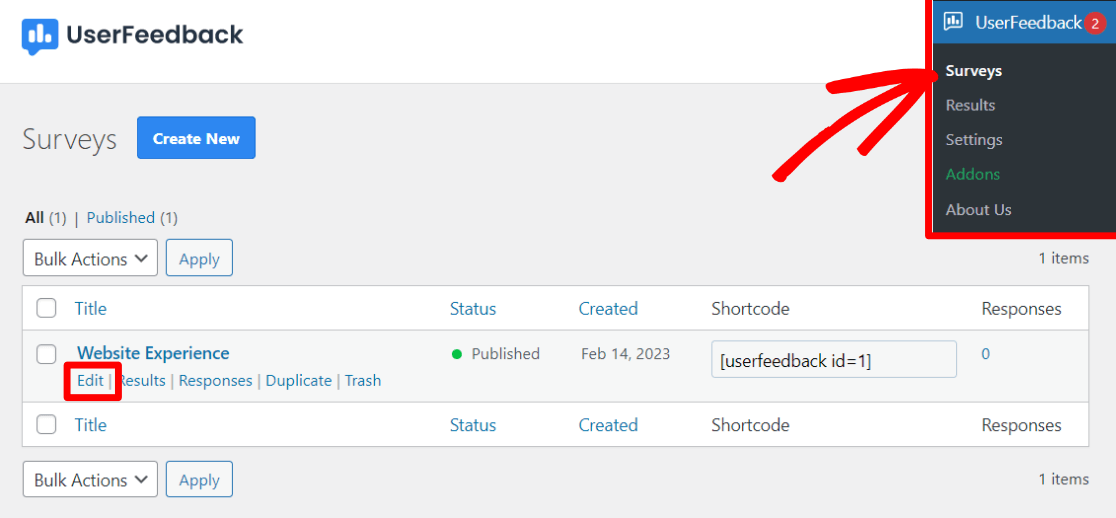
And that’s how to add a popup on WordPress using UserFeedback! You’ll now see the popup you just added under your list of surveys.
You probably want to edit your popup to match your brand, add questions, choose your targeting, make a different type of form popup, and customize other features.
You can click Edit below the popup survey or click Trash and use the Create New button to make a different popup survey and check out the variety of templates.
Head to this article section to find a full tutorial on additional steps for creating a popup survey in WordPress and using the addons in UserFeedback.
Check out this customer satisfaction survey popup that we made with UserFeedback!

Let’s go ahead and move right into our third method for how to add a popup on WordPress…
Method 3: Add a Popup on WordPress with Popup Maker and WPForms
With over 700,000 active users, Popup Maker is the 2nd most popular WordPress popup plugin at WordPress.org.
Install Popup Maker on WordPress
First, log in to your WordPress site and click Plugins » Add New. Type popup maker into the search bar and enter.

Find Popup Maker in the search results and click the Install Now button.
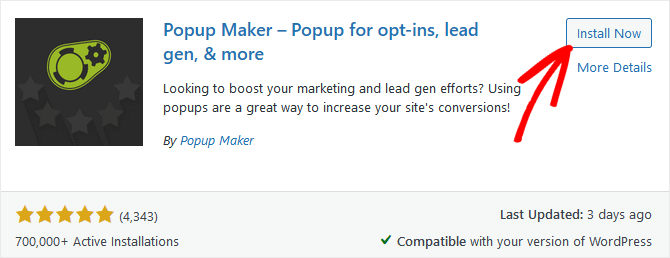
After the plugin installs, click Activate and it’s ready to go! Your WordPress dashboard should now include the Popup Maker menu. Click Popup Maker » Create Popup to start building a new popup.
Create a New Popup
The Popup Maker editor screen looks very similar to the WordPress page editor. Enter a name for your popup in the top field. If you want, you can also type in a headline that will appear inside your popup in the second field.
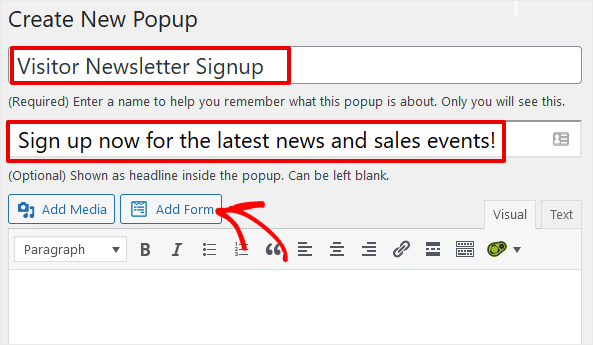
Now, all you need to do is click the Add Form button. A popup box will appear with a dropdown list where you can select the form you created earlier in WPForms.
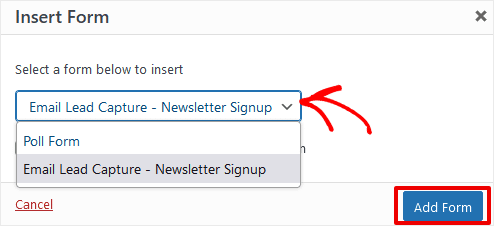
Go ahead and select that form, then click Add Form. This adds the WPForms shortcode for the form you picked to the popup.
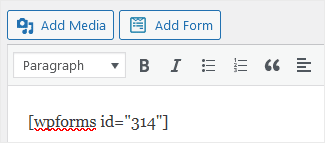
Okay, now before you publish, you’ll need to set up triggers to define when and where the popup displays on your site.
Scroll down to the Popup Settings box and click the Add New Trigger button.
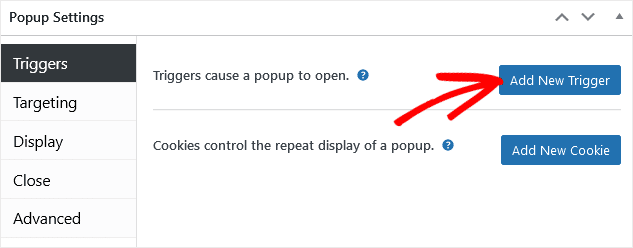
Here you’ll choose whether your popup shows after a time delay, on click, or after a form submission. Let’s select Time Delay.
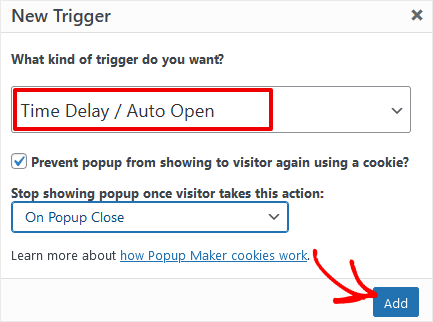
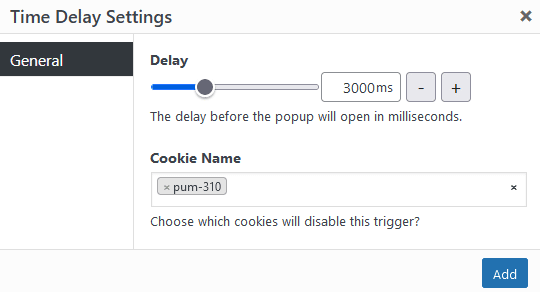
Click the Add button and Popup Maker will ask how long the delay should be, in milliseconds. The default is 500, which is one-half of a second. You can leave this as is, or change it if you prefer. Then click Add again.
The next step in setting up your popup is to choose where it shows on your site, to whom, and so on. Click the Targeting tab.
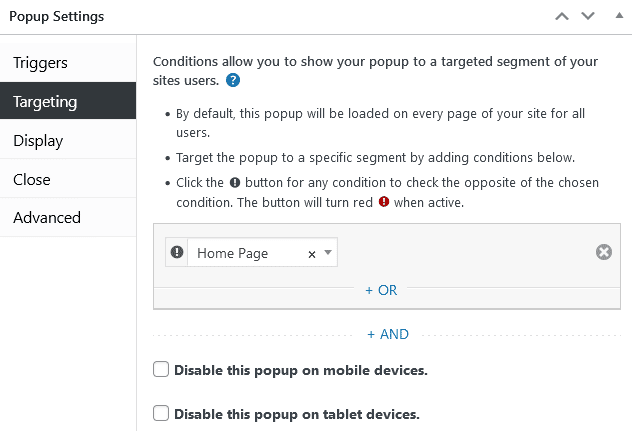
The dropdown list on this setting lets you select a particular page where the popup will display. Popup Maker also has a number of filters so you can show it on pages according to categories, tags, hierarchies, and more.
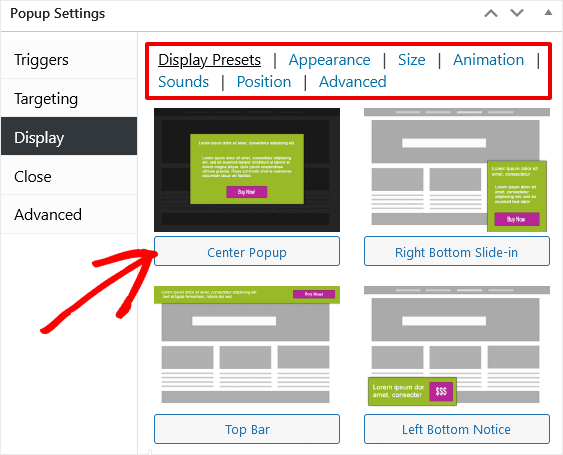
The next setting offers several Display options. Pick one of the 4 display options from the tiles, then adjust by clicking the links above for Appearance, Size, Animation, Sounds, Position, and Advanced settings.
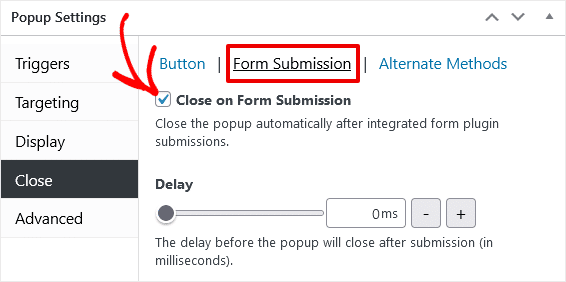
All right, we’re almost done! Click the Close tab in the Settings box. Now, you need to tell your popup to close after someone submits the signup form. Click Form Submission at the top, then check the Close on Form Submission checkbox.
Okay, you can leave everything else on the default settings for now. Let’s save by clicking the Publish button in the right sidebar.
Now, go visit your website to see your live popup!
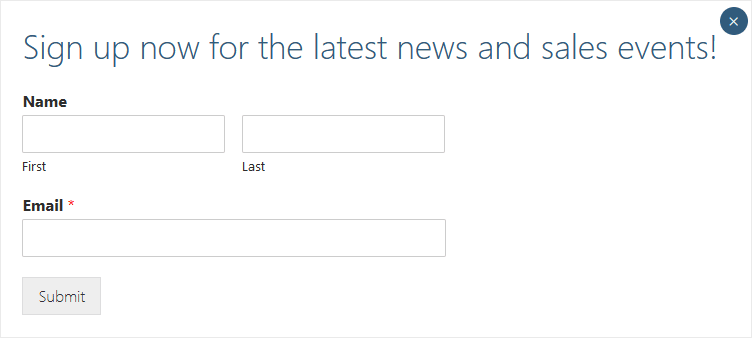
As with our first method, to see new subscribers you must go to WPForms » Entries to view contact info for people who sign up.
While OptinMonster is a more powerful tool overall, with more options, built-in templates, and extensions, WP Popup Maker is a simple alternative that works well for basic campaigns.
And that’s all for our tutorial on 2 easy ways to add a popup to a WordPress website. You also learned how to create an opt-in form to collect email leads using WPForms.
Track Form Conversions with MonsterInsights
We looked at how you can view form entries in the WPForms Entries screen. However, that doesn’t give you much information about how your forms are performing.
To get more details on form performance, you need a tool like MonsterInsights, the best WordPress plugin for Google Analytics.
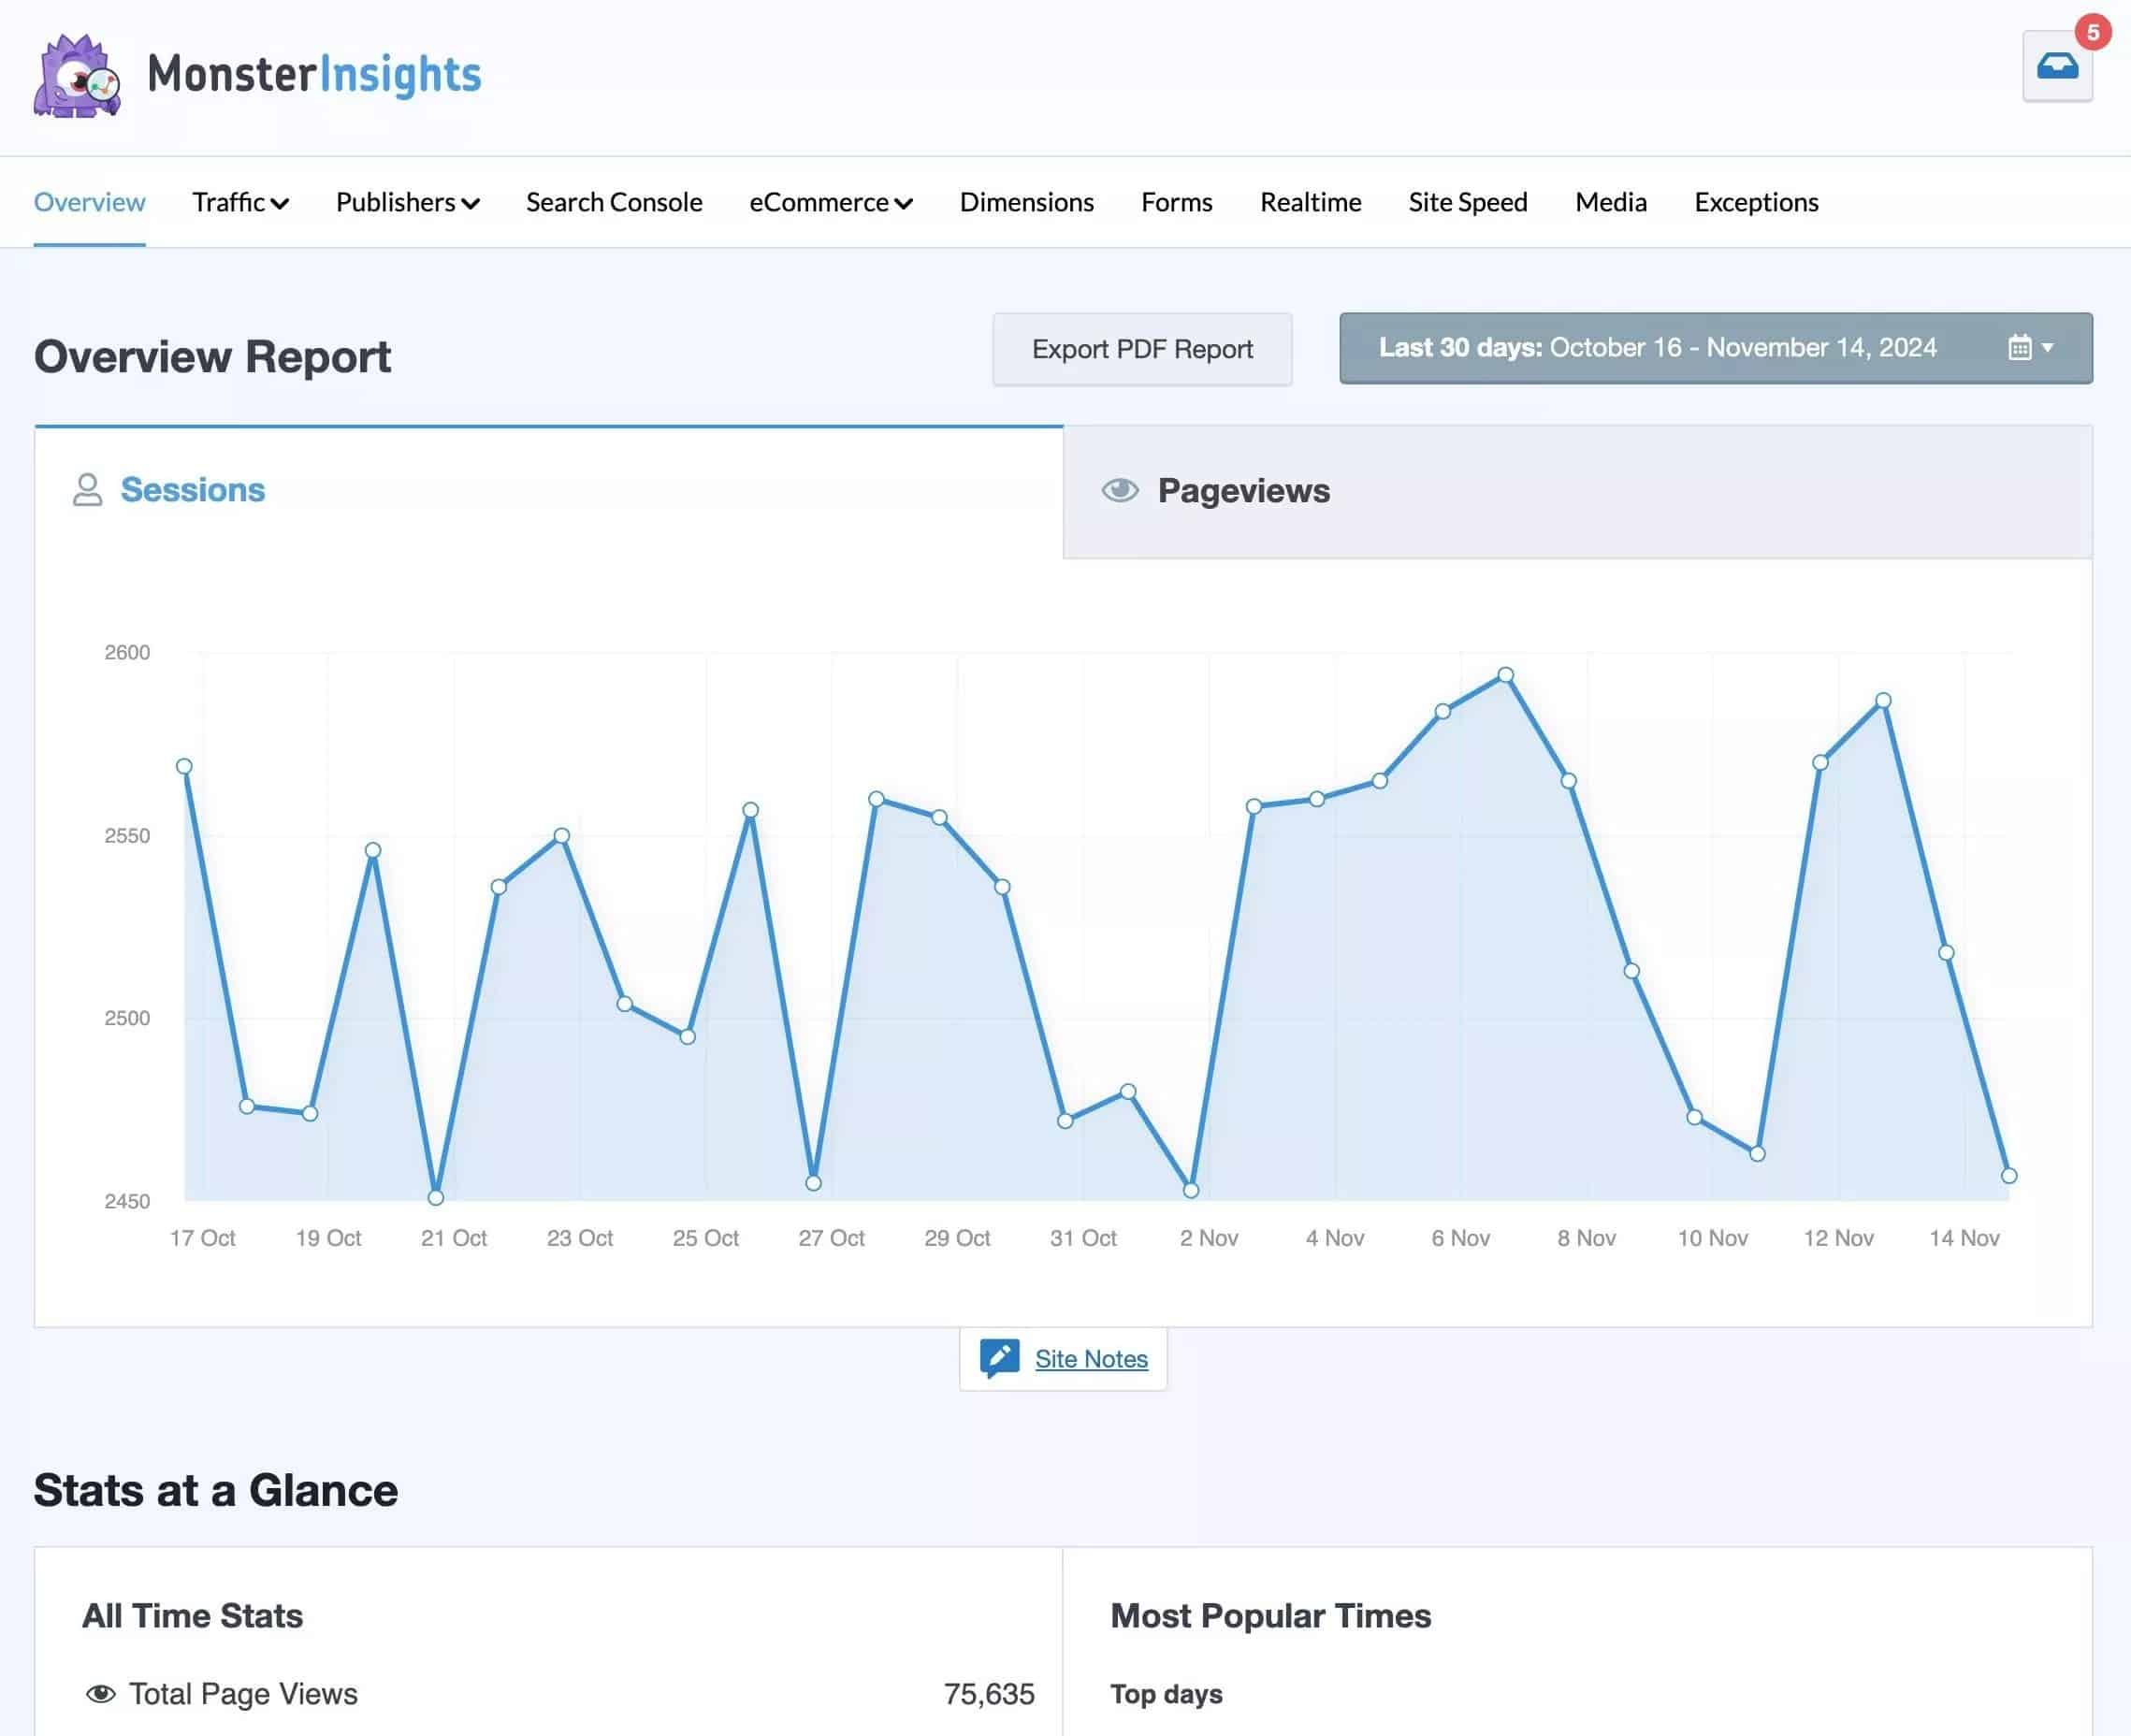
MonsterInsights offers a Forms addon that lets you see how users are interacting with forms on your site, including impressions, conversions, and conversion rate per form. This is great if your site has multiple forms or popups to track.
Once you have MonsterInsights installed with forms tracking activated, you’ll find the Forms report by going to Insights » Reports and clicking the Forms tab.
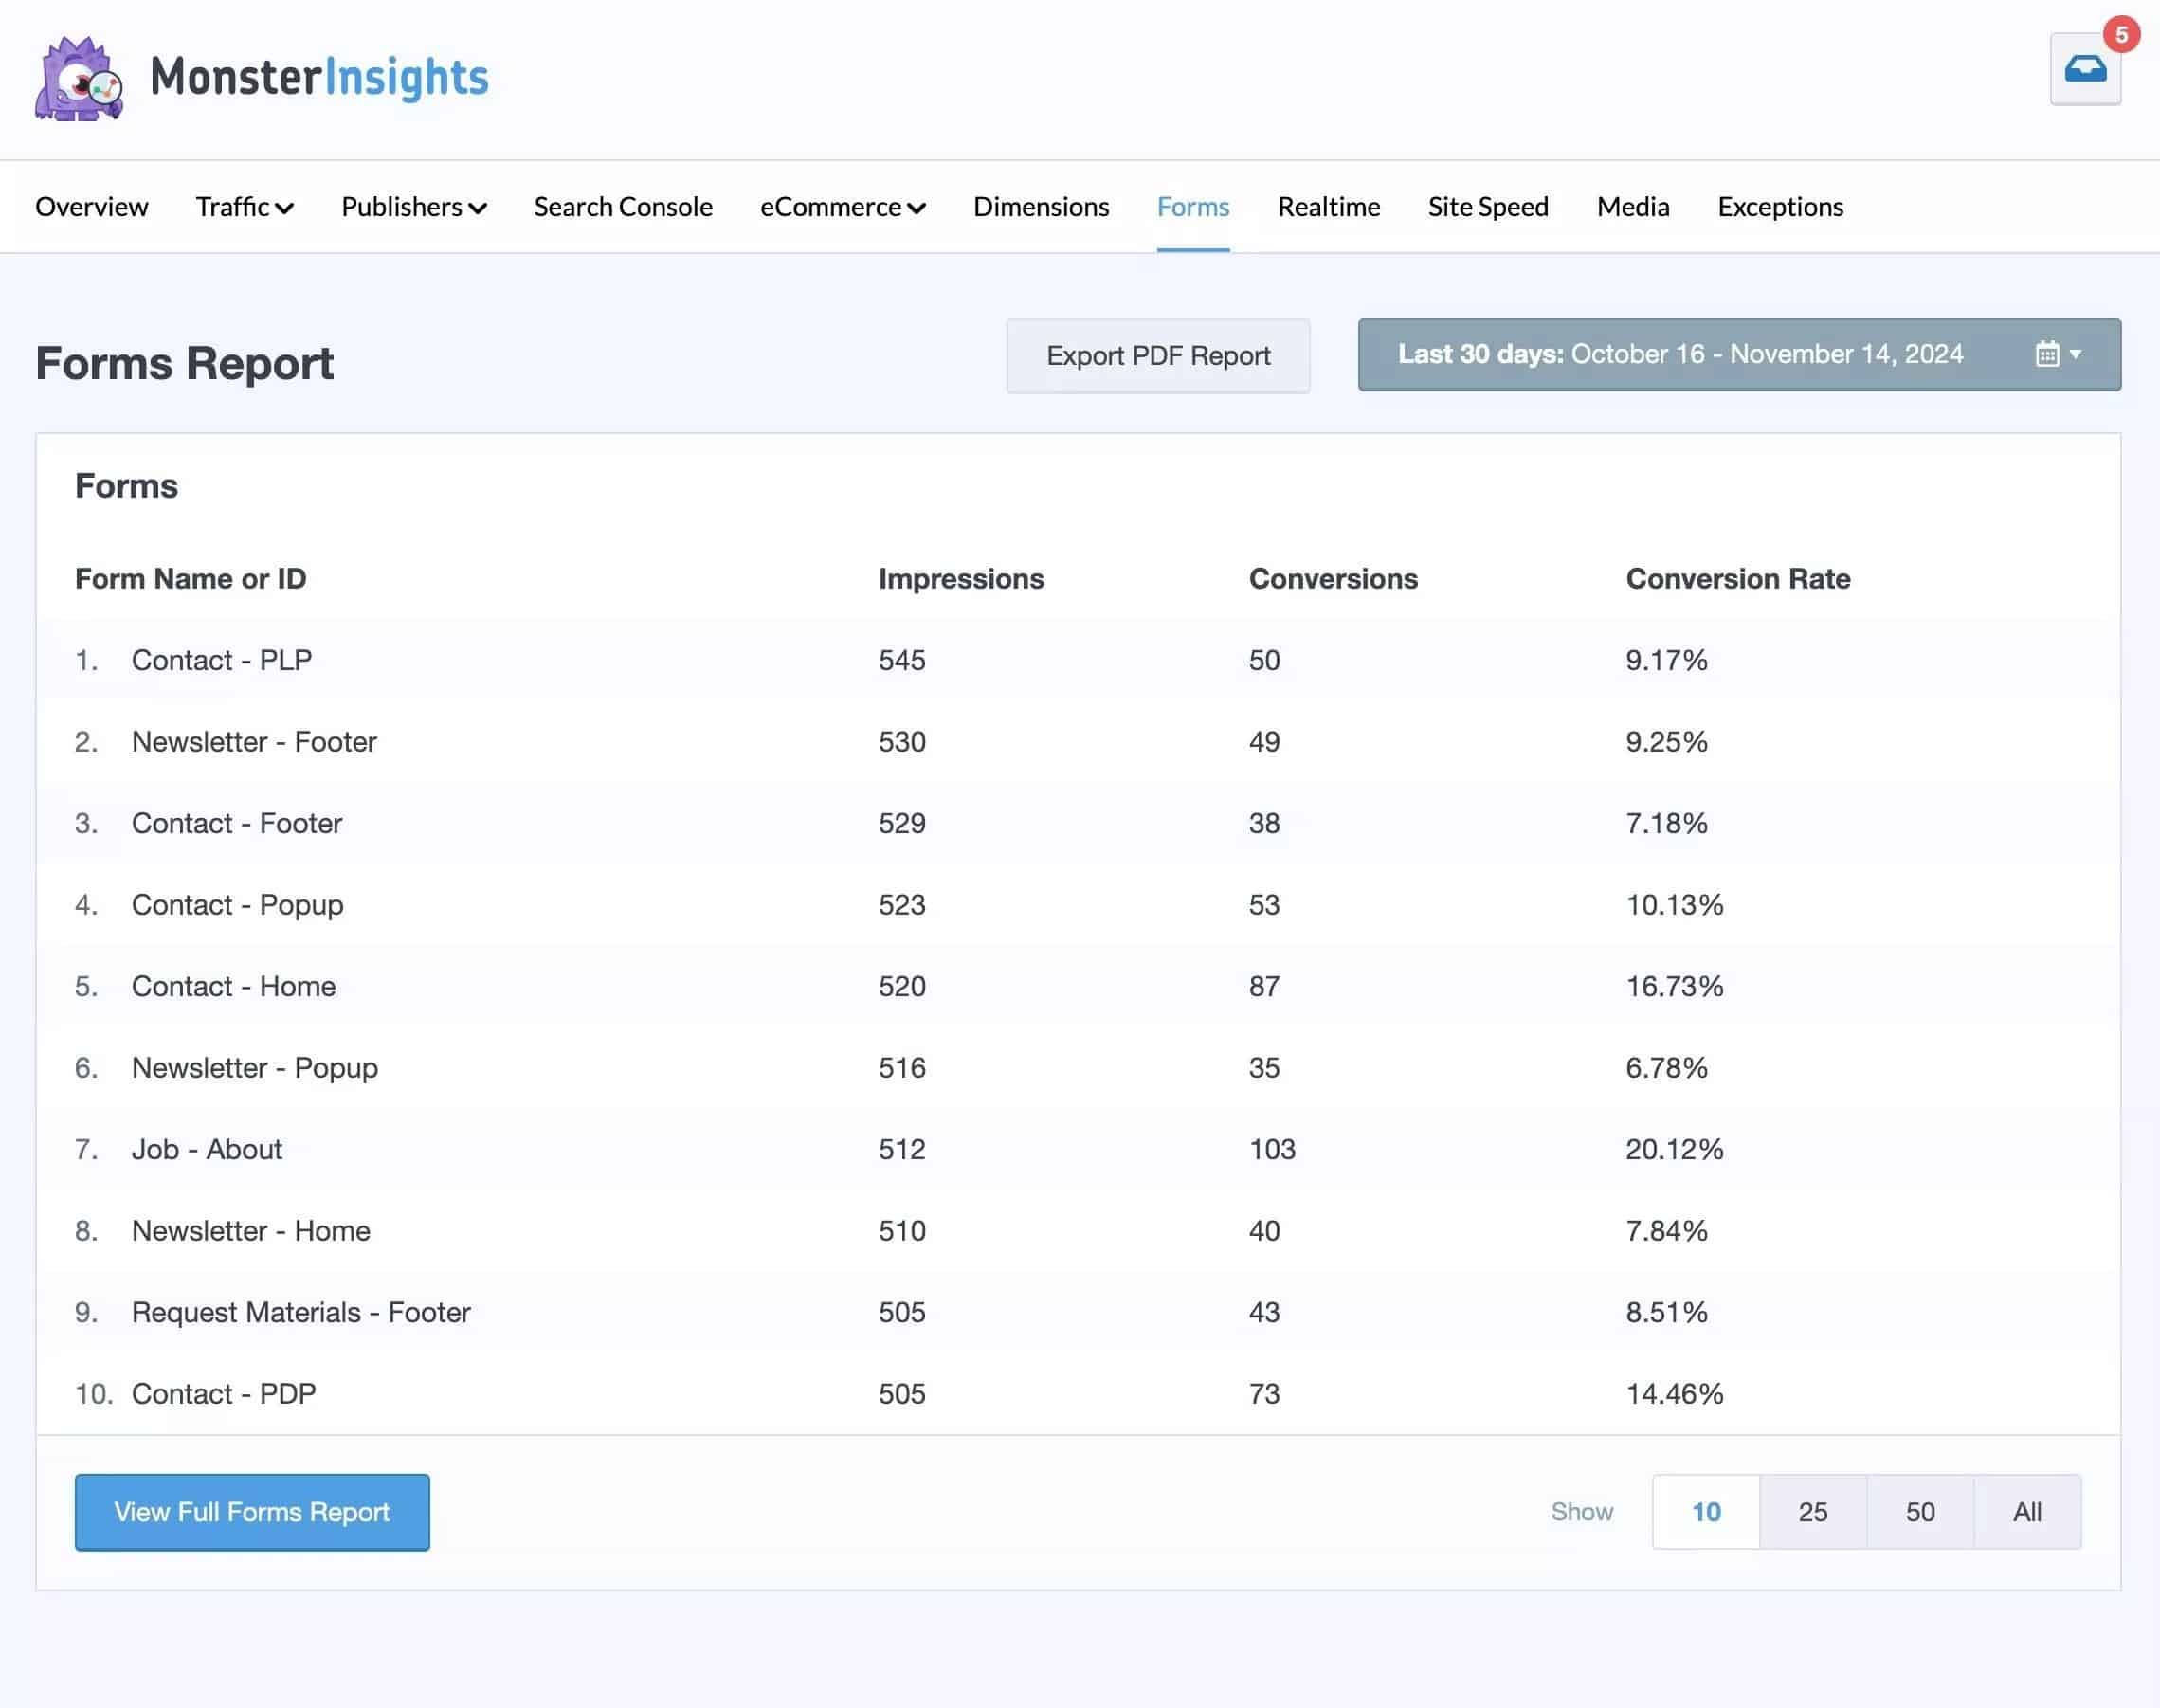
Now you can view all your forms, impressions and conversions on one page in WordPress, quickly and efficiently. Figure out whether your forms and popups are displaying correctly, and whether they’re converting well or need improvement.
Note: If you’re using UserFeedback (method 2) to create a popup in WordPress, you won’t need any additional steps for form tracking. MonsterInsights is integrated with UserFeedback and will automatically track your popup forms by default! You can even navigate to UserFeedback from your MonsterInsights menu.
MonsterInsights’ tracking seamlessly integrates with UserFeedback, and it works automatically with just about any other WordPress form plugin, including WPForms, Gravity Forms, Formidable Forms, Ninja Forms, and more.
Need more info on getting started with MonsterInsights? Check out How to Add Google Analytics to WordPress.
If you liked learning about how to add a popup to your website, you might want to read:
How to Create an Email Newsletter (In 6 Easy Steps)
How to Build an Email List: 16 Highly Effective Ways
How to Do a Giveaway on Your WordPress Website
Finally, don’t forget to follow us on YouTube for more helpful reviews, tutorials, and Google Analytics tips.


