Do you want to boost your website traffic and grow your business using Google Ads, but you don’t know how or where to start? You’re not alone. Many business owners and marketers are intrigued by Google Ads’ potential yet overwhelmed by its complexity.
Google Ads is the go-to platform for online paid advertising, and with good reason. It offers unmatched reach, sophisticated targeting options, and the potential for immediate results. Unlike traditional advertising methods or even organic SEO efforts, Google Ads can put your business in front of potential customers at the exact moment they’re searching for products or services like yours.
In this guide, I’ll demystify Google Ads, breaking down its components into easy-to-understand sections. I’ll dive into what the various types of Google Ads are, how they work, and how you can use them to achieve your business goals. Whether you’re aiming to drive more traffic to your website, increase sales, or boost brand awareness, I’ve got you covered.
I’ll also walk you through setting up your first campaign, share tips for success, and explore how you can track and optimize your Ads’ performance. By the end of this guide, you’ll have a solid understanding of Google Ads and the confidence to start your own campaigns.
Let’s get started.
What is Google Ads?
Google Ads is an online advertising platform by Google that allows businesses to create ads targeting users on Google Search, YouTube, and partner websites. Advertisers can bid on keywords to display ads in search results or other placements, optimizing for clicks, impressions, or conversions.
Using Google Ads, you can run PPC (pay-per-click) ads that appear on search results pages (at the top and bottom), on the display network, on YouTube, and more.
Here are some of the most popular types of Google Ads campaigns:
Search Ads
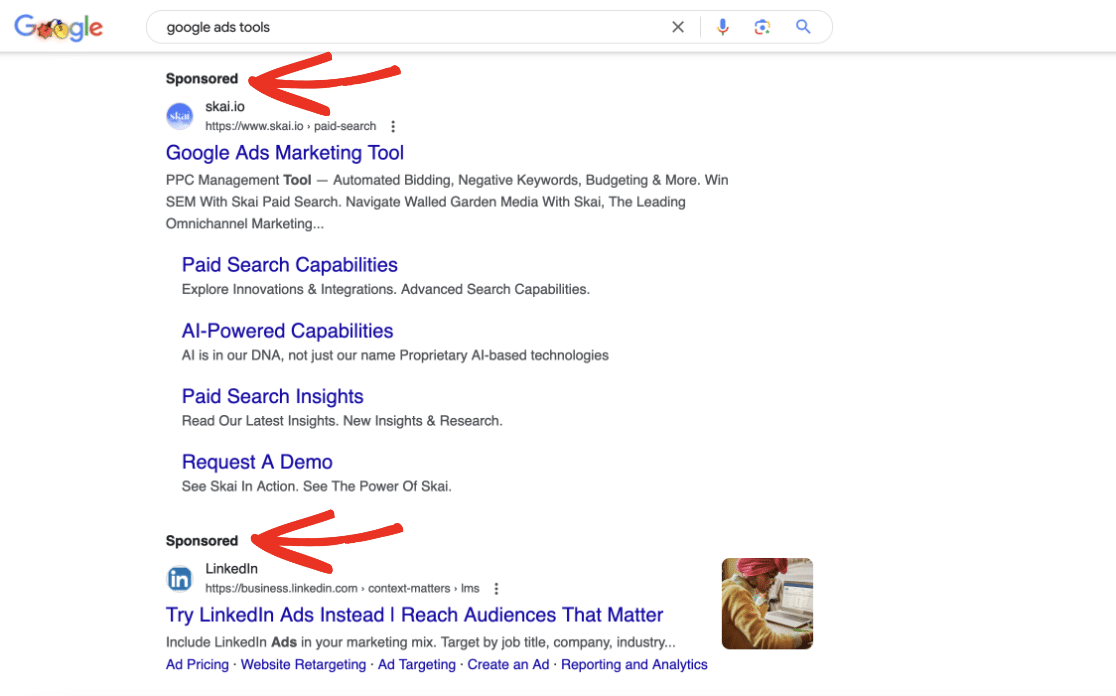
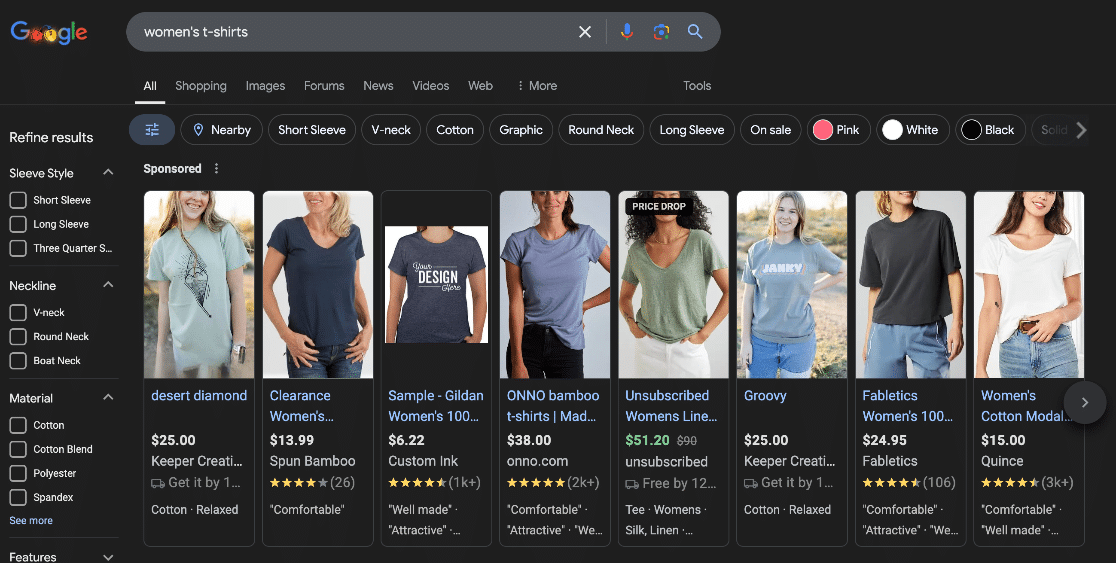
Search ads appear at the top and sometimes the bottom of the page in Google search results. They have a Sponsored notice to let searchers know that they’re paid ads. Advertisers “bid” on these ad slots by choosing an amount they’re willing to pay per click.
Display Ads
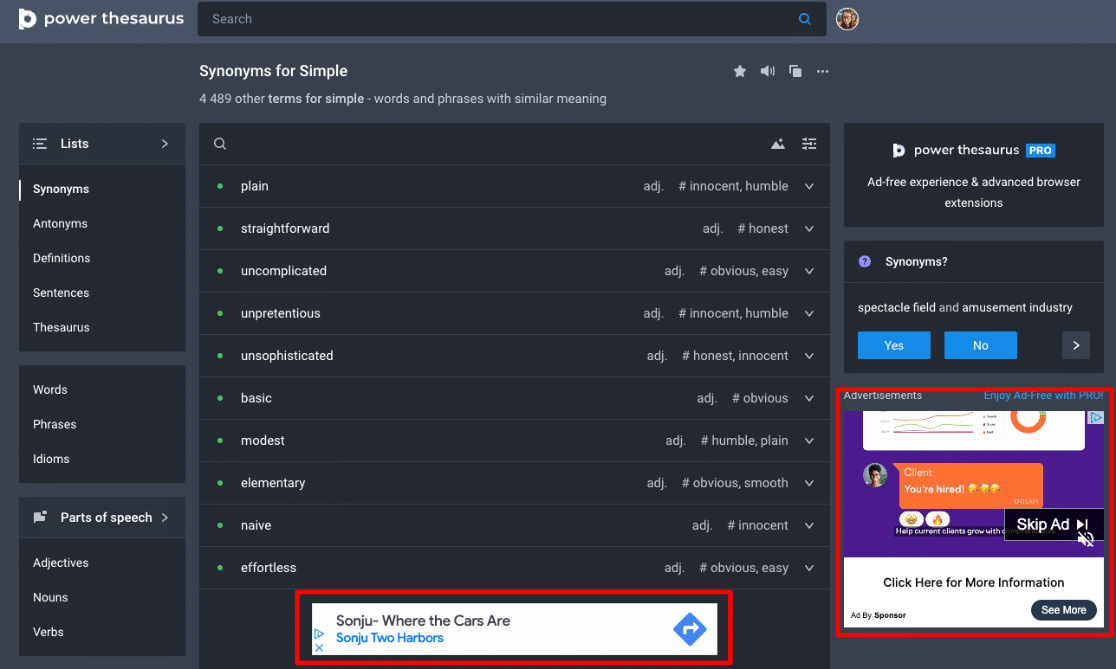
Display ads are visual ads that show up on websites across the Google Display Network. For example, a common place for these types of ads is the sidebar of your favorite blog, tool, or resource. There are a few different ways to bid on display ads, including cost-per-click and cost per 1,000 impressions.
Video Ads
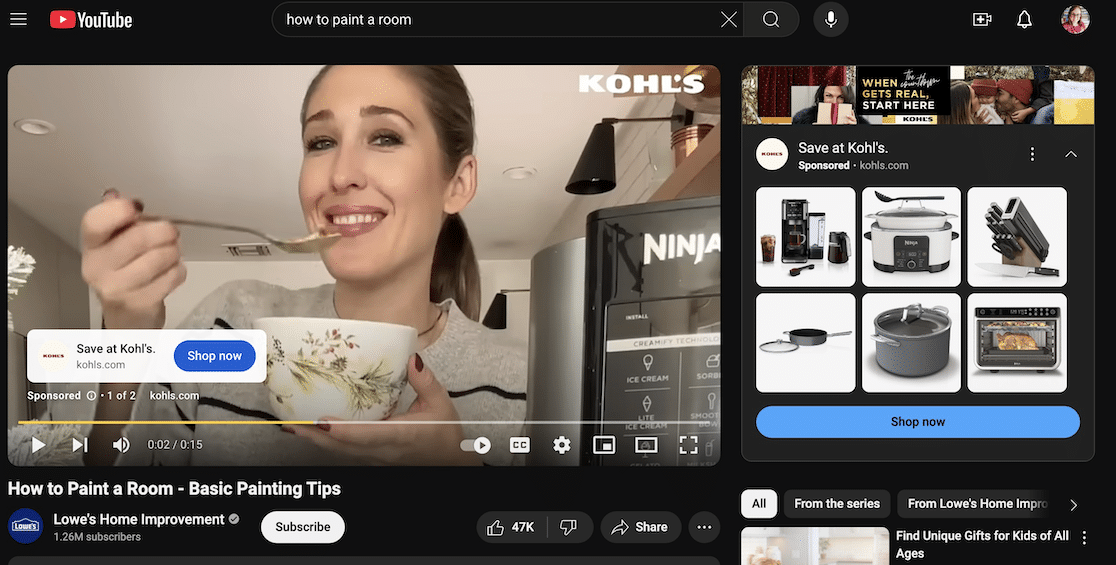
Video ads run on YouTube and other video partners. They play before and during other videos.
Shopping Ads
You’ve likely come across shopping ads when searching for a product you needed to buy. They’re product listings that appear in Google Shopping and in search results, depending on the search query.
Should you use Google Ads?
The decision to run paid ads can be difficult. Will it be worth it? Will the cost of the ads pay off?
The best way to find out the answers to those questions is to give it a try, after learning about how to create effective ads and landing pages.
If you think there’s a possibility that Google Ads could help you grow, it’s worth giving them a shot. Here are some of the ways Google Ads can be super beneficial for your business:
- Instant Traffic Boost: Google Ads can provide an immediate increase in website visitors. Earning organic traffic from search engines and/or social media can take months, whereas paid ads can start driving traffic as soon as your campaign goes live. Of course, you need to make sure your user experience and conversion rate optimization are dialed in before that traffic starts flowing to your site.
- Increased Reach: Running Google Ads will naturally put your brand in front of more people. Even if they don’t click on your result, they’ll have seen your brand there in search results. Putting your products or services out there with your brand gets you in front of more eyeballs, helping you increase brand recognition.
- Highly Targeted Advertising: One of Google Ads’ strongest features is its precise targeting capabilities. You don’t want to be paying for clicks or impressions from people who aren’t interested in your products or services, right? You can create ads based on factors like location, interests, and search intent, ensuring you reach the right people at the right time.
- Prime Positioning: You can work for months and months on a highly competitive organic keyword only to end up stuck at the bottom of page one or back on page two. Google Ads eliminates that issue, allowing you to secure top positions in search results above even the first organic result. This prime real estate can significantly increase your visibility and click-through rates.
Running Google Ads complements your organic SEO efforts, giving your business a powerful, more immediate boost while your long-term strategies continue to develop.
Alright, now you’ve got the benefits of Google Ads down. It’s time to move on to the need-to-know details about how Google Ads works!
How does Google Ads work?
Google Ads operates on an auction system. For Search ads, after you’ve chosen which keywords you want your ads to potentially show up for, Google may choose to show them to searchers who’ve typed in those queries. To decide which ads to show, Google’s system looks at several different factors and then assigns each of your ads an Ad Rank.
Ad Rank is used by Google to decide when and where to show your ads. If you have a higher Ad Rank, your ad may be at the top of the page. If others who bid on the same keyword have a higher ad rank than yours, they’re likely to rank above you.
And it’s not all based on how much you’re willing to pay!
Ad Rank is calculated using a list of different factors, such as:
- Maximum Bid: The highest amount you’re willing to pay for a click.
- Quality Score: Google’s assessment of the relevance and quality of your ad and landing page. This includes factors like keyword relevance, ad relevance, landing page experience, and expected click-through rate (CTR).
- Competitiveness: If there are multiple advertisers vying for the top ad spots, it can be harder to win them.
- Context: Google’s system is more complicated than you might think! It also looks at things like where the searcher is located, the type of device they’re on, other ads on the page, the nature of the search, and more.
- Asset Impact: If your ads include assets like phone number or links to more pages on your site, Google Ads will look at the expected impact of those as well when choosing your ad.
Hoping to improve your Ad Rank so your ads have the potential to rank higher? Focus on:
- Keyword Relevance: Use relevant keywords that match your users’ search intent. Before you choose a keyword for your ad, Google it yourself. Does your ad fit with the results that show up?
- Ad Relevance: Create compelling ad copy that aligns with your keywords and landing page.
- Landing Page Experience: Ensure your landing page is relevant, user-friendly, and loads quickly. You’ll also want to make sure it’s properly optimized for conversions!
- Bid Amount: Set competitive bids, but balance them with your budget and desired return on investment (ROI).
Now, you know the basics of how your ads are chosen (or not) to appear in search results. You know you need a high-quality landing page, a competitive bid, and relevant keywords. So, let’s move on to setting up your first campaign!
What is a Performance Max campaign?
A Performance Max campaign is a Google Ads campaign type designed to maximize conversions and reach across all Google advertising channels. It uses machine learning to optimize ad performance by combining assets like text, images, and videos. Advertisers benefit from broad audience targeting and automated bidding.
In general, it’s an easier campaign to set up and run because Google does some of the work for you. It puts together the right combination of headlines, descriptions, and other assets, puts your ads in the places it thinks will work the best based on your goal, and decides on a bid for each location. This makes it a good place to start for beginners.
In the next step, I’ll show you how to set up your first Google Ads campaign. As you’re setting it up, Google will automatically turn it into a Performance Max campaign.
How to Run Paid Ads on Google
Ready to create your first Google Ads search campaign? I’ll walk you through each step.
Before we start, I’m going to assume you’ve already created some sort of appropriate landing page on your site (even if it’s just your home page for now), performed a little bit of keyword research, and thought about your goals.
Need help with keyword research? Check out:
How to Do Keyword Research for SEO: Quick-Start Guide
How to Use Google Keyword Planner (A Step-by-Step Guide)
You’re about to pay to send traffic to your site, so you want to make sure you’re starting with clearly defined goals. What does success look like? It might be increasing sales, generating leads, getting newsletter subscribers, or just raising brand awareness.
With that, let’s dive in!
Step 1: Sign into Google Ads
If you haven’t done this already, it’s time to create a Google Ads account.
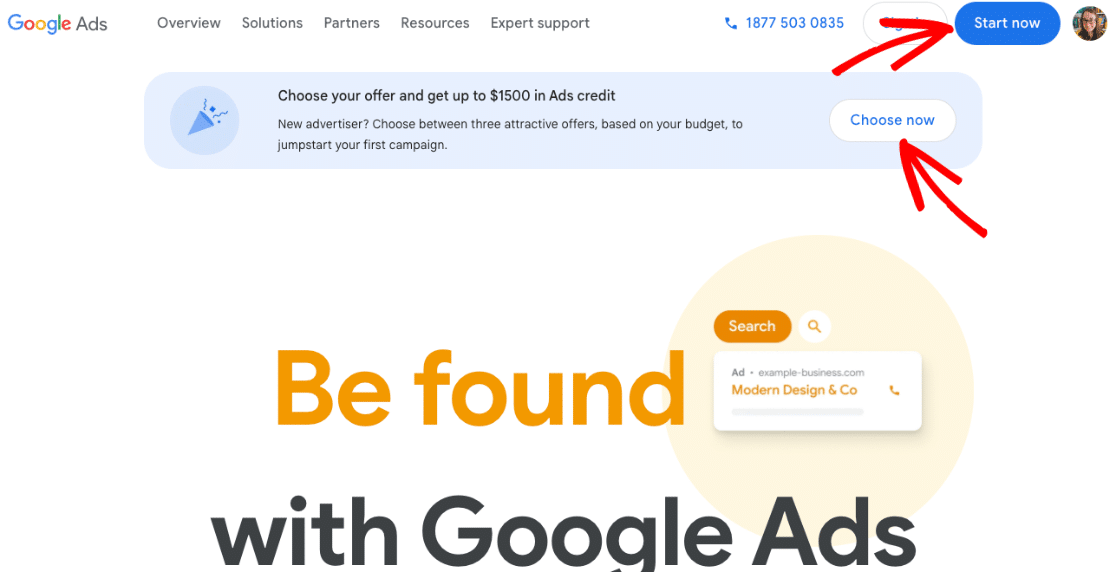
Go to Google Ads homepage and click Start now. Note that there may be promotions for new advertisers that you can check out as well by clicking the Choose now button:
Sign in with your current Google account, or create a new one to use for advertising.
Step 2: Add Business Information
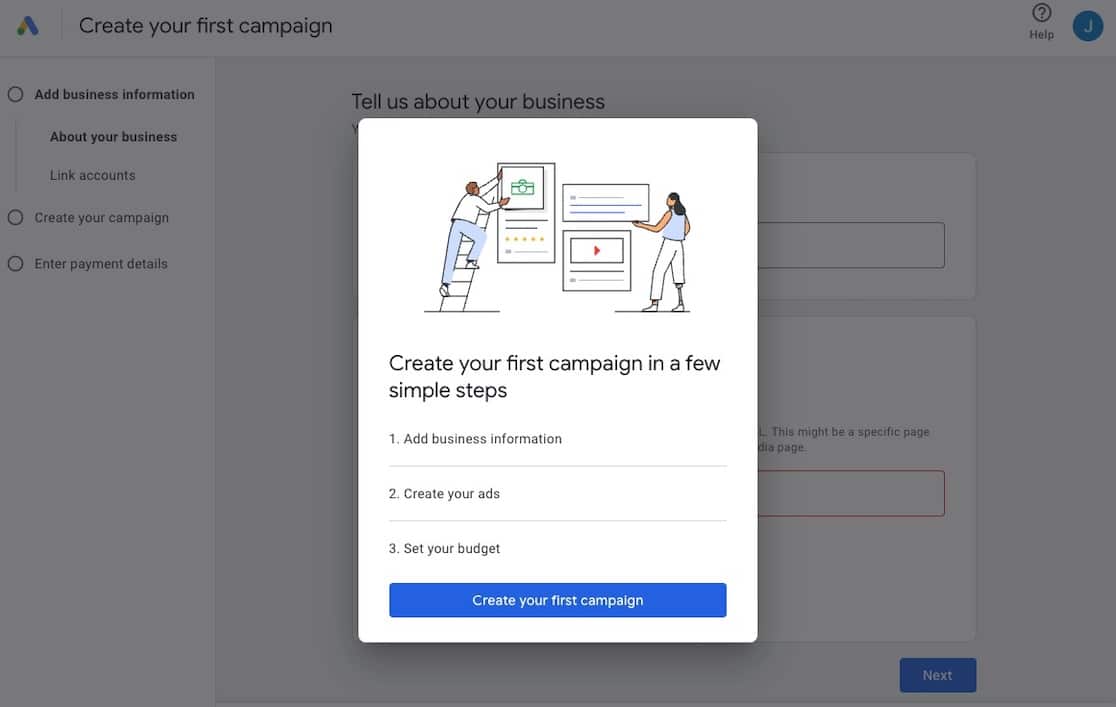
Once you’ve signed in, Google will begin to walk you through creating your first campaign. Go ahead and click Create your first campaign:
You’ll be guided through adding all of the necessary business information, including your business name and where people should go when they click on your ad. Put the URL there that you want to send your first ad(s) to. Don’t worry, this is something you’ll be able to change later:
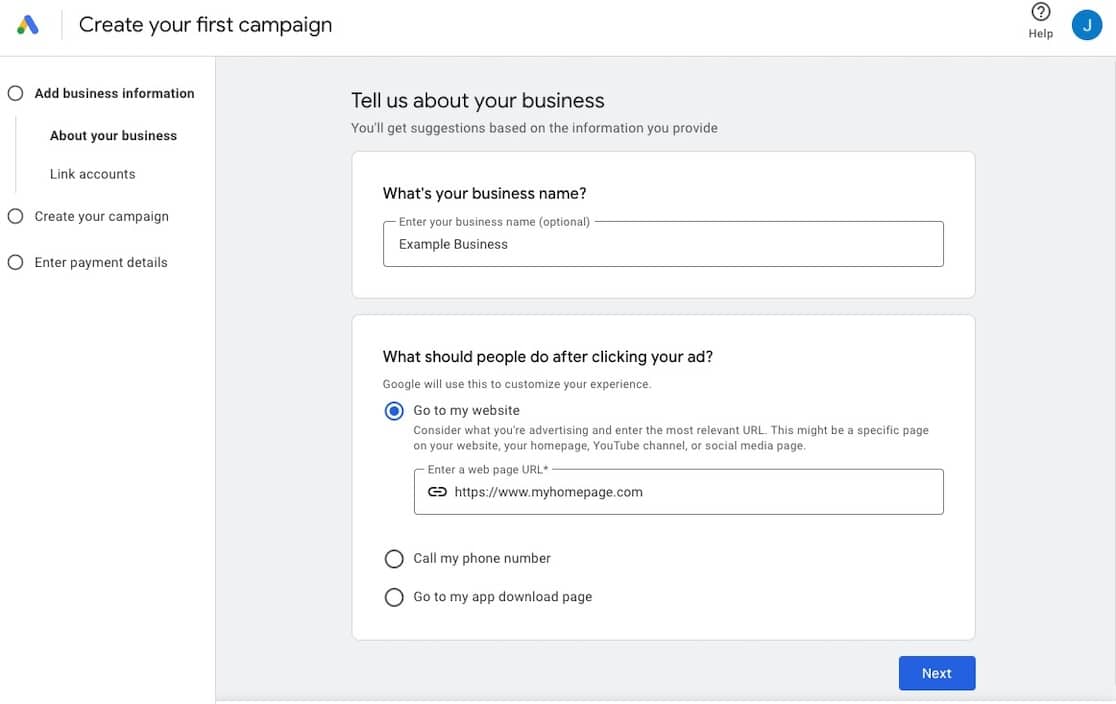
When you’re done, click Next.
On the next screen, you’ll have the chance to link any accounts to your Google Ads that you’re going to need, including adding your phone number (if you want any of your ads to include your phone number):
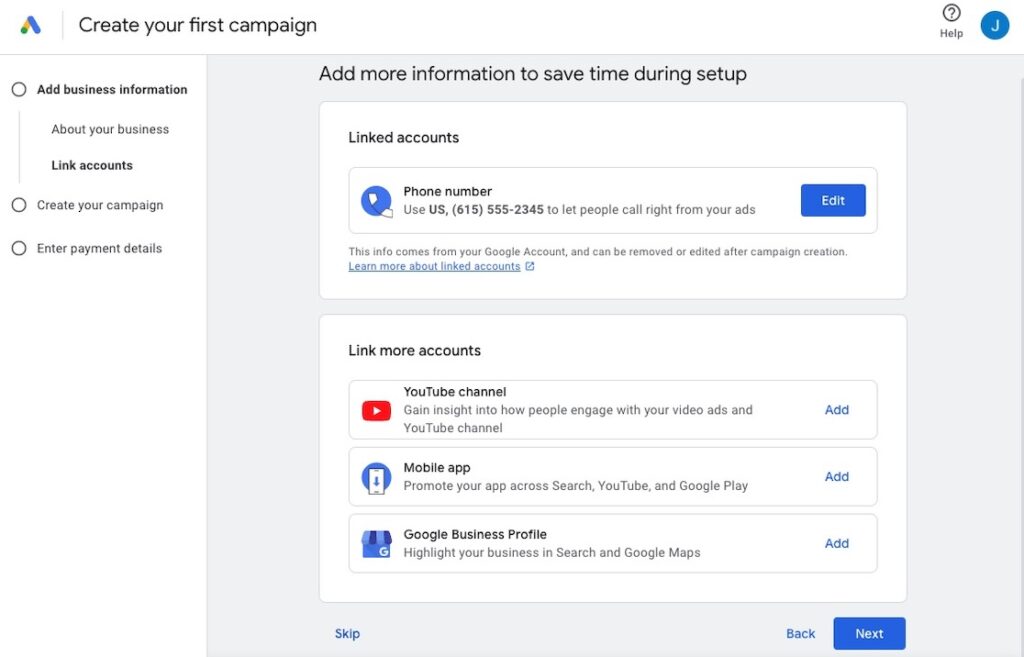
You’ll be able to add accounts later, too. When you’re done, click Next.
Step 3: Create Your Campaign
Next, you’ll walk through the steps of actually creating your first campaign.
Choose Goal
The first thing you’ll do here is select a goal! Note that you’ll be able to create other campaigns later with other goals. For now, pick just one to get started with:
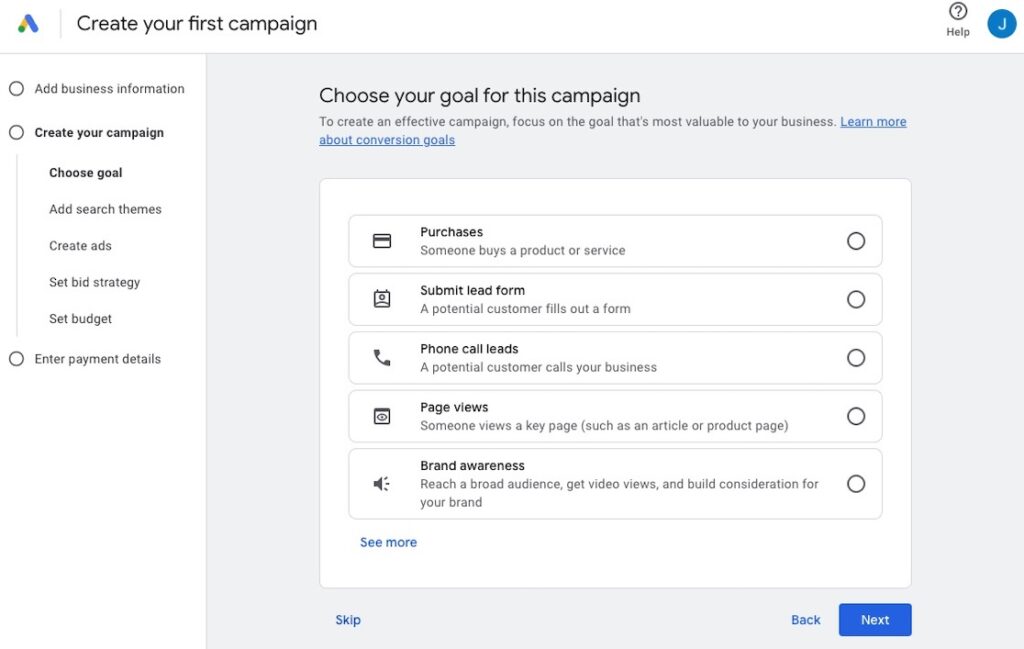
Each goal will come with a different further question in order to get things set up for your campaign. For example, selecting Submit lead form will then ask you which page Google should count as a successful goal (like the thank you page). Follow the prompts to configure whichever goal you choose.
When you’ve picked and configured your goal, click Next.
NOTE: The rest of your experience may vary slightly based on which goal you’ve chosen. I’ll walk you through the next steps after choosing Submit lead form.
Add Search Themes
On the next page, you’ll need to enter search themes. These are essentially keywords and topics. When you start typing in a topic, Google will give you suggestions. For example, if you want to show your ads to marketing professionals at small businesses, you might use the keyword “small business marketing.” Hit enter after each keyword or phrase to use it in your campaign. You can add up to 25.
Remember, these should be closely related to your products, services, or content, and also match your audience’s search intent.
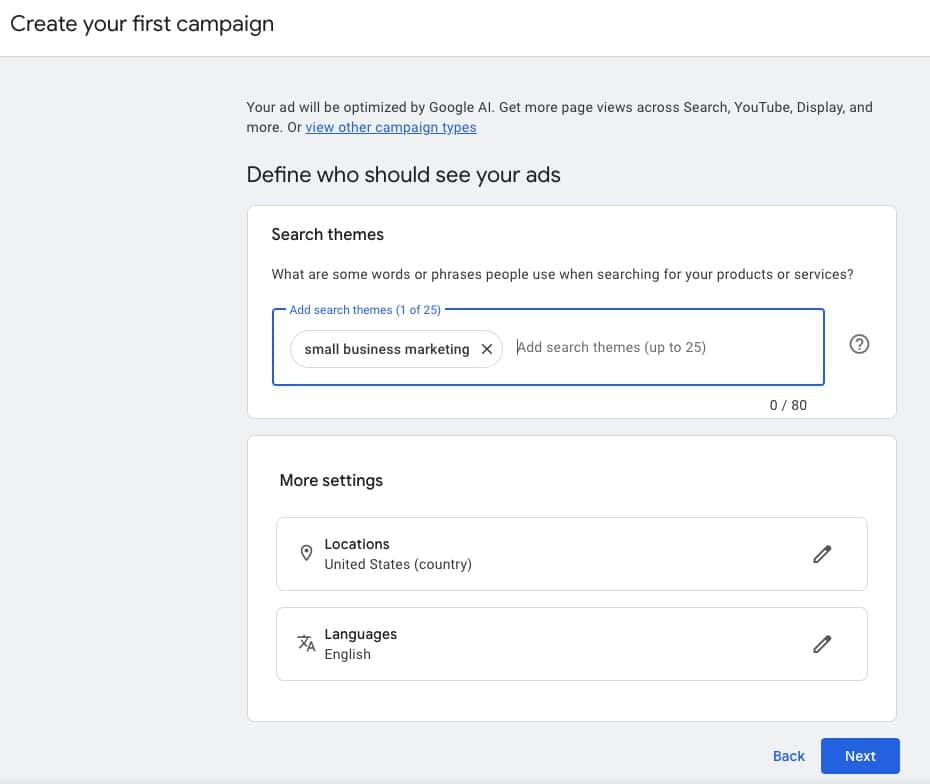
When you’re done adding keywords, click Next.
Generate Assets
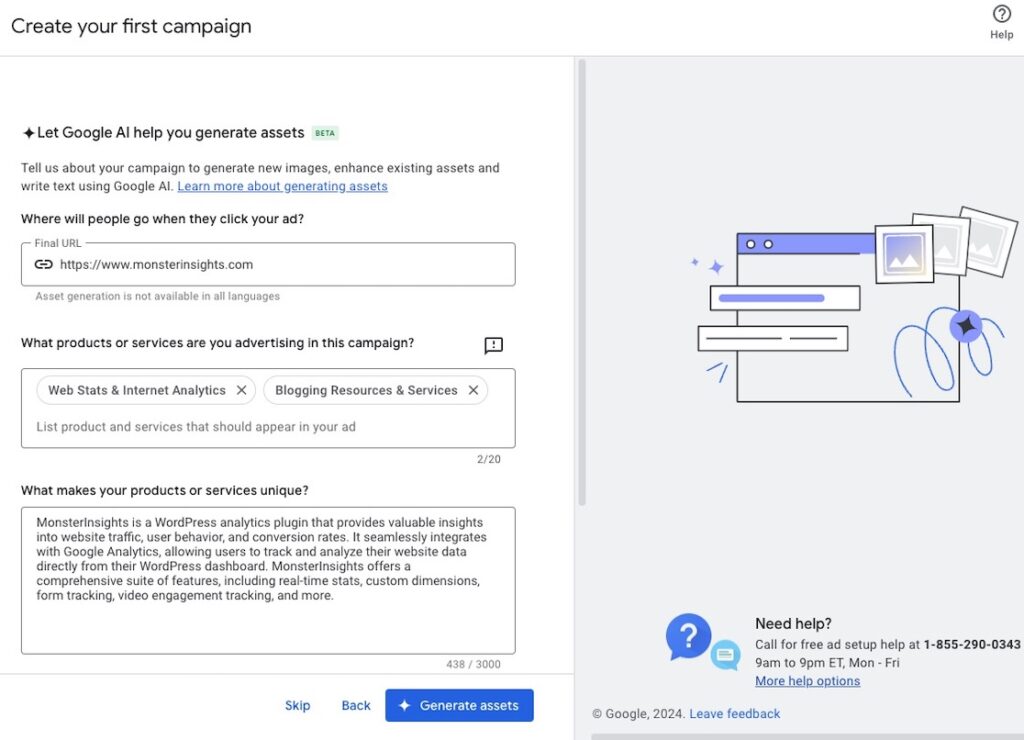
Next, Google will offer to use its AI to help you create your ads. You can absolutely try this if you’d like! For this tutorial, I’ll skip it and show you how to create all of your own assets. So, I’ll click Skip here, but you can click Generate assets if you’d like to give it a go.
Create Ads
Now it’s time to write your ads. Make sure to create persuasive copy here that highlights the benefits of your product, service, or content.
As you input ad copy and assets on the left, the panel on the right will update to show you what your ad will look like. You’ll also see dropdowns with ideas in them based on your website copy as you’re filling it out. These are helpful, but don’t let them take over all of the strategy for you! Really put yourself in your audience’s shoes. What’s going to speak to them?
Note that you can create up to 15 different headlines, 5 different long headlines, and 5 different descriptions. These will be mixed and matched as Google sees fit based on what the search query and search intent are.
You’ll also be able to add other assets here, such as images, videos, extra links, and calls to action.
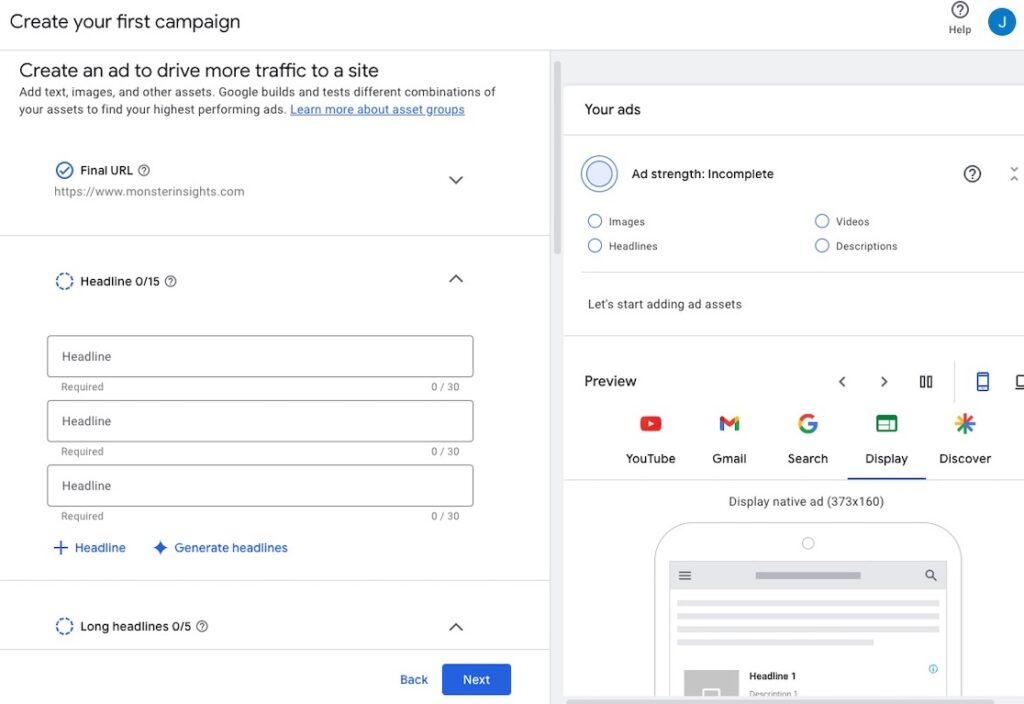
When you’ve created and added enough assets, go ahead and click Next.
Set Bid Strategy
On the next screen, you’ll choose your bid strategy. This is how you want Google to decide how it chooses to run your campaign. Based on the goal I set, I can choose conversions or conversion value:
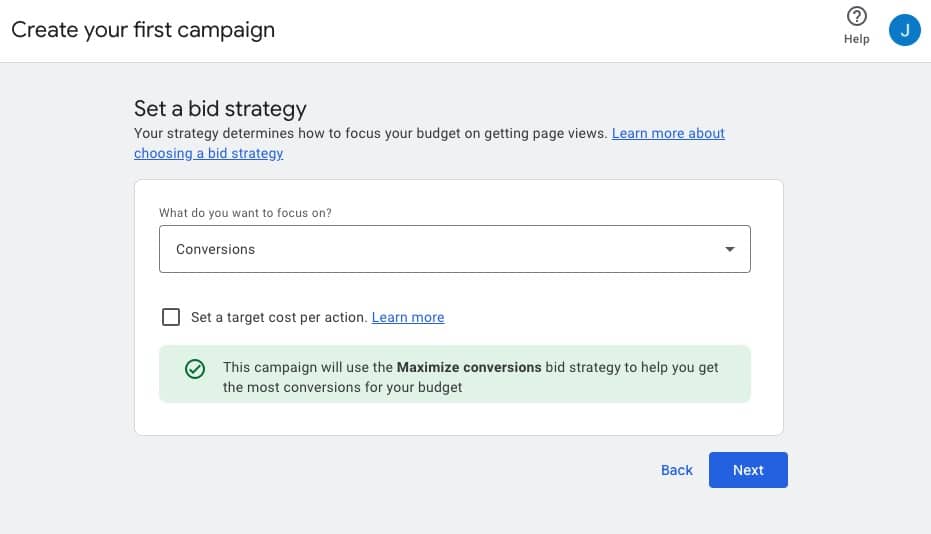
When you’ve chosen your bid strategy, click Next.
Set Budget
Finally, in this campaign setup section, you’ll set a budget. Google will help you out by suggesting one based on the keywords and conversion you chose, but you can change it to anything you want.
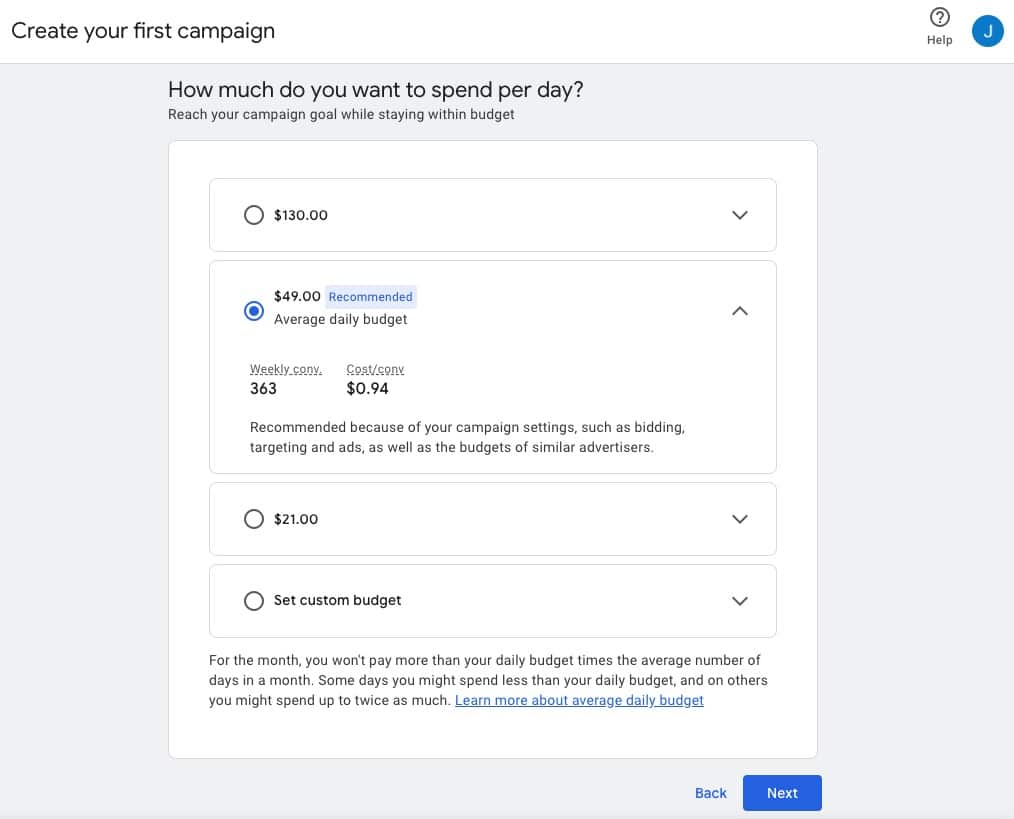
When you’ve set your budget (remember, it’s always changeable!), click Next.
Step 4: Enter Payment Details
This part is pretty self-explanatory! Enter the details here about how you’ll pay. You can pay via credit card or with your bank account information.
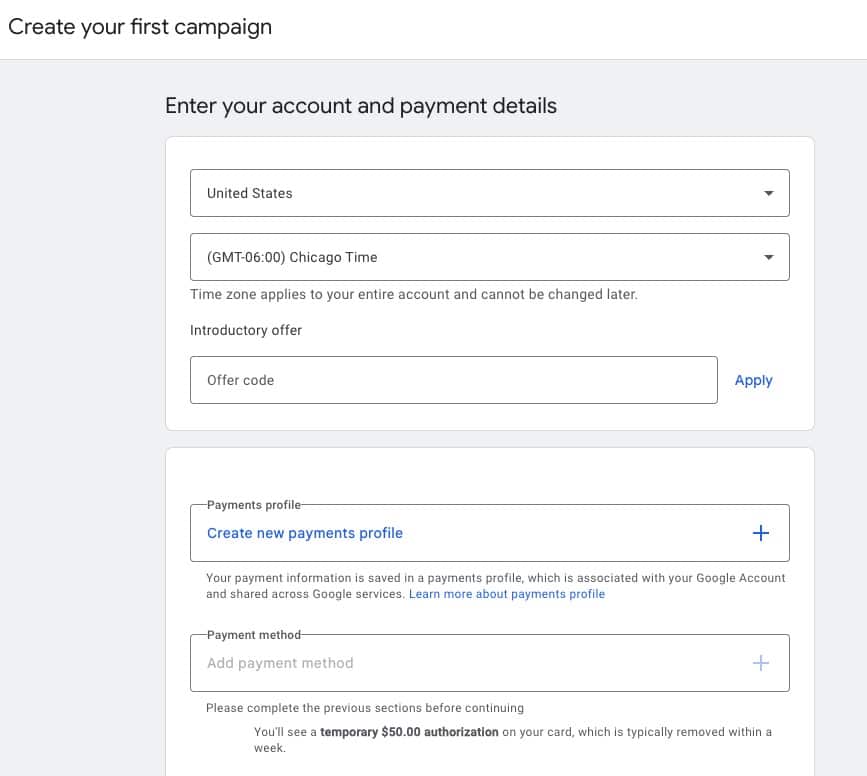
That’s it! Your first Google Ads campaign is created!
Don’t stop here, though—make sure to read through the last step.
Step 5: Track Your Google Ads Performance
An incredibly important part of running a Google Ads campaign is monitoring its performance and making tweaks to improve it.
To gauge the effectiveness of your Google Ads campaigns, it’s essential to track PPC key performance indicators (KPIs) like:
- Click-Through Rate (CTR): The percentage of people who click on your ad.
- Cost-Per-Click (CPC): The average amount you pay for each click.
- Conversion Rate: The percentage of people who take a desired action, such as making a purchase or signing up for a newsletter.
- Return on Ad Spend (ROAS): The revenue generated for every dollar spent on advertising.
- Engagement Rate: How engaged users are with your landing page or website.
To track all the most important PPC metrics, you’ll want to link Google Ads to Google Analytics. Then, you’ll be able to follow your Ad metrics in your Ads account, plus see how that traffic is interacting with your website in your Google Analytics account.
Then, if you have WordPress, you can take it a step further and keep track of those Google Analytics metrics right inside your WordPress dashboard.
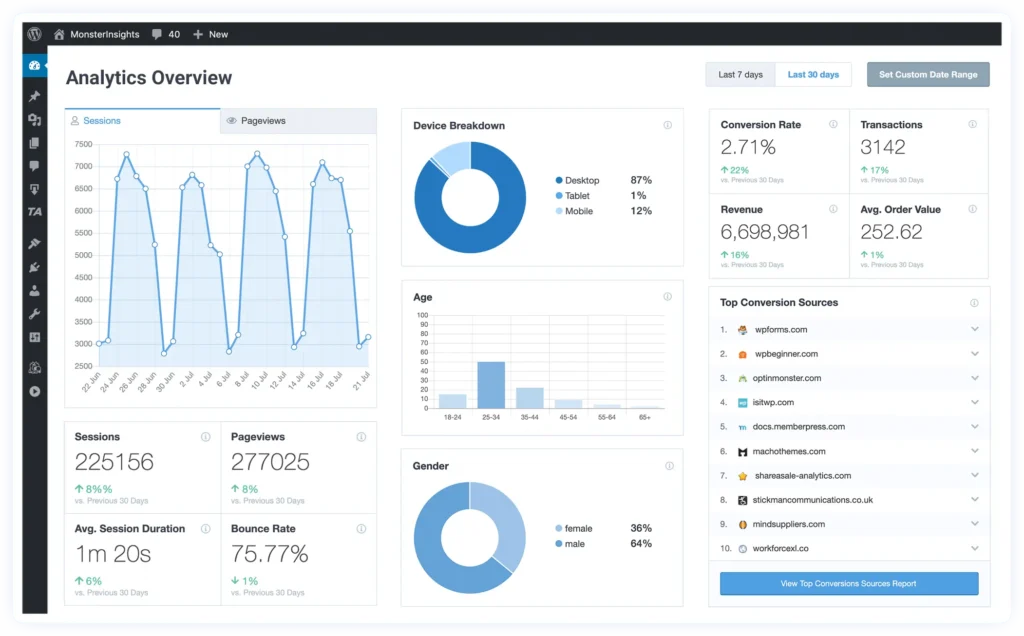
MonsterInsights is the most powerful Google Analytics plugin for WordPress. With over 3 million downloads, it’s a trusted plugin that you can use to help you track your Google Ads conversions and optimize your campaigns. By installing MonsterInsights on your WordPress website, you can:
- Track Google Ads Conversions: Monitor the number of conversions generated by your Google Ads campaigns.
- Analyze Website Traffic and User Behavior: Gain insights into how users interact with your website after clicking on your Google Ads.
- Identify Top-Performing Campaigns: Pinpoint the campaigns that are driving the most traffic and conversions.
- Optimize Your Campaigns and Website: Make data-driven decisions to improve your campaign and landing page performance.
By tracking Google Ads conversions in Google Analytics, you can make the right decisions for optimizing your campaigns. This data helps to identify which keywords, ad groups, and ads are generating conversions. With MonsterInsights, you can install your conversion ID on your site without touching any code.
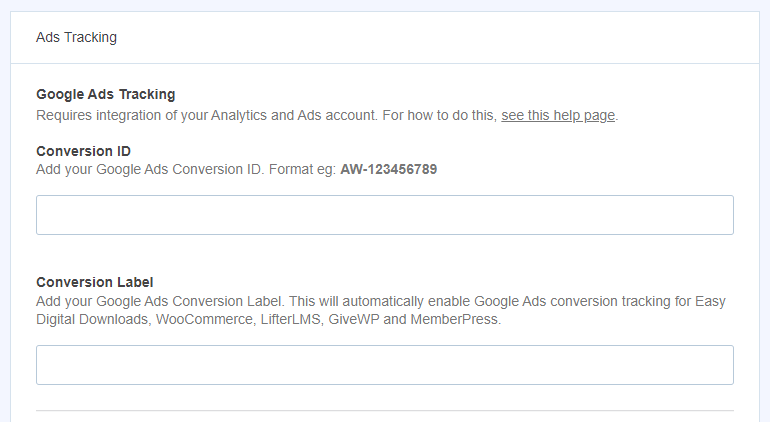
MonsterInsights makes using Google Analytics super easy to set up and use, provides detailed reports inside your WordPress dashboard, and helps configure advanced features with a few clicks.
What else can you do with MonsterInsights? Here’s a look at how the plugin can help with optimizing your Google Ads campaigns:
1. See Campaign Performance Inside Your WordPress Dashboard
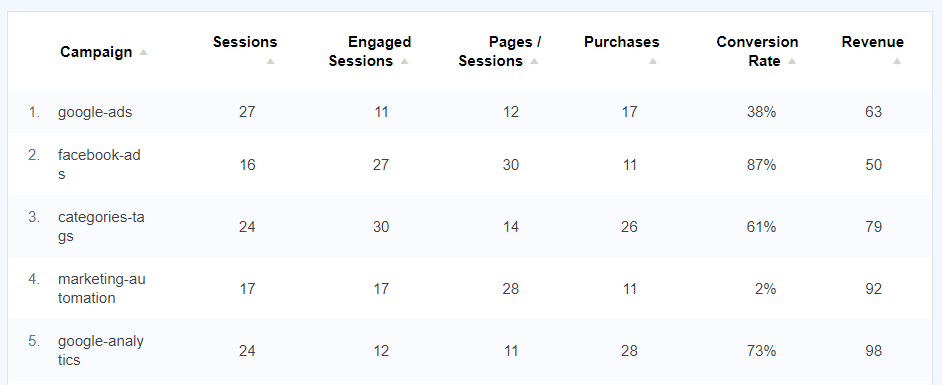
When you set up your first Google Ads campaign, the URL you used in your ads was automatically tagged with UTM parameters so that it shows up as a campaign in your Google Analytics. That means you’ll be able to find some campaign results inside the MonsterInsights dashboard under Reports » Traffic » Campaigns:
2. Monitor Overall Ad Traffic + Conversions
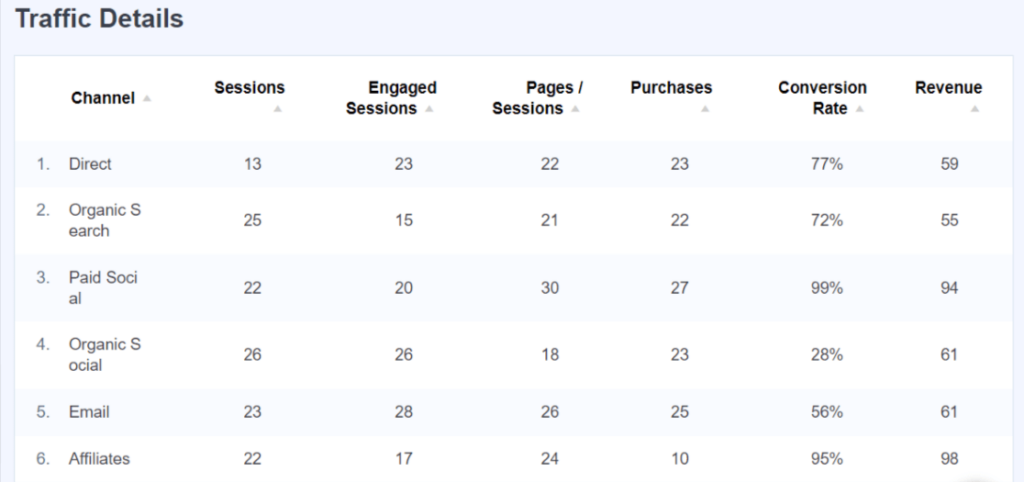
For a quick look at how your Google Ads campaign is doing, open the MonsterInsights Traffic report under Reports » Traffic » Overview and look for Paid Search in the table:
3. Find Keywords for Ad Groups
MonsterInsights integrates with Search Console so you can see the top 50 organic keywords that are driving traffic to your website inside your dashboard. Use the report to help inform your keyword research for your Google Ads campaigns.
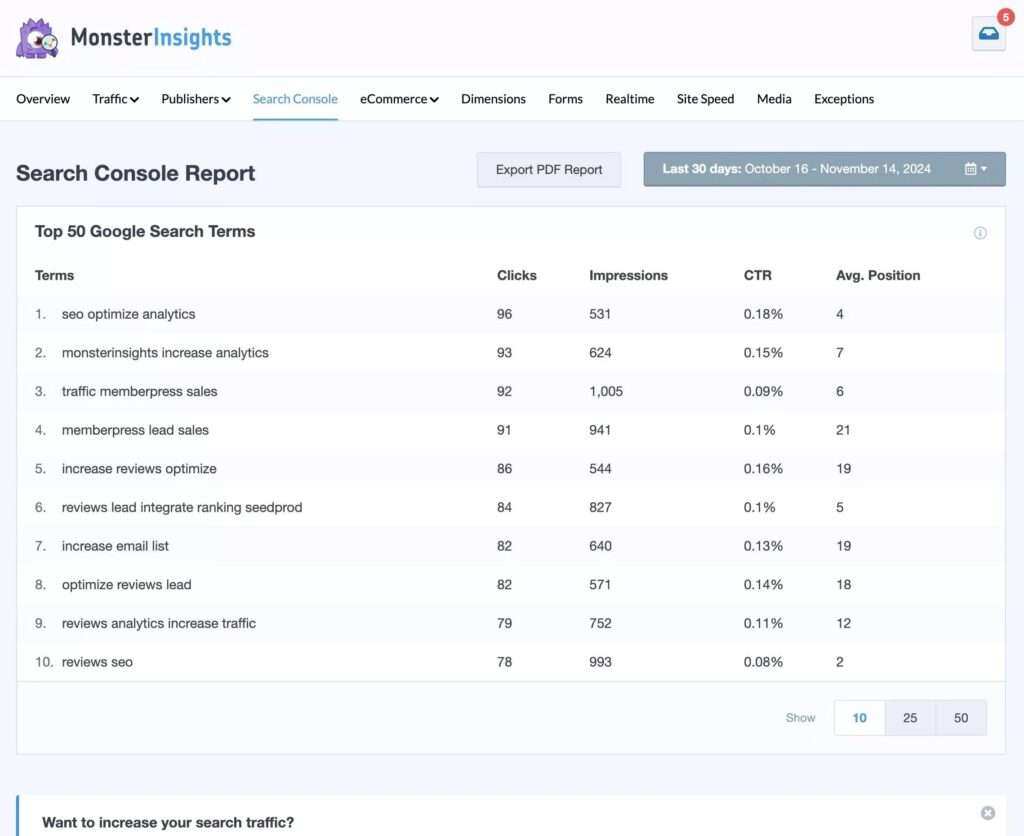
Look through your top keywords regularly to see if there’s anything new there that you could use in your campaigns.
4. Use the eCommerce Addon to Track Conversions
If you have an eCommerce website and you’re running Google Ads to boost sales, the MonsterInsights eCommerce addon can help.
MonsterInsights integrates with many of the top eCommerce plugins, including WooCommerce, Easy Digital Downloads, MemberPress, and more to automatically set up eCommerce tracking in Google Analytics for you. You don’t have to touch any code or use Google Tag Manager!
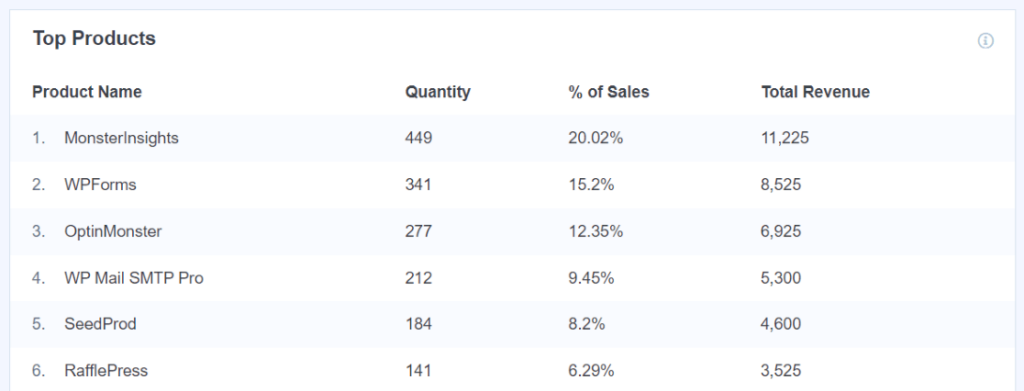
So, if you’re running an ad campaign to promote a product, the eCommerce report will reflect its results by showing your top-performing products:
5. Track Downloads Automatically
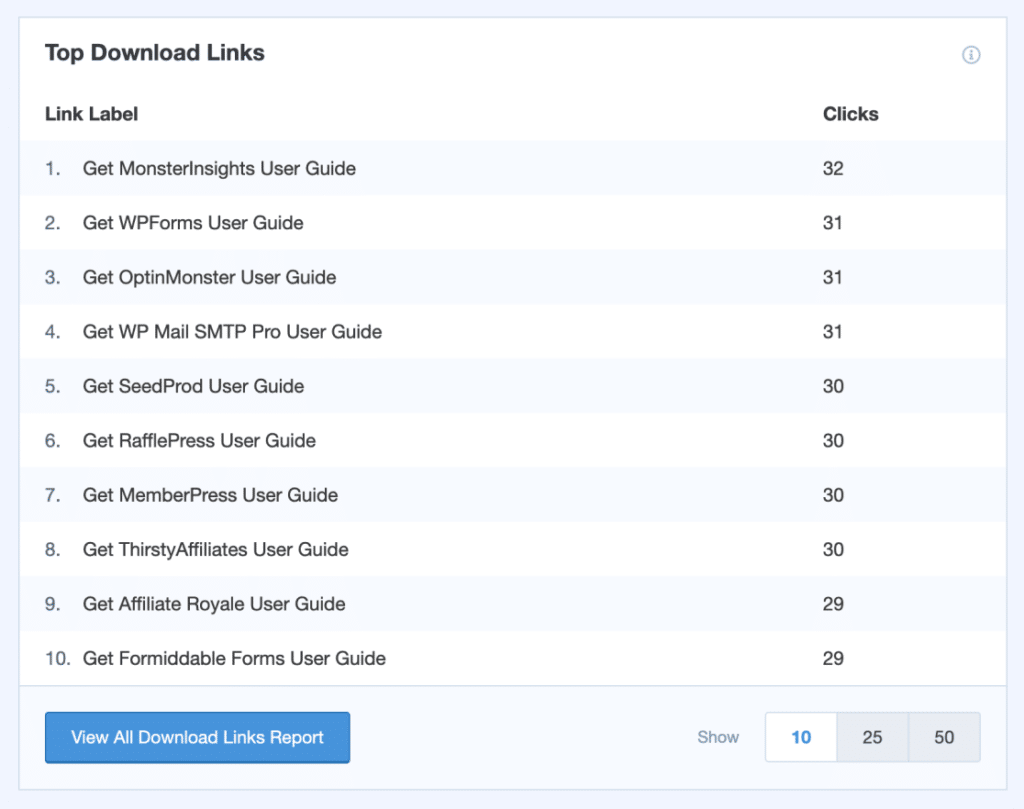
Publishers and bloggers who promote different downloadable content through Google paid ads can use MonsterInsights to track file downloads and their conversions.
In MonsterInsights Publisher’s report, you can view your top downloads. Monitor how many you’re getting for each downloadable asset to determine if your ads are performing well:
And that’s it!
I hope this article helped you understand Google Ads and paid search traffic a little bit better, so you can set up your first paid campaign with more confidence.
If you liked this article, make sure to also check out:
How to Find Google Ads Reports in Google Analytics (GA4)
How to Use Google Analytics for Google Ads Conversion Tracking
How to Optimize Google Ads: 5 Tips & Strategies to Boost Clicks
Not using MonsterInsights yet? Get started today!
Finally, stay connected with us on YouTube for the latest Google Analytics and WordPress tips and tutorials.
Google Ads FAQ
What is Quality Score in Google Ads?
Quality Score in Google Ads is a metric that measures the relevance and quality of your ads, keywords, and landing pages. It ranges from 1 to 10, with a higher score improving ad placement and reducing costs. Google determines this score based on click-through rate (CTR), ad relevance, and landing page experience.
How much does Google Ads cost?
The cost of Google Ads depends on various factors, including the keywords you target, your bid amount, and your Quality Score. You can set a daily budget to control your spending.
Can I use Google Ads to target a specific audience?
Yes, Google Ads offers advanced targeting options to reach your desired audience. You can target by location, demographics, interests, and device type.
How can I track the performance of my Google Ads campaigns?
Google Ads provides detailed analytics to track the performance of your campaigns. You can monitor key metrics such as clicks, impressions, conversions, and return on investment (ROI). You can also connect Google Ads with Google Analytics to monitor how your campaign traffic is behaving on your website. Use a tool like MonsterInsights to simplify Google Analytics and bring your data into your WordPress dashboard.
Is Google Ads effective for small businesses?
Yes, Google Ads can be a highly effective tool for small businesses. It allows you to reach a targeted audience and generate leads and sales.
Do I need to hire an agency to manage my Google Ads campaigns?
While hiring an agency can be beneficial, you can also manage your Google Ads campaigns yourself. Google Ads offers a user-friendly interface and many helpful resources, including help documents and live chat.
