Marketing campaigns take a lot of time and resources to create, but without proper tracking, it’s nearly impossible to know which efforts are actually driving results. UTM parameters solve this problem by providing clear data about your traffic.
UTM parameters are powerful tracking tools that transform how you understand your website traffic. By adding these simple code snippets to your URLs, you gain insights into exactly where your visitors are coming from and which marketing efforts are resulting in real results.
Whether you’re running social media campaigns, email newsletters, or paid advertisements, UTM codes help you connect the dots between your marketing activities and actual conversions.
In this comprehensive guide, I’ll walk you through everything you need to know about UTM parameters. I’ll go over what they are, how they work, and most importantly, how you can use them to make smarter marketing decisions that grow your business.
How to Use UTM Parameters: Video Tutorial
What are UTM parameters?
UTM (Urchin Tracking Module) parameters, also called UTM tags or UTM codes, are small bits of text added to the end of your URLs that help track the performance of your digital marketing campaigns.
These tracking codes are essential for understanding which specific marketing efforts are driving traffic and conversions on your website. They provide detailed data about your visitors, including where they came from, which campaign brought them to your site, and even which specific link they clicked.
Here’s what a normal URL looks like:
https://example.com/And here’s the same URL with UTM parameters added for email campaign tracking:
https://example.com/?utm_source=newsletter&utm_medium=email&utm_campaign=onboardingThe beauty of UTM parameters is that they work with virtually any marketing channel – social media, email newsletters, digital ads, QR codes, and more.
Now that you know what UTM parameters are, let’s find out how they work.
How do UTM parameters work?
When a user clicks on a URL containing UTM parameters, they’re directed to your website just like any normal link. The difference is that Google Analytics captures the UTM information and records it as part of that visitor’s session data.
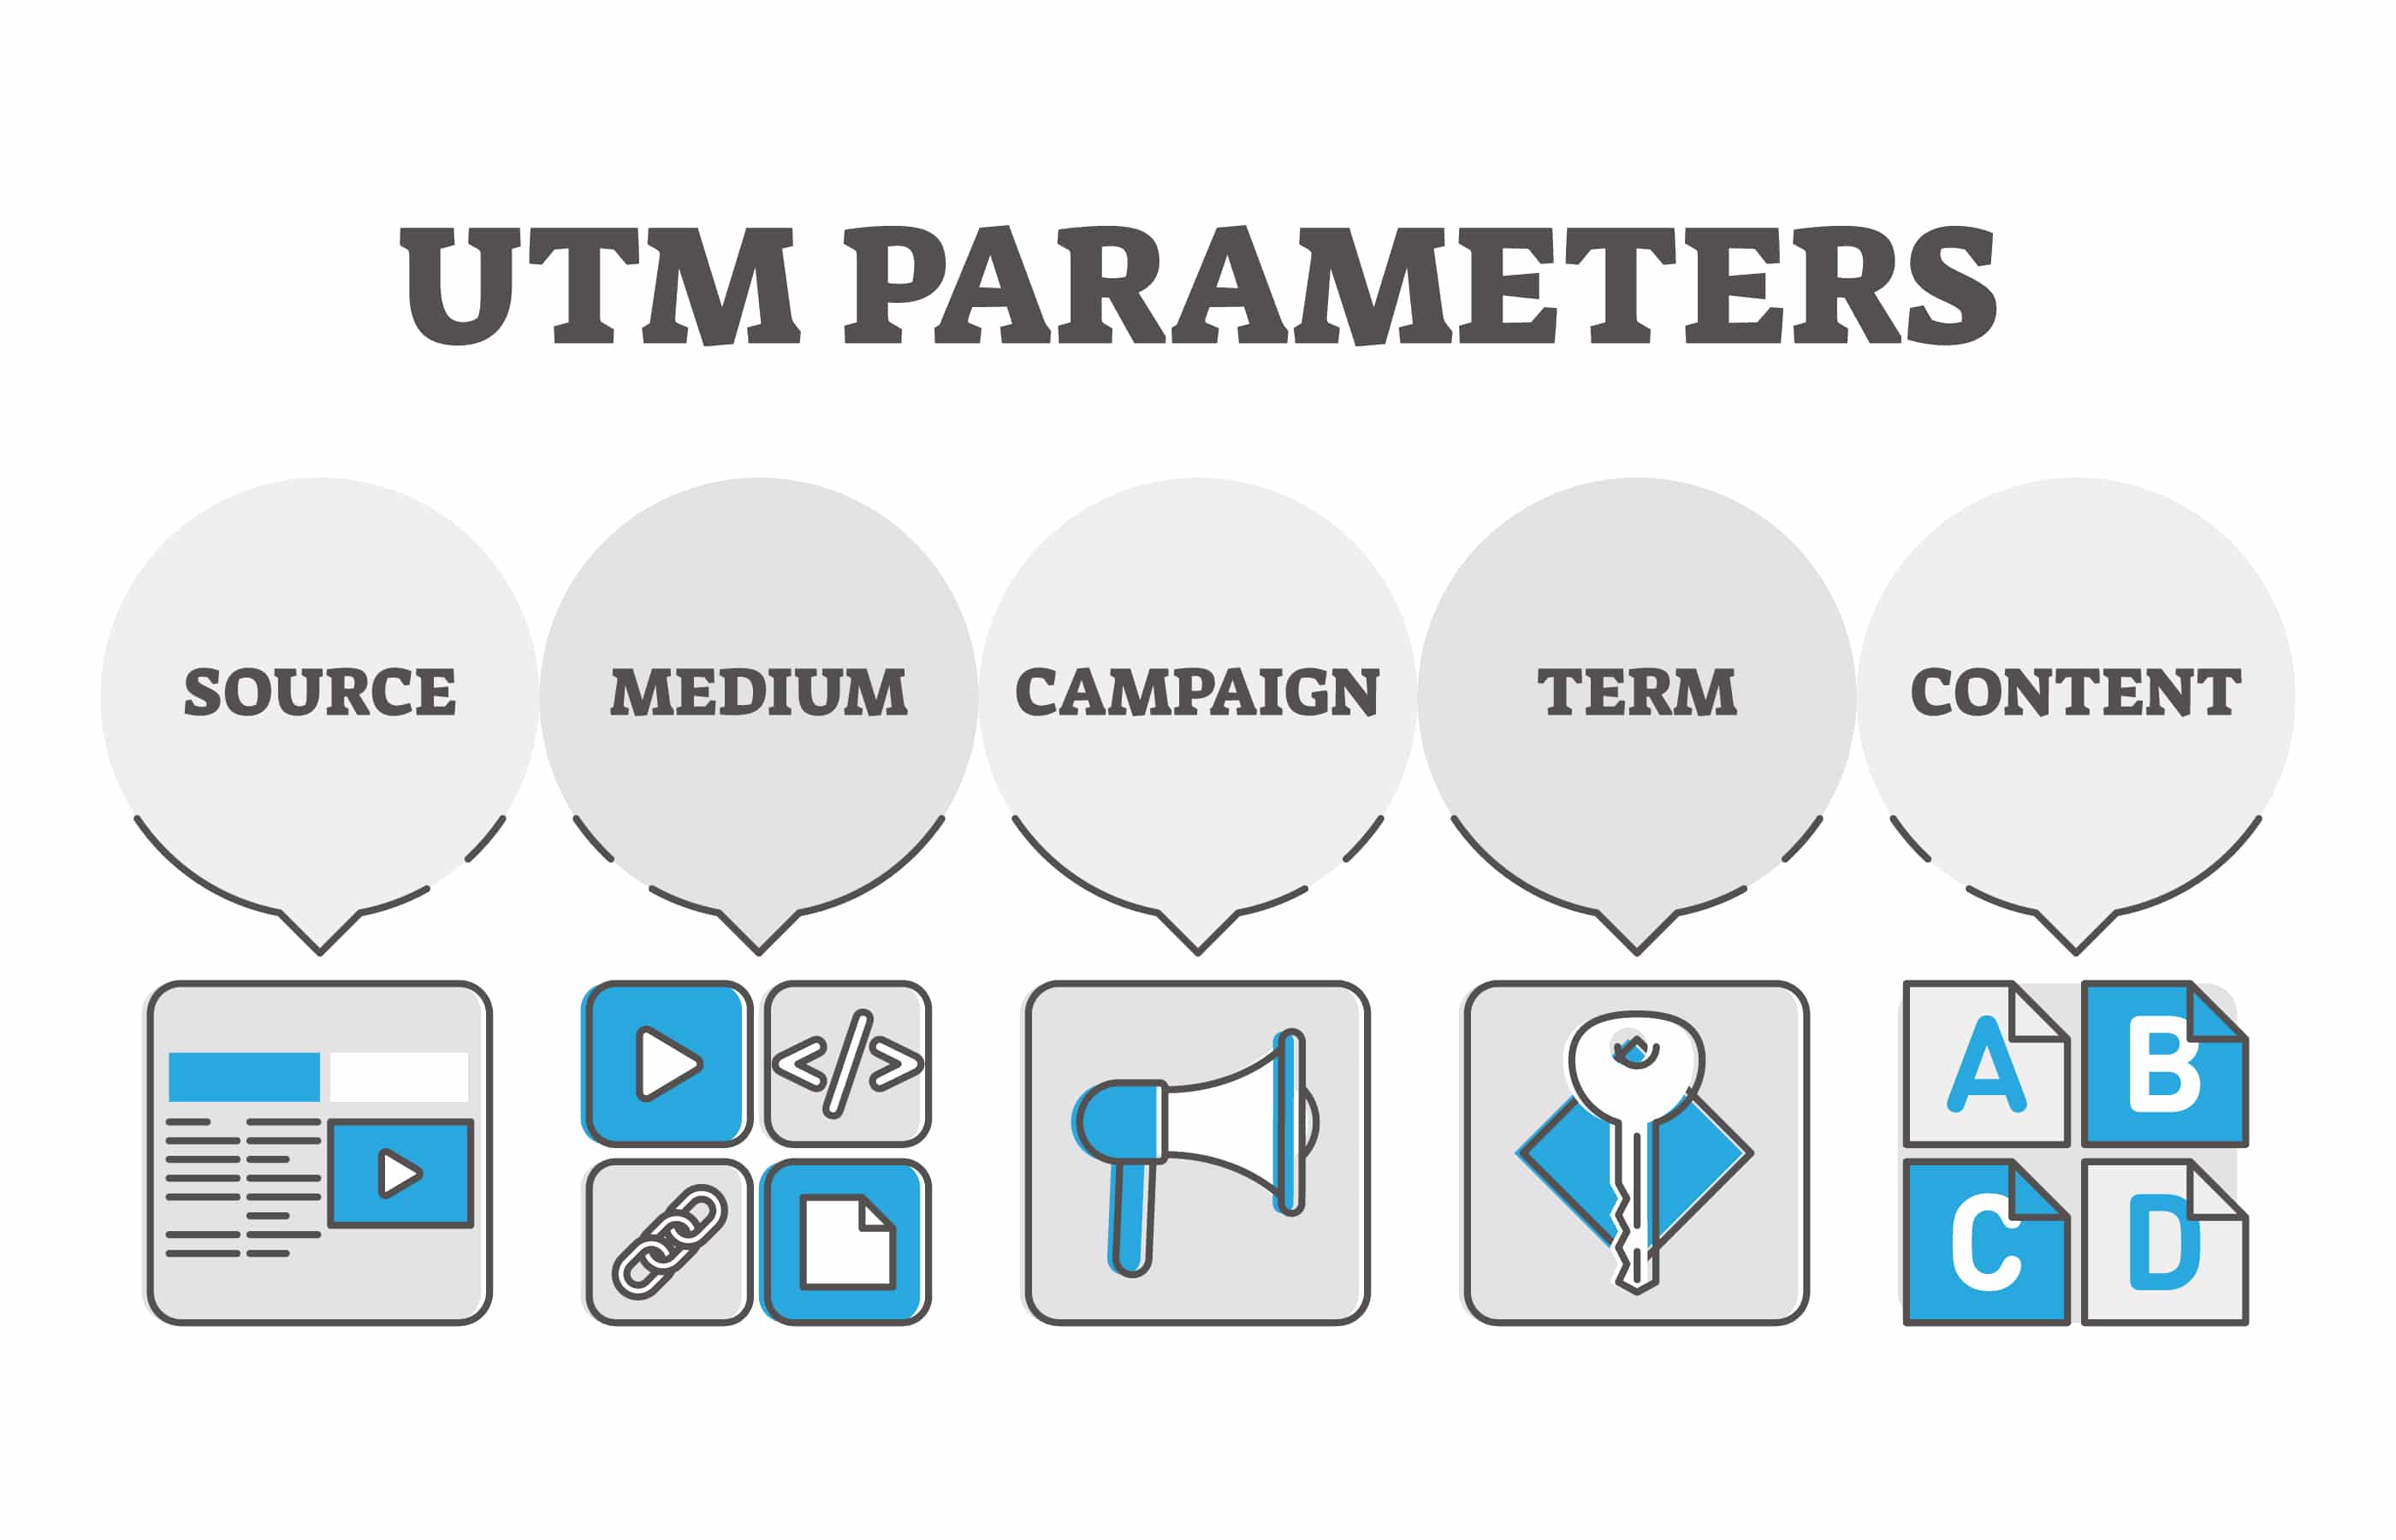
This tracking happens seamlessly for the user. They won’t notice anything different about their browsing experience. But behind the scenes, Google Analytics gathers valuable information about which marketing efforts drive traffic and conversions.
The data collected through UTM parameters appears in your Google Analytics reports, allowing you to measure and compare the performance of different campaigns, content, and channels.
The 5 UTM Parameter Types Explained
UTM parameters consist of five different tags, each serving a specific tracking purpose. The first three are essential, while the last two are optional depending on your tracking needs:
- Source (utm_source): Identifies where your traffic is coming from, such as:
– Google
– Facebook
– Instagram
– Newsletter
– Partner website - Medium (utm_medium): Indicates the marketing medium used to deliver your link:
– Email
– Social
– Cost-per-click (CPC)
– Banner
– QR-code - Campaign (utm_campaign): Names your specific marketing initiative:
– Spring-sale
– Product-launch
– Weekly-newsletter
– Black-friday - Term (utm_term): Optional, primarily used for paid search to identify keywords in ads:
– Winter-boots
– Digital-marketing
– Payroll-software - Content (utm_content): Optional, helps differentiate similar content within the same campaign:
– Header-button
– Image-link
– Footer-banner
– Version-b
Pro tip: Be careful; UTM tags are case-sensitive. Decide on a naming convention before naming your campaigns so that your campaign parameters are concise and make sense across all of them! Decide on things like uppercase vs. lowercase and when you’ll use dashes vs. underscores.
Using UTM Parameters: 4 Examples
Now, I’ll show you a few examples of how to use UTM parameters in different types of campaigns.
1. Measuring Social Media ROI
UTM parameters help you track your social media efforts. By adding UTM code to your social media links, you’ll be able to see which posts and campaigns were most effective in generating traffic and conversions.
Based on the data, you can optimize later campaigns and effectively measure the return on investment (ROI) of your social media activities.
For example, let’s say you’re running a big summer sale, and you plan to post about it on Facebook, X, and Instagram. You’d use UTM parameters on each post, with different campaign sources to show which network the traffic came from. If you use the same “summer_sale” Campaign term, you’ll see all your posts under the same campaign in Google Analytics and be able to compare which social network did the best in terms of driving sales.
If you’d like, you could even use the Content tag to describe which post it is (like “sunday_morning” or “sweaters”) if you’re making multiple posts on each channel.
Let’s take a look at an example. In the three posts below on the Easy Digital Downloads Facebook page, you can see that they’re having a sale for Black Friday/Cyber Monday. In the example links, you can see that all three posts are tagged as a part of the bfcm (Black Friday Cyber Monday) campaign, but the content tags give each post a unique UTM link.

2. Tracking Email Performance
Do you want to see which of your emails brought in the most visitors and conversions? UTM parameters can make that easy.
You can add UTM tags to your URL in any email and get insights about its performance. Use your email client (like “constant-contact” or “mailchimp”) as the Source, “email” for the Medium, whichever Campaign makes sense for your message (like “feb-newsletter” or “summer_sale”), and use the Content tag if you want to describe which button or link the click was on in your email (like “red_button” or “header_logo”).
Many email marketing services also provide A/B testing to help you see what’s working best.
3. Finding the Right Ad Placement
If you run paid campaigns, it’s important to know which ad campaigns and ad placements are working the best. UTM parameters can help you find out which websites and ad locations are bringing in the most traffic and leading to the most conversions.
For example, let’s say you run two different types of banner ads for the same product. One ad is placed in the sidebar and the other ad is shown in the page content.

Using UTM tracking will show you how many clicks and conversions each separate ad is getting, even though they’re landing on the same product page. With this information, you can optimize your CPC (cost per click) and hone your ad spend to only the best-converting placements.
4. Tracking the Effectiveness of Content on Different Channels
Do you publish the same content on multiple channels? Maybe you run an article on three different social media networks and send it out via email, or maybe you have a sale that you’re promoting across all of your marketing channels. In both of those circumstances (and more), you can use UTM codes to easily see which channel sent the best traffic.
How to Create UTM Codes in Google Analytics
There are two ways you can go about creating UTM codes for Google Analytics. You can either:
- Type them manually
- Use a URL builder tool
The problem with the manual approach is that UTM codes can become very lengthy, and there’s a chance you’ll make a mistake. As a result, there may be campaign tracking errors, and your data won’t be organized correctly.
So, a simpler way of creating UTM tags is by using a URL builder tool. Campaign URL builder tools are brief forms you can fill out with your campaign, source, medium, and other tags, and they’ll create your final URL for you:

If you’re a WordPress user, you can use MonsterInsights for both campaign URL creation and tracking those campaigns right inside your WordPress dashboard.
MonsterInsights is the best Google Analytics plugin for WordPress. Whether your site is small and simple or big and complex, MonsterInsights helps you track what matters most to grow your business. It connects with Google Analytics to set up important tracking features and bring your data into your WordPress dashboard in the form of easy-to-read reports.
To use the campaign URL builder, just enter the required fields and then copy the custom URL it creates for you.
Let’s say you’re going to run a campaign for Black Friday. Here’s what you can enter in the UTM builder:
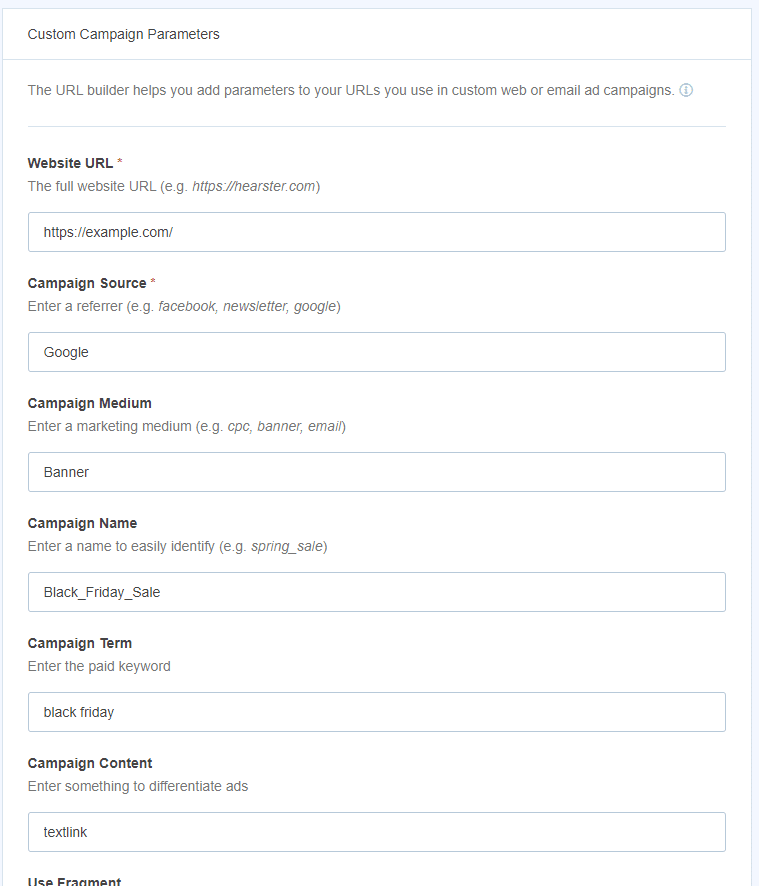
The UTM campaign builder will then automatically generate a URL for you. Copy the link and use it for your promotion.
How to See UTM Parameters in Google Analytics 4
You can view your Campaign reports and see your UTM Parameters in Google Analytics by going to Acquisition » Traffic Acquisition.
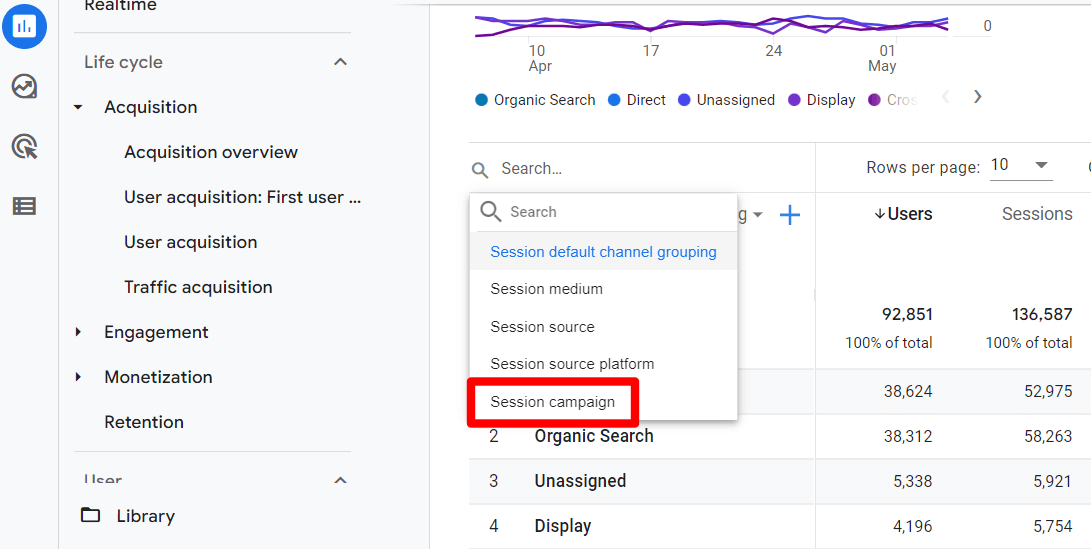
Then, scroll down to the table and click the drop-down menu.
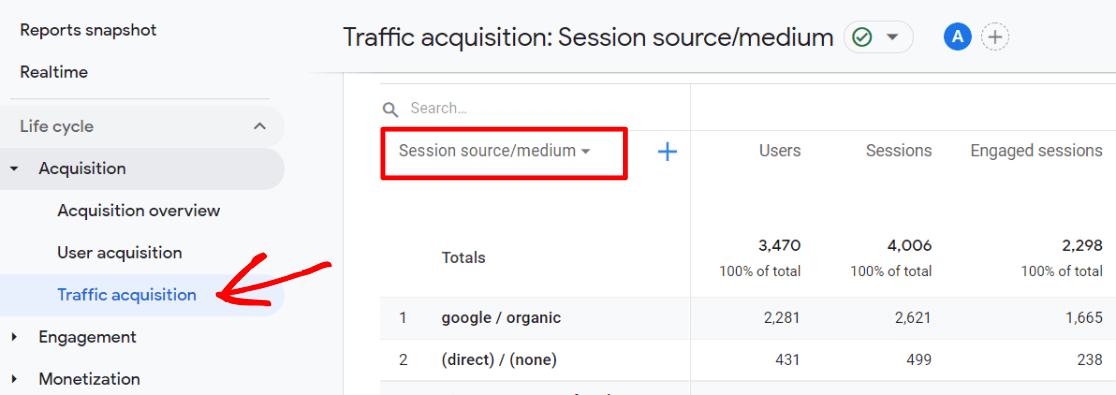
Change your dimension to Session campaign.
Now, you’ll be able to see all your campaigns listed.
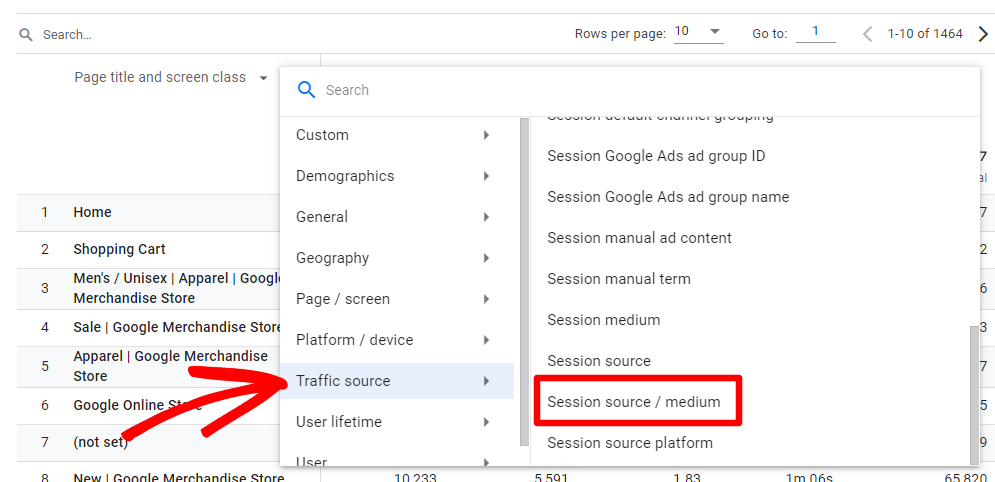
If you’d like to see the Source and Medium for each campaign, you can add it to your report by clicking the blue + sign next to the dropdown. Under Traffic source, select Session source/medium.
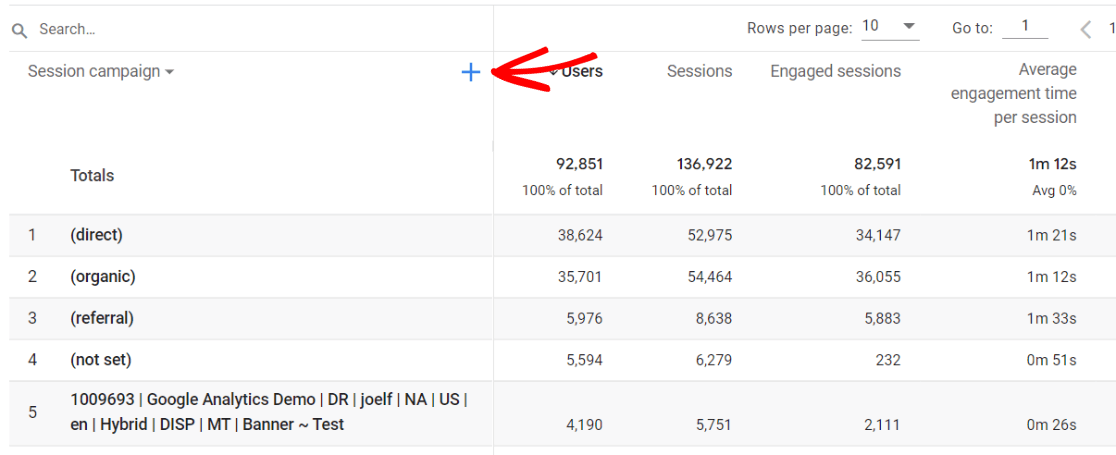
Under Traffic source, select Session source/medium.
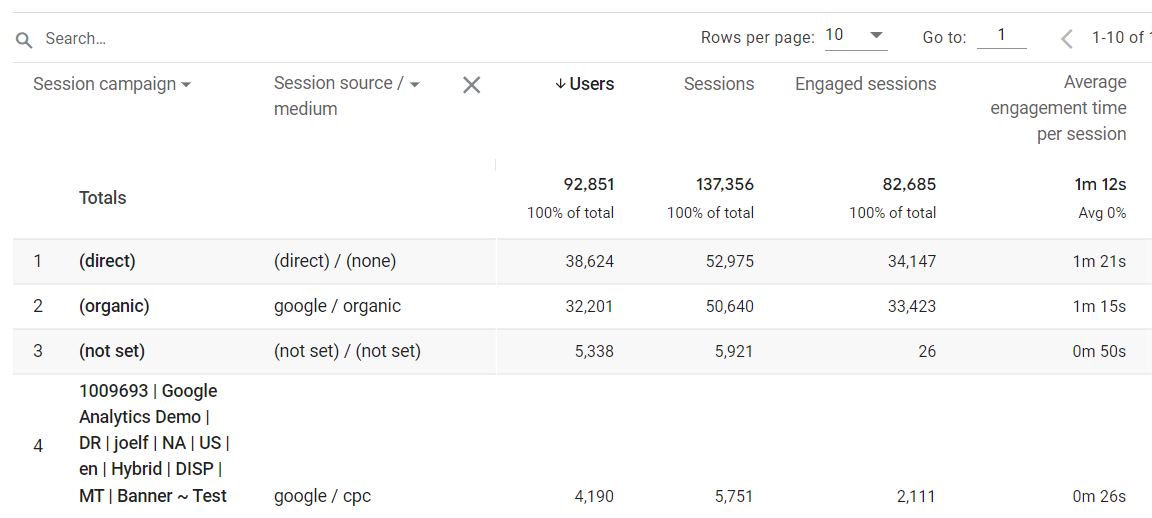
Now, you’ll see all your Session campaigns along with the source and medium. With the information collected through UTM codes in Google Analytics, you get a clear picture of your traffic sources, campaign performance, and user behavior.
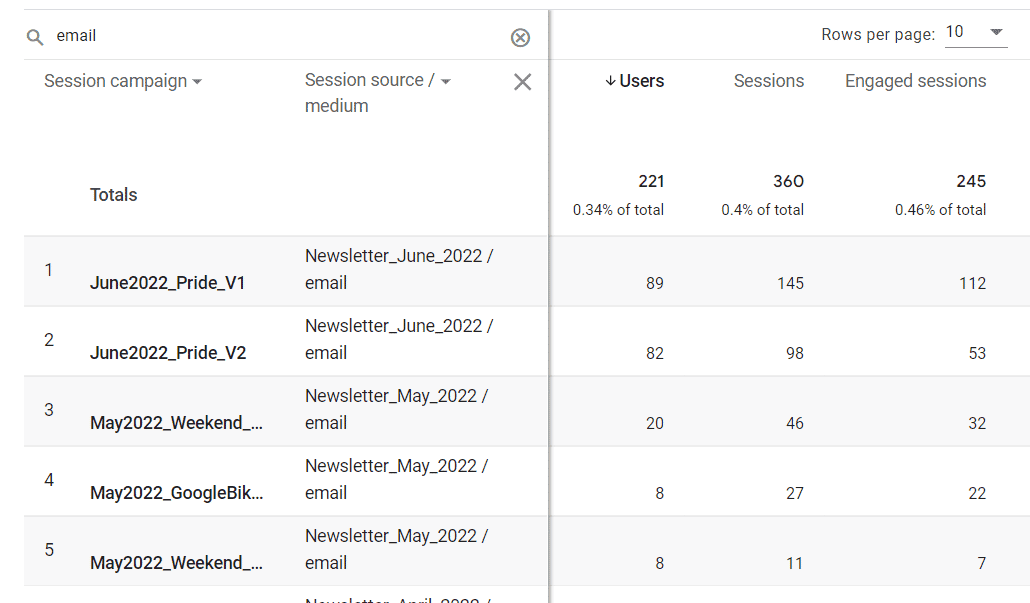
To see results for a specific campaign, source, or medium, type it into the Search bar:
Want to see your utm_content tag results? Jump to our instructions for creating a custom campaigns report in GA4.
How to See UTM Parameters in WordPress
In your WordPress dashboard with MonsterInsights installed at the Plus level or above, simply head to Reports » Traffic » Campaigns. There, you’ll be able to see which campaigns generated traffic for your site and which performed the best:
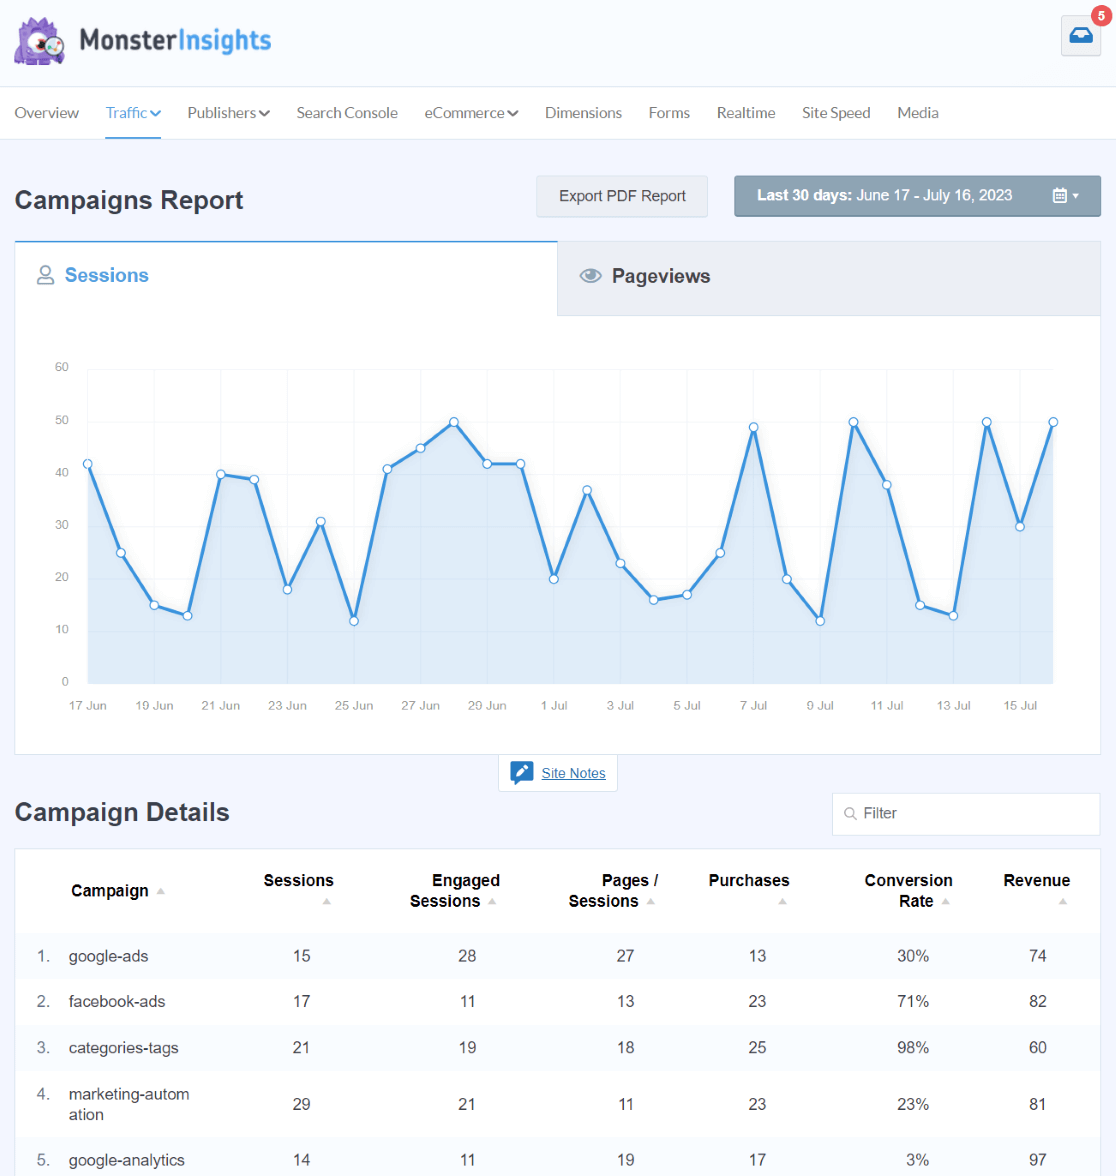
That’s just one of the reports you’ll find in the MonsterInsights dashboard. You’ll also get a source/medium report, social media traffic, eCommerce overview, eCommerce funnel, form submissions, Search Console rankings, and so much more.
Get a full tour of the MonsterInsights dashboard reports and tools.
How to Create a Custom Campaigns Report in GA4
Want to create a custom report that you can access at any time to get a full look at how all of your campaigns are performing? Here’s how.
Step 1: Create a Blank Report
To get started, head to the Explore tab and click on Blank:
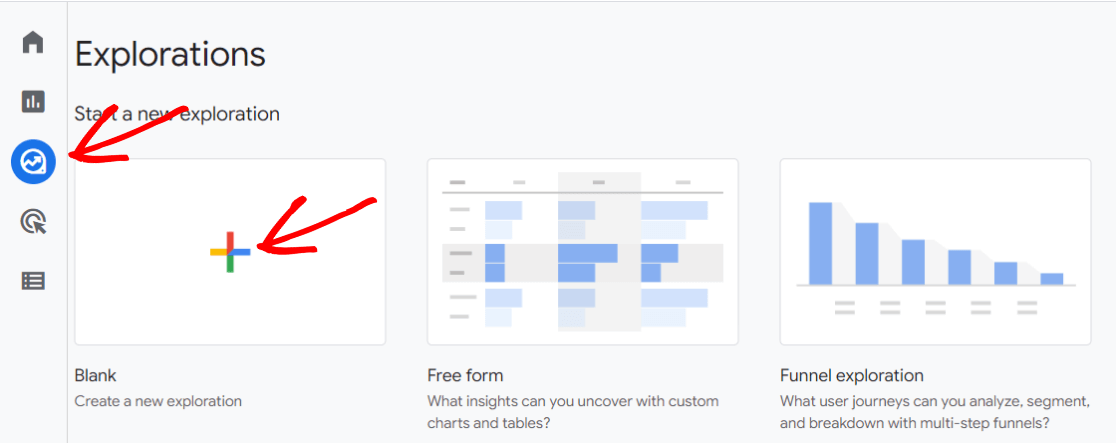
Step 2: Add Dimensions
Now, you need to add some dimensions to your report. In the Dimensions area, click the plus sign and add the following dimensions:
- Session campaign
- Session source/medium
- Session manual ad content
- Landing page + query string
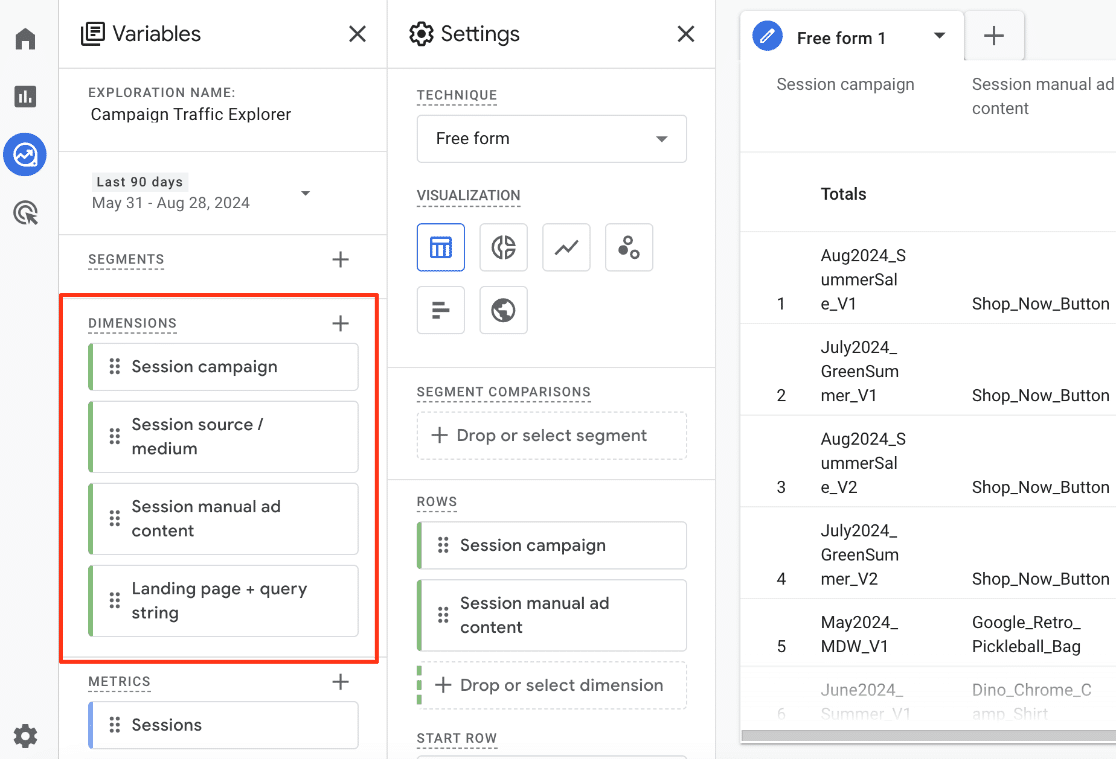
Step 3: Add Metrics
Now, scroll down to the Metrics area and click the plus sign to add the following metrics:
- Sessions
- Engaged sessions
- Engagement rate
- Average engagement time per session
- Key events
- Transactions (if applicable to your site)
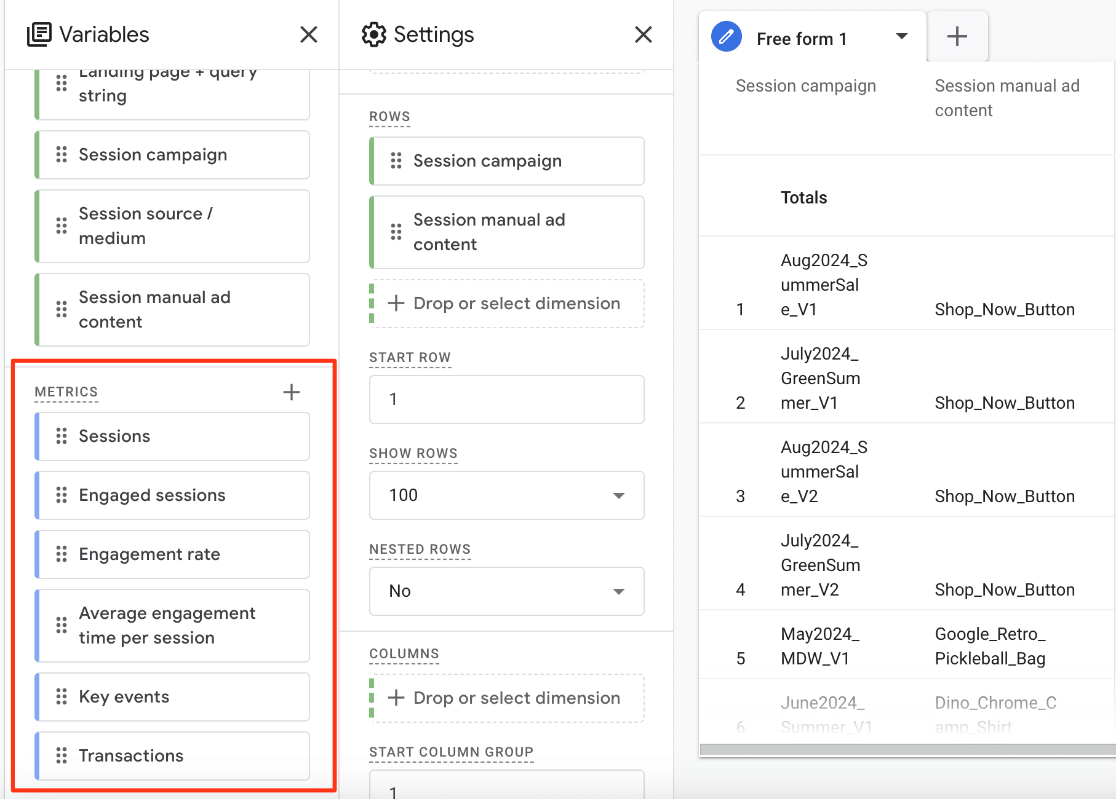
Step 4: Build Your Report
Now that you have dimensions and metrics ready to use in your report, it’s time to click and drag them into the right spots in your report.
Start by dragging Session campaign over to the the Rows box. If you use utm_content tags in your campaigns, you should also move Session manual ad content over. You can also put Session source/medium there if you need to see that data.
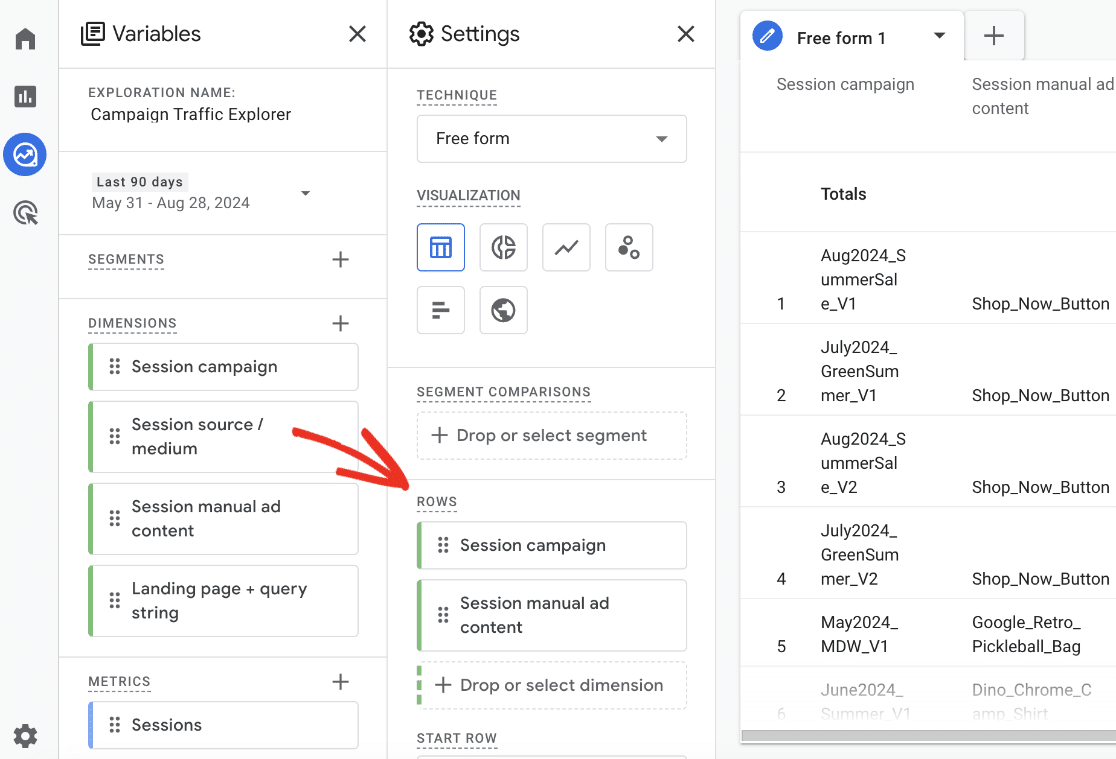
Then, drag the metrics you want to see for each campaign over to the Values box:
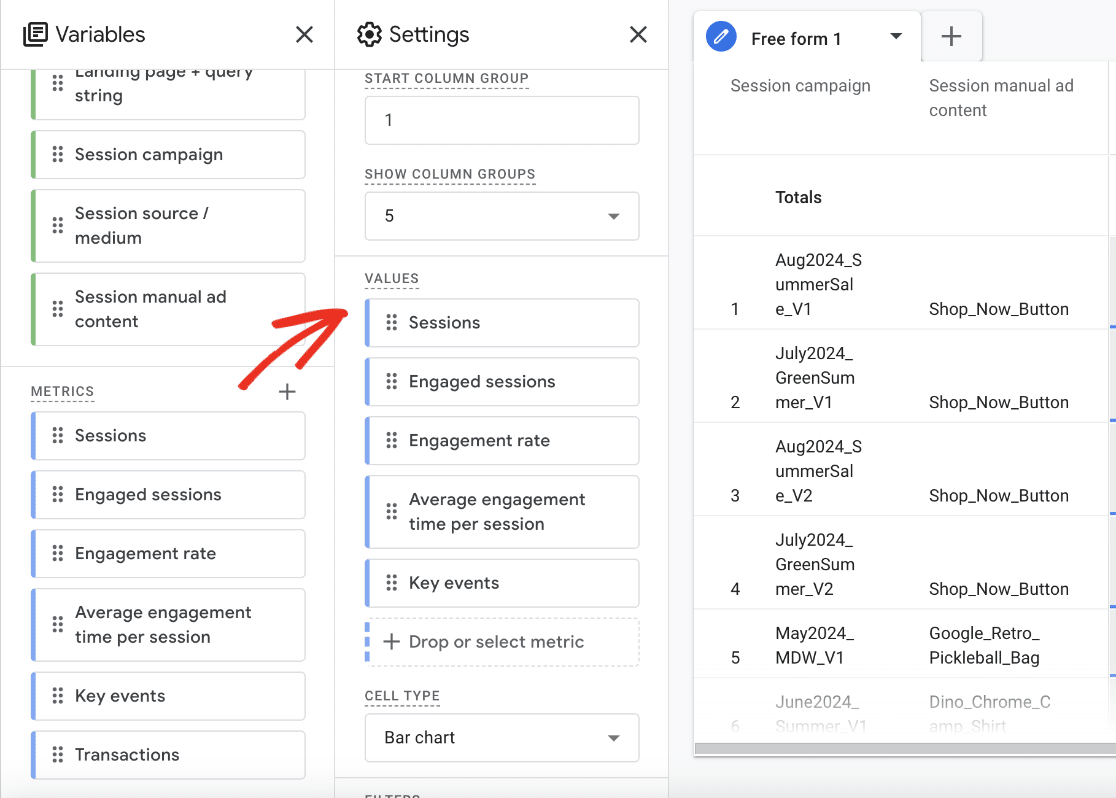
Step 5: Adjust Report Settings
Finally, make sure your report has:
- A descriptive name
- The date range you’re interested in seeing
- More than 10 rows (in the show rows area):
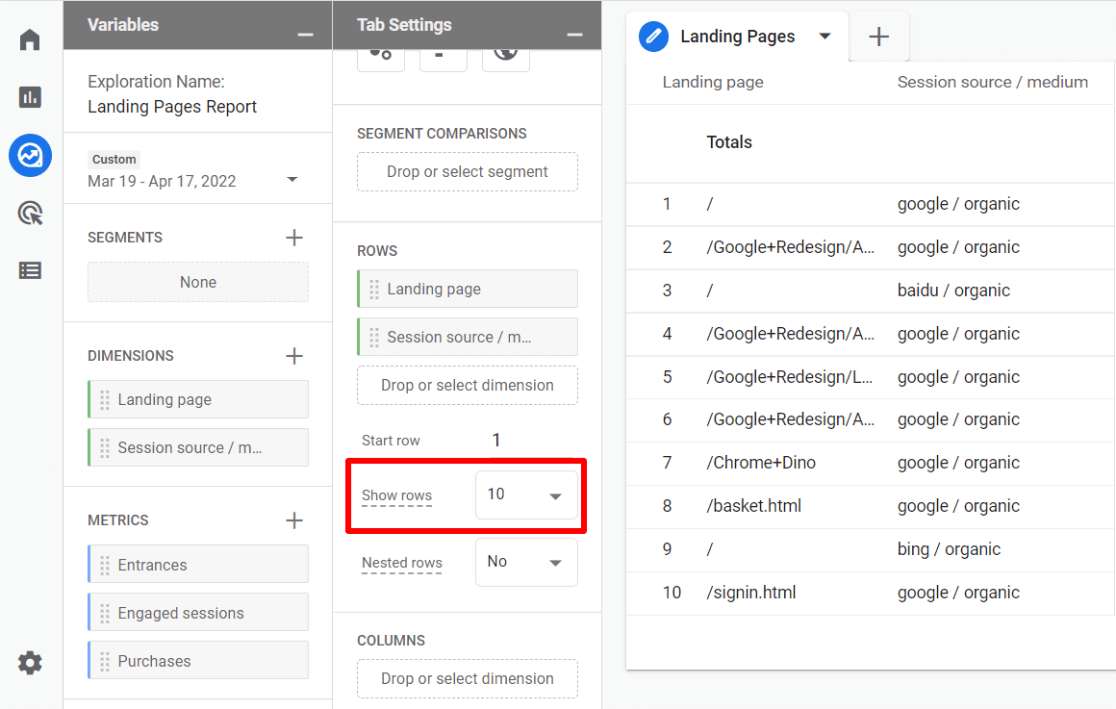
That’s it! You’ve got a custom campaigns report:
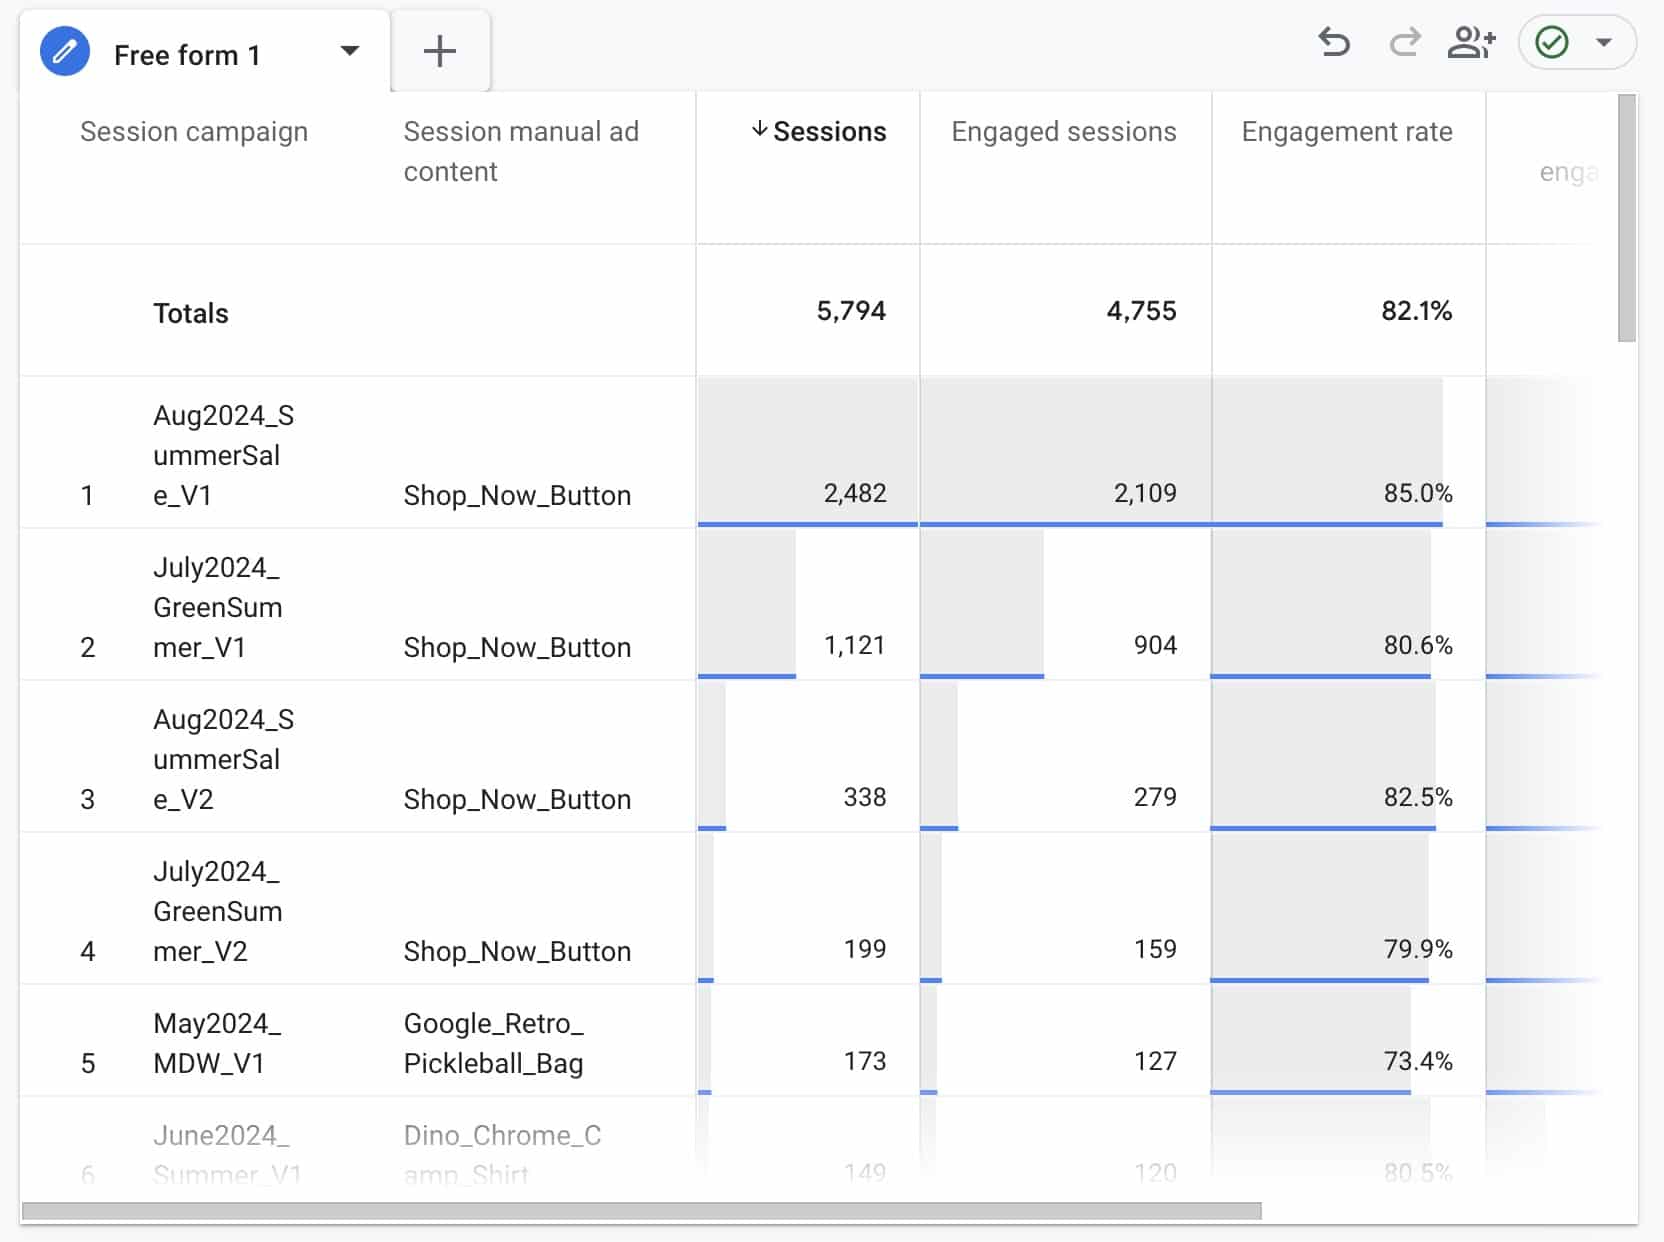
You can now experiment with using different dimensions in your report or even create a second tab to show your campaign landing pages. Use the same dimensions and metrics, but move the Landing page dimension into your Rows along with the Campaign dimension.
We hope you like our beginner’s guide to UTM parameters. You might also want to check out:
How to Set up Google Analytics Click Tracking
How to Create Google Analytics 4 Custom Reports (Step by Step)
How To Set Up QR Code Tracking With Google Analytics
Not using MonsterInsights to track your campaigns yet? What are you waiting for?
Finally, don’t forget to follow us on YouTube for more helpful Google Analytics tips.
